Two years ago I said: "I'm learning a lot about late period tailoring, construction and finishing. But there have definitely been some wrinkles. So, I guess, go in with some caution, and if something doesn't seem right to your purposes, you don't have to just trust it."
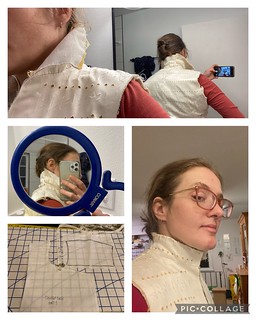
So yeah! The straight front women's doublet in MMv2 has a collar drafted to height L-o. Maybe that's just perfect for the style you're going for - tall, rolled over, probably worn open. If you want a straight, closed collar that fits under your chin, you can bring that whole thing down to L-d. (and still use one dedo for tapering the front). Really. Photo collage shows before and after.
Anyway, if you want to see actual content from me, you'll have more luck over at @catrijnmakes on Instagram.
06 December 2022


31 January 2021
Please do not mind the zombie post
So, what could get me to write a new post for a dead blog? Did you guess irritation/frustration?
I'm very slowly working on a project to extend my wardrobe into the end of SCA period, around 1580-1600. I'm primarily using M. Gnagy's Modern Maker series (books and videos) for patterning and construction, with portrait references for stylistic details. The kirtle continues to be a major workhorse of a woman's outfit, so that's where I started. It's my first time using the Bara system.
If you're not familiar, the Bara system, used in the late Spanish tailors' books, is a proportional drafting system. The units of measure are subdivided fractions of body measurements like chest, waist, and height. Starting with a tape or string of the correct total measure, it is marked down in half, thirds, quarters, sixths, eighths, and even smaller divisions. It essentially shifts the math to a different point in the process. If I need to mark 1/4 of a chest measurement of 38in or 96cm, in a modern system, I'd do the division, grab a single tape measure in standard units, and mark at 9.5in or 24cm. In the Bara system, I pick up the measure labeled 38in, and mark at the line marked 1/4 (Q). It's an interesting way of thinking. I like that this makes the old pattern manuals more interpretable and accessible. That said, I've made more mistakes using this system than I ever have in any other kind of drafting. Two tips from my mistakes. First, a tape that has any stretch or give is NOT your friend. Cotton twill tape? Right out. Try for tabby woven, and artificial fibers are probably better. Who'd think I'd ever say that. Second, get yourself some alphabet charms, put them on safety pins, and attach them to the tapes in use. I'm not even kidding. I've made so many errors just by grabbing the wrong one.
The other thing to comment on is the drafts themselves. I don't know how much of the problem comes from each of various sources - no draft is truly universal, using Spanish patterns for a Dutch style, or inherent issues. My kirtle skirt I ended up doing completely twice (and actually cutting a third time) because the result of the draft was not what I wanted or expected. If you're using the pattern in v.2 p.162-163 and want the look of p.175 or 177, increase the waist measurents significantly (I believe I ended at W-QQQ for both front and back), and you may need to increase the bottom width to keep proportion, perhaps L-BM. The second part is to closely observe the length between side and center. Each side is drafted to L-BM, and so is the center... until you drop the waist curve. Now the front and back length is significantly shorter. Maybe this is just right for wearing over the bum pad? But for my look, it just gave me an uneven hem that was an absolute pain to fix. If doing it again, I'd lengthen the bottom as well when drawing in the waist curve. For my still in the drafting stage doublet, the initial draft fit pretty well, except having a very high waist cut around sides and back. I'm lengthening by 1.5-2" to hit the waist line of my kirtle, which is still slightly above my natural waist. I'm not tall, I'm petite; I don't think of myself as having an unusually long torso.
I don't want it to come across like I'm bashing the Modern Maker. I'm learning a lot about late period tailoring, construction and finishing. But there have definitely been some wrinkles. So, I guess, go in with some caution, and if something doesn't seem right to your purposes, you don't have to just trust it. I'm not entirely happy with this kirtle, but I'm just so DONE with it and I'm moving on.

I'm very slowly working on a project to extend my wardrobe into the end of SCA period, around 1580-1600. I'm primarily using M. Gnagy's Modern Maker series (books and videos) for patterning and construction, with portrait references for stylistic details. The kirtle continues to be a major workhorse of a woman's outfit, so that's where I started. It's my first time using the Bara system.
If you're not familiar, the Bara system, used in the late Spanish tailors' books, is a proportional drafting system. The units of measure are subdivided fractions of body measurements like chest, waist, and height. Starting with a tape or string of the correct total measure, it is marked down in half, thirds, quarters, sixths, eighths, and even smaller divisions. It essentially shifts the math to a different point in the process. If I need to mark 1/4 of a chest measurement of 38in or 96cm, in a modern system, I'd do the division, grab a single tape measure in standard units, and mark at 9.5in or 24cm. In the Bara system, I pick up the measure labeled 38in, and mark at the line marked 1/4 (Q). It's an interesting way of thinking. I like that this makes the old pattern manuals more interpretable and accessible. That said, I've made more mistakes using this system than I ever have in any other kind of drafting. Two tips from my mistakes. First, a tape that has any stretch or give is NOT your friend. Cotton twill tape? Right out. Try for tabby woven, and artificial fibers are probably better. Who'd think I'd ever say that. Second, get yourself some alphabet charms, put them on safety pins, and attach them to the tapes in use. I'm not even kidding. I've made so many errors just by grabbing the wrong one.
The other thing to comment on is the drafts themselves. I don't know how much of the problem comes from each of various sources - no draft is truly universal, using Spanish patterns for a Dutch style, or inherent issues. My kirtle skirt I ended up doing completely twice (and actually cutting a third time) because the result of the draft was not what I wanted or expected. If you're using the pattern in v.2 p.162-163 and want the look of p.175 or 177, increase the waist measurents significantly (I believe I ended at W-QQQ for both front and back), and you may need to increase the bottom width to keep proportion, perhaps L-BM. The second part is to closely observe the length between side and center. Each side is drafted to L-BM, and so is the center... until you drop the waist curve. Now the front and back length is significantly shorter. Maybe this is just right for wearing over the bum pad? But for my look, it just gave me an uneven hem that was an absolute pain to fix. If doing it again, I'd lengthen the bottom as well when drawing in the waist curve. For my still in the drafting stage doublet, the initial draft fit pretty well, except having a very high waist cut around sides and back. I'm lengthening by 1.5-2" to hit the waist line of my kirtle, which is still slightly above my natural waist. I'm not tall, I'm petite; I don't think of myself as having an unusually long torso.
I don't want it to come across like I'm bashing the Modern Maker. I'm learning a lot about late period tailoring, construction and finishing. But there have definitely been some wrinkles. So, I guess, go in with some caution, and if something doesn't seem right to your purposes, you don't have to just trust it. I'm not entirely happy with this kirtle, but I'm just so DONE with it and I'm moving on.
10 August 2017
Secret Project: Intarsia Pillows
This was one of 2016-2017's secret projects - a pair of pillows in sewn intarsia.
This was initially conceived as a no-occasion gift for a dear friend, whose heraldry includes a red mermaid on a white background. The original design featured only the mermaid. However, when she was announced for the SCA's Order of the Pelican, it was a little too perfect. The mermaids had already been cut, and one sewn back together, but there was enough space to add the border of blood drops, and this gave me a firm deadline!
Intarsia, as pertains to sewing/embroidery, not knitting, is sort of like an un-backed applique. Instead of putting a design on a ground fabric, two identical designs are cut and exchanged, and then carefully stitched back into a solid piece with a whip stitch joining raw edges that are just butted together. The examples I know of are late medieval and Scandinavian, I'm not sure if it was more widely used than that - when I first saw them in Stockholm, I'd never heard of this before, and there don't seem to be many resources on it in English. Extant pieces seem to be home and church textiles, such as bedcoverings and cushions. The fabrics I used were red and cream/white wool flannels, I believe from Wm. Booth Draper, sewn with linen thread. The couched edging and details are ~2-2.5mm strips of "gold" goatskin leather, surprisingly cheap from Tandy's outlet store. The wool was all joined before I started the couching, so there are two layers of stitching everywhere that the leather is over a join. The backs of the pillows are in the opposite color wool, and it all encloses a feather pillow.
This was definitely a learning project; I jumped in hoping to figure it out as I went along. Although I did simplify the mermaid design, I could have gone further with that. Points and sharp corners really don't work well here! Sewing around raw edges is tricky, too close or too tight and you can pull the weave apart. In general, tighter weaves would be better. Finally, for drawing in my detail lines, I used my soapstone marker on the red (brushed off fine) and pink chalk on the white, which remained way too visible! In the end, I had to wash the whole panel. Yes, that's right, I stuck non-prewashed red and white wools, plus leather, in a sink full of water hoping to get pink spots out (not add more)! Everything turned out fine, but it was nerve-wracking.
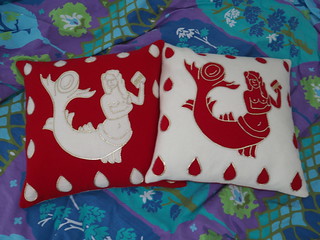
This was initially conceived as a no-occasion gift for a dear friend, whose heraldry includes a red mermaid on a white background. The original design featured only the mermaid. However, when she was announced for the SCA's Order of the Pelican, it was a little too perfect. The mermaids had already been cut, and one sewn back together, but there was enough space to add the border of blood drops, and this gave me a firm deadline!
Intarsia, as pertains to sewing/embroidery, not knitting, is sort of like an un-backed applique. Instead of putting a design on a ground fabric, two identical designs are cut and exchanged, and then carefully stitched back into a solid piece with a whip stitch joining raw edges that are just butted together. The examples I know of are late medieval and Scandinavian, I'm not sure if it was more widely used than that - when I first saw them in Stockholm, I'd never heard of this before, and there don't seem to be many resources on it in English. Extant pieces seem to be home and church textiles, such as bedcoverings and cushions. The fabrics I used were red and cream/white wool flannels, I believe from Wm. Booth Draper, sewn with linen thread. The couched edging and details are ~2-2.5mm strips of "gold" goatskin leather, surprisingly cheap from Tandy's outlet store. The wool was all joined before I started the couching, so there are two layers of stitching everywhere that the leather is over a join. The backs of the pillows are in the opposite color wool, and it all encloses a feather pillow.
This was definitely a learning project; I jumped in hoping to figure it out as I went along. Although I did simplify the mermaid design, I could have gone further with that. Points and sharp corners really don't work well here! Sewing around raw edges is tricky, too close or too tight and you can pull the weave apart. In general, tighter weaves would be better. Finally, for drawing in my detail lines, I used my soapstone marker on the red (brushed off fine) and pink chalk on the white, which remained way too visible! In the end, I had to wash the whole panel. Yes, that's right, I stuck non-prewashed red and white wools, plus leather, in a sink full of water hoping to get pink spots out (not add more)! Everything turned out fine, but it was nerve-wracking.
10 July 2017
A little something to tie you over
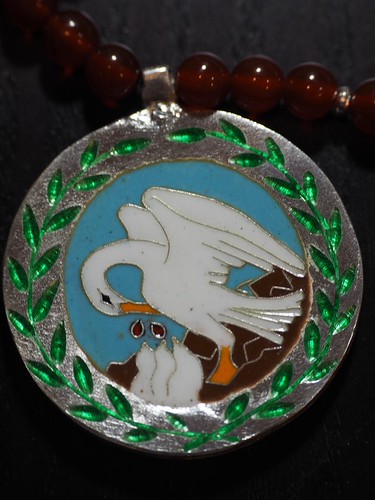
The secret projects are done! I even have pictures of some of them, I just need to get organized and find some time to write posts. This is a medallion I did for a dear friend - fine silver with cloisonne enamel. The outer wreath is engraved and filled, so it might be considered champleve.
24 March 2017
Burgundian gown pattern layout
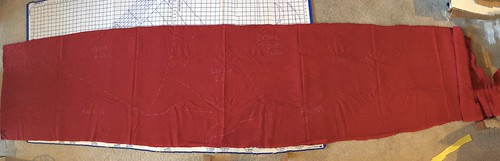
I've been meaning to blog this forever: how I cut my Burgundian gowns. And since I was cutting a new one, I finally have a picture of my layout. Obviously, there's some distortion from creating the panoramic, but you can get the idea. My back panels are cut like a 4-panel supportive kirtle, with flared skirt. Laying them on the selvage leaves a large wedge between them that becomes the center back gore. The front panels are cut differently, with the selvage going all the way up the neckline to the shoulder. Like the back, the skirt is flared as much as fabric width allows. The leftover bit between the fronts is enough for sleeves, cuffs, and collar. How this works in practice, and why there's only one gore is this: the angling of the front pulls the fullness forward, draping in folds at center front with the side seams pulled forward from the normal vertical line. The big gore in the back then replaces all the fullness that the front is stealing, making it even. I think it works really well, and it's a fairly efficient layout.
I have several other projects I'm working on, including some exciting things, but they are !sssh~secret!, with a few months to go before unveiling.
I have several other projects I'm working on, including some exciting things, but they are !sssh~secret!, with a few months to go before unveiling.
17 January 2017
What was I doing in 2016?
As I alluded to earlier, there were some projects in 2016, despite the lack of blogging!
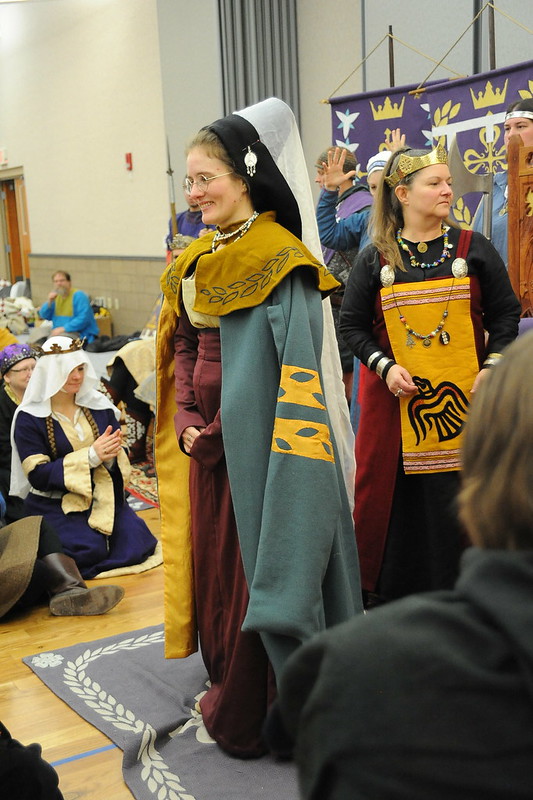
Sewing: aside from the brick stitch pouch, I made myself some basic, everyday wear. I made two more pirihan for my Persian wear - shirts were by far the limiting factor on how many days I could wear this style. I expanded my male clothing - a short tunic, two pairs of braies, and cheater hose. The braies and hose have elastic waistbands, and the hose just have stirrups instead of full feet. But they're comfortable and very practical. Finally, for my elevation I made a handsewn wool tunic for the vigil, and a white wrap dress to wear over my other clothes on my way into court.
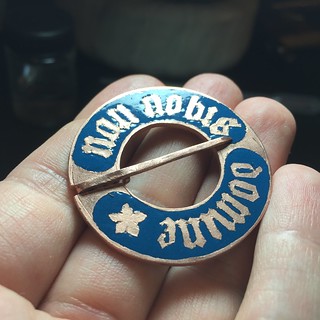
I've been continuing to expand my metal an enamel work. The annular pin here was started in 2015, but in 2016 I finished the engraving, applied the enamel, and did the finishing work. I have a stupid-large cloisonne medallion in progress. Finally, I engraved a plate for intaglio printing; these were my vigil tokens.
Sewing: aside from the brick stitch pouch, I made myself some basic, everyday wear. I made two more pirihan for my Persian wear - shirts were by far the limiting factor on how many days I could wear this style. I expanded my male clothing - a short tunic, two pairs of braies, and cheater hose. The braies and hose have elastic waistbands, and the hose just have stirrups instead of full feet. But they're comfortable and very practical. Finally, for my elevation I made a handsewn wool tunic for the vigil, and a white wrap dress to wear over my other clothes on my way into court.
I've been continuing to expand my metal an enamel work. The annular pin here was started in 2015, but in 2016 I finished the engraving, applied the enamel, and did the finishing work. I have a stupid-large cloisonne medallion in progress. Finally, I engraved a plate for intaglio printing; these were my vigil tokens.
14 January 2017
05 January 2017
Elsewhere in blog land
There have been some really good resources put out lately, these are a few that I recommend:
Fur primer at Cotte Simple. This overview includes a lot of different fur types, not just vair, ermine and gris, and has great images for examples and recognizing different types.
Women's Headwear 1480-1520 at Clothing the Low Countries. A subject near and dear to my heart!
Overview of 16th Century Dutch Women’s Clothing, also at Clothing the Low Countries. Although I'm not sure I'd ever want to wear the later styles, this is a good survey of Dutch women's fashion in the 1500s.
Fur primer at Cotte Simple. This overview includes a lot of different fur types, not just vair, ermine and gris, and has great images for examples and recognizing different types.
Women's Headwear 1480-1520 at Clothing the Low Countries. A subject near and dear to my heart!
Overview of 16th Century Dutch Women’s Clothing, also at Clothing the Low Countries. Although I'm not sure I'd ever want to wear the later styles, this is a good survey of Dutch women's fashion in the 1500s.
18 November 2016
The finished brick stitch purse
Well hello there! Things have been happening, but not making it to the blog. I haven't had any large clothing projects to encourage me to post, and a fair bit of my crafting time has diverted to metalwork and enamel.
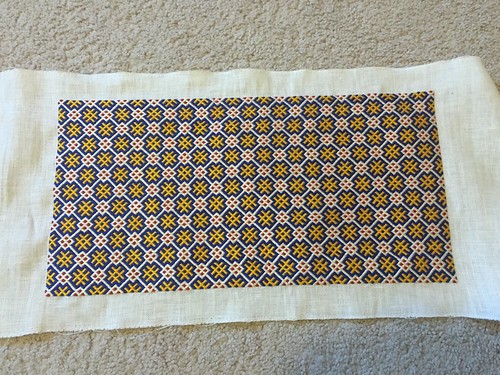
The last picture of this was just the embroidery, flat. The next step was lining. I fully backed the embroidery with a lightweight linen, raw edges to the inside, before folding to a pouch shape. Then folded in half, the sides were whipstitched together going through both lining and embroidery ground. Those edges were then covered in a tubular tablet woven-edging (4 cards, threaded for wide diagonals and set for a chevron). That edging continues up across the top edge opening. In theory, the edging could also be the initial stitching holding the edges together, but I was happier having that already lined up perfectly and stable. The carrying string and the drawstring are both fingerloop braids. The handle string is a six-loop braid ( A grene dorge of vj bowes -- c. 1475), using full strands of the embroidery silk. For the drawstring, which needed to be thin, I split the silk from 2-ply to single, and then used the divided five loop braid to make two matching strings. And finally, tassels. There's a whole skein of silk in those three.
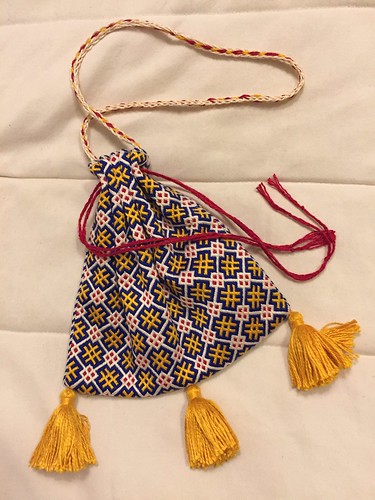
The last picture of this was just the embroidery, flat. The next step was lining. I fully backed the embroidery with a lightweight linen, raw edges to the inside, before folding to a pouch shape. Then folded in half, the sides were whipstitched together going through both lining and embroidery ground. Those edges were then covered in a tubular tablet woven-edging (4 cards, threaded for wide diagonals and set for a chevron). That edging continues up across the top edge opening. In theory, the edging could also be the initial stitching holding the edges together, but I was happier having that already lined up perfectly and stable. The carrying string and the drawstring are both fingerloop braids. The handle string is a six-loop braid ( A grene dorge of vj bowes -- c. 1475), using full strands of the embroidery silk. For the drawstring, which needed to be thin, I split the silk from 2-ply to single, and then used the divided five loop braid to make two matching strings. And finally, tassels. There's a whole skein of silk in those three.
01 February 2016
02 October 2015
September challenge: Brown
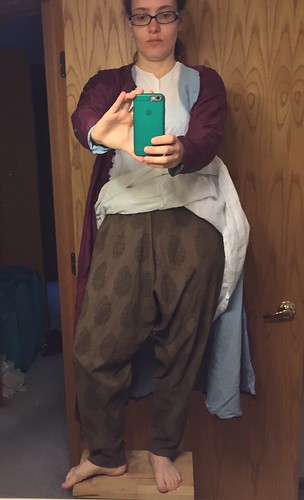
For the brown challenge, I made a pair of salwar to wear with my 16th c. Persian clothes. They are made of a lightweight, block-printed cotton from India that was originally cream with black, which I then overdyed to brown. The pattern is incredibly simple: two tapered tubes. They're held up by a separate cord or thin belt. The cut is the same as the closest extant items I'm aware of, which are Ottoman Turkish pants from the same time period. Those ones were very high status, and made from brocades that look fairly stiff. Persian silhouettes are generally softer and more fluid that Turkish ones, and cotton and block printing were both available. I choose this print because it preserves at large scale the design aesthetic - large individual motifs, well separated by blank space, and largely symmetrical. The motif itself is probably a bit too complex, but is not glaringly bad.
The Challenge: September - Brown
Fabric: 2.5 yds block-printed cotton
Pattern: none
Year: 16th c. Persian
How historically accurate is it:Matches (limited) information - materials speculative.
Total cost: $40.
The Challenge: September - Brown
Fabric: 2.5 yds block-printed cotton
Pattern: none
Year: 16th c. Persian
How historically accurate is it:Matches (limited) information - materials speculative.
Total cost: $40.
18 August 2015
Running to stand still
I have been making things, but none of it has really felt ... blog-worthy? I made a wool hood for myself, very basic. I felted another hat - this one went a lot more smoothly than the first one. Both of those were tied to the HSM July challenge (accessories). The brick stitch pouch is death by a thousand stitches (and then another thousand, and another...). It's halfway through August, and the only ideas I've had for the HSM challenge would be multi-month projects. Unless inspiration strikes, I'll be skipping this one. I do have a plan for September, though, and I've even ordered fabric.
22 July 2015
Historical Sew Monthly: not going as planned
I think I'm falling off the HSM wagon. I did make an entry for the June challenge - men's 14th c. braies and hose, but they didn't turn out as well as I'd hoped. Usable, yes, and they look decent (although late in the day I had a *lot* of sag in the hose), but there are definitely things I'll change when I attempt this again. Minor adjustments on the hose, but I'll probably start from scratch with different construction for the braies.
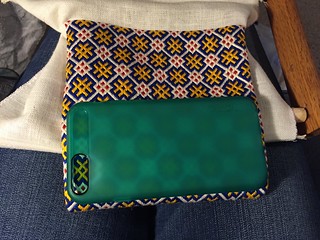
For the July Accessories challenge, I wanted to finish my brick-stitch pouch. I knew that was going to be a stretch goal, and it's not going to happen. If I had left it the size I originally started with, it would be done by now. If I could leave it at the size after the first enlargement, I could probably still finish, although it'd be tight. And in both cases I would have a pouch that wouldn't hold my new phone (at all, or comfortably, respectively). And so I need to embark on a second round of enlargement. My heart sinks at the thought of it. I am tired of this project.
I may see about doing something else smaller for the July challenge, but my energy for working on projects has been pretty low. I did start a hat (felted, not sewn), but I'll need to borrow some of the tools to finish it, which isn't going to happen in the next week.
For the July Accessories challenge, I wanted to finish my brick-stitch pouch. I knew that was going to be a stretch goal, and it's not going to happen. If I had left it the size I originally started with, it would be done by now. If I could leave it at the size after the first enlargement, I could probably still finish, although it'd be tight. And in both cases I would have a pouch that wouldn't hold my new phone (at all, or comfortably, respectively). And so I need to embark on a second round of enlargement. My heart sinks at the thought of it. I am tired of this project.
I may see about doing something else smaller for the July challenge, but my energy for working on projects has been pretty low. I did start a hat (felted, not sewn), but I'll need to borrow some of the tools to finish it, which isn't going to happen in the next week.
28 May 2015
Practical sometimes means boring
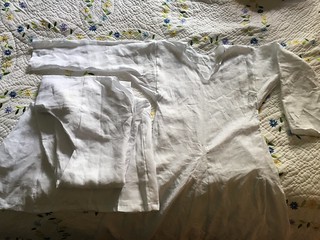
Practicality is ... replacing basics that don't fit even when you'd much rather sew something interesting. Since I normally hang out in the 15th century, anything before the mid-14th c. is "early period" to me. I use those eras a lot, though, especially when camping, because they are simple and fairly uncomplicated. My undertunics are cut pretty much identically to my tunics, with two exceptions: shorter hem and snug underbust. The width of the body panels at the bottom of the sleeve gussets is only slightly bigger than my rib cage measurement. It's a little tricky to squeeze in and out of, but it provides enough support for light to medium activities. (Pinning the neckline closed also helps.) The downside is, while the nice loose tunics are accommodating of weight fluctuation, the more fitted layer not so much.
The Challenge: May - Practicality
Fabric: 2 yds handkerchief linen
Pattern: none
Year: 8th-13th c. Ish.
How historically accurate is it:Eh. Not a lot of solid details on underwear from this time period, but undyed linen in a rectangular tunic cut is consistent with what we know. Construction is modern (machine, French seams).
Total cost: $15-20 each.
The Challenge: May - Practicality
Fabric: 2 yds handkerchief linen
Pattern: none
Year: 8th-13th c. Ish.
How historically accurate is it:Eh. Not a lot of solid details on underwear from this time period, but undyed linen in a rectangular tunic cut is consistent with what we know. Construction is modern (machine, French seams).
Total cost: $15-20 each.
05 May 2015
Next time: remember to take pictures
I didn't get any pictures of it?
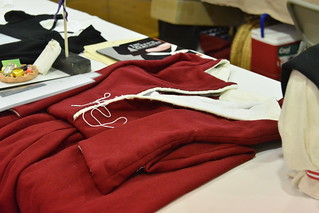
The red 1490s gown is done. It's fabulous, if I do say so myself. And every time I want to post about, I go looking through my photos for which one captures the overall result, and I can't find any. I have no photos of myself wearing this gown. I don't know how that slipped my mind. I guess I'm going to have to do a photo session at some point.
Since the last set of progress photos, it's all been finishing work. Strips of wool flannel around all the edges to mimic a lining, and larger sections pieced into the lower sleeves where it might show. Stitching down and/or whipping seam allowances and raw edges. The lacing rings for the front opening are set between the lining and the outer fabric, and the lining extends a bit such that it covers the gap I would otherwise get. This works well and provides a really nice look.
In other news, the April HSM challenge totally didn't happen for me. I went into the month without any ideas of what to do, and inspiration struck really, really late in the month, when I no longer had any time to work on it. I'll be cutting my losses and moving straight on to the next challenge.
The red 1490s gown is done. It's fabulous, if I do say so myself. And every time I want to post about, I go looking through my photos for which one captures the overall result, and I can't find any. I have no photos of myself wearing this gown. I don't know how that slipped my mind. I guess I'm going to have to do a photo session at some point.
Since the last set of progress photos, it's all been finishing work. Strips of wool flannel around all the edges to mimic a lining, and larger sections pieced into the lower sleeves where it might show. Stitching down and/or whipping seam allowances and raw edges. The lacing rings for the front opening are set between the lining and the outer fabric, and the lining extends a bit such that it covers the gap I would otherwise get. This works well and provides a really nice look.
In other news, the April HSM challenge totally didn't happen for me. I went into the month without any ideas of what to do, and inspiration struck really, really late in the month, when I no longer had any time to work on it. I'll be cutting my losses and moving straight on to the next challenge.
16 April 2015
Bonus stashbusting flat cap
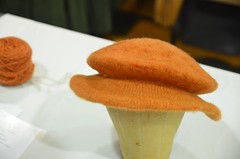
Bonus HSM! Yarn stashbusting! This is my handspun, a 3-ply worsted in roughly DK weight. Hand-dyed with madder. The knitting itself is not too complicated - all stockinette, with increases and decreases, and just a little fiddly joining the brim layers. The hardest part was getting the rate of decrease right so that it sits mostly flat instead of being conical.
The Challenge: March - Stashbusting
Fabric: Originally, undyed Romney roving
Pattern: Gagiana beret, modified
Year: 1st half of 16th century
How historically accurate is it:There's not much I could do to make it more period.
Total cost: Wool was probably around $20, dyeing was more expensive (but partly start-up costs for basic supplies)
The Challenge: March - Stashbusting
Fabric: Originally, undyed Romney roving
Pattern: Gagiana beret, modified
Year: 1st half of 16th century
How historically accurate is it:There's not much I could do to make it more period.
Total cost: Wool was probably around $20, dyeing was more expensive (but partly start-up costs for basic supplies)
14 April 2015
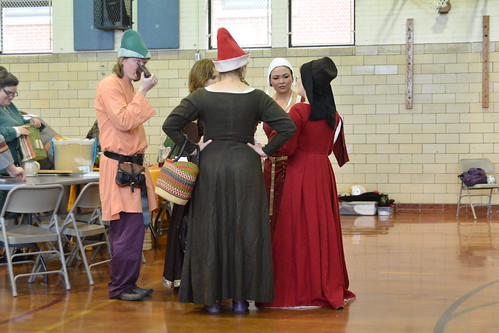
Red dress teaser
I've got a backlog of things to post about - I have actually been working on things, just not blogging about them. Here's a teaser for the now-completed red dress project.
07 March 2015
Letting the fabric sing
Have you ever dug through your stash and found yourself saying "Wow, I forgot I had something this nice"? This fabric is luscious and shouldn't be allowed to sit in the bottom of a storage container any longer. More than 10 years ago, I bought a bundle of remnants of coating wool off ebay, all black but not all the same fabric. 2 matching lengths went into a modern coat that I seldom wear but still like, another pair went into a medieval coat that gets much more use, and one lighter weight one has been used for several hats and other accessories. I had one 2yd cut left, a lovely heavyweight with a nice nap (not strongly directional, almost velvety) - not enough for a big project, but too nice to waste. And so, an immensely simple project, a half-circle cloak. I was able to get about a 45 inch neck to hem length by piecing the bottom corners in both front and back. There's a small seam on the left shoulder to help it lay nicely, and the right shoulder is overlapped and pinned, but could also be sewn. The seams were done in a small whipstitch that was then 'popped' out to be completely flat with the fabric edges abutted. No treatment of cut edges was necessary.
The Challenge: March - Stashbusting
Fabric: 2 yds coating wool
Pattern: none, based on Bocksten bog man's cloak
Year: 1st half of 14th century
Notions:Silk sewing thread.
How historically accurate is it:Very. Period materials and construction. Pattern is modified to take advantage of wider loom-width, rather than introducing piecing just to match the original. Right shoulder is pinned rather than sewn, but I might still change that.
Total cost: Stash fabric so old I can't guess what I paid for it.

The Challenge: March - Stashbusting
Fabric: 2 yds coating wool
Pattern: none, based on Bocksten bog man's cloak
Year: 1st half of 14th century
Notions:Silk sewing thread.
How historically accurate is it:Very. Period materials and construction. Pattern is modified to take advantage of wider loom-width, rather than introducing piecing just to match the original. Right shoulder is pinned rather than sewn, but I might still change that.
Total cost: Stash fabric so old I can't guess what I paid for it.
25 February 2015
A blue, blue tunic
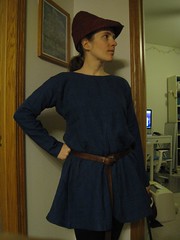
Slowly but surely. February's Challenge is Blue, and I had a couple of different stash fabrics to choose from. Most of them are already paired with a planned project, and ultimately the most practical one won out. Very occasionally, I get to participate in equestrian activities, and although I can ride in a dress, there are times where I'd just rather not. So, for the first time ever, I'm working on historical mens clothes for myself. I'm targeting mid-14th century, and not super fancy. I've got existing tunics that have the fit I wanted, so I pulled measurements from there and then just brought the hemline up to mid-thigh. I have accessories for a decent look, but what I still don't have are appropriate men's undergarments for a complete outfit. Hopefully I can work that in to an upcoming challenge :)
The Challenge: February - Blue
Fabric: 2 yds med-heavy linen
Pattern: Drafted from measurements; style is basically that of "T-tunic the Period Way"
Year: 1340ish
Notions:1/4" linen tape for finishing neckline
How historically accurate is it: Eh. Looks good, but up close the details aren't right. I can't document dyed linen outerwear for this era, but it's comfortable.
Total cost: Stash fabric, estimated value $15.
The Challenge: February - Blue
Fabric: 2 yds med-heavy linen
Pattern: Drafted from measurements; style is basically that of "T-tunic the Period Way"
Year: 1340ish
Notions:1/4" linen tape for finishing neckline
How historically accurate is it: Eh. Looks good, but up close the details aren't right. I can't document dyed linen outerwear for this era, but it's comfortable.
Total cost: Stash fabric, estimated value $15.
28 January 2015
An 18th c. shift
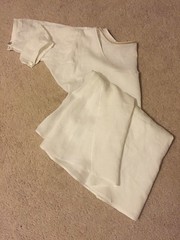
The first finished object of 2015 is a humble shift. January's Challenge is Foundations, and I interpreted that as the thing that comes first, the base layer. After the fact, though, thinking about the inspiration more broadly, I still like my choice. In my experience, correct underwear is one of the things that help me achieve not just costumes, but historical clothing. I don't mean just in getting the look right, although there certainly is that, but also in mindset. When I'm dressed, this shift won't be seen at all. But I'll know.
This shift is based on the style from around 1770. I used simple geometric construction, and really the differences from a medieval version are minor. Construction was all machine, due to time constraints, and the finished result looks like a plain white shirt, exactly what it is. Seams are flat-felled and the neckline is finished by turning under and binding with a narrow linen tape. My favorite detail is the reproduction sleeve buttons, sourced from Wm. Booth, Draper. The buttonholes turned out fairly well, which I'm very pleased with since I have struggled with them in the past.
The Challenge: January - Foundations
Fabric: 1.5 yds handkerchief linen
Pattern: Online sources, primarily Mara Riley and Sharon Ann Burnston
Year: 1770s
Notions:1/4" linen tape, pewter buttons
How historically accurate is it: Middling. Pattern and materials are accurate, all-machine construction is not.
Total cost: Stash fabric, estimated value $25. Buttons, $9.
This shift is based on the style from around 1770. I used simple geometric construction, and really the differences from a medieval version are minor. Construction was all machine, due to time constraints, and the finished result looks like a plain white shirt, exactly what it is. Seams are flat-felled and the neckline is finished by turning under and binding with a narrow linen tape. My favorite detail is the reproduction sleeve buttons, sourced from Wm. Booth, Draper. The buttonholes turned out fairly well, which I'm very pleased with since I have struggled with them in the past.
The Challenge: January - Foundations
Fabric: 1.5 yds handkerchief linen
Pattern: Online sources, primarily Mara Riley and Sharon Ann Burnston
Year: 1770s
Notions:1/4" linen tape, pewter buttons
How historically accurate is it: Middling. Pattern and materials are accurate, all-machine construction is not.
Total cost: Stash fabric, estimated value $25. Buttons, $9.
Subscribe to:
Posts (Atom)