Showing posts with label caps and veils. Show all posts

08 June 2014

A simple late 15th c. cap

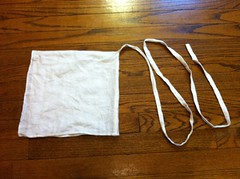
Late 15th c. cap
Late 15th c. cap
Originally uploaded by Catrijn.

Wearing late 15th c. cap
Originally uploaded by Catrijn.
This is an incredibly simple piece of headwear - but it looks right, so why make it complicated? I think of this style as primarily 15th c., although it's probably plausible into the early 16th.
  1. Take a rectangle of fine linen, 22 by 12 inches. (These measurements fit my head - small adjustments may be necessary.)
  2. Hem all four sides.
  3. Fold in half, sewing the edge together to form the center-back seam.
  4. Attach a long tie to the point at the top of the head.
  5. There is no step 5!
To wear, secure hair close to head in braids or bun. Drape cap on head, hold tail snug to top of neck keeping front edge where you want it, wrap tail around head once, pull end through first loop in order to change directions and wrap around head the other way. Tuck end under previous wrap to secure, and flip the front edge back to frame the face.

11 April 2014

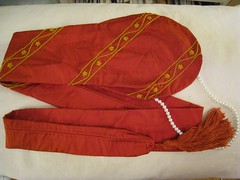
The previously-promised Persian braid case

Braidcase, flat
Braidcase, flat
Originally uploaded by Catrijn.

Braidcase, worn
Braidcase, worn
Originally uploaded by Catrijn.
Here are some pictures of the (mostly) finished braidcase. This was almost entirely a stash project. The main fabric is a red silk - it is medium weight with a strong hand, somewhat similar to a dupioni but with very few slubs. The tassel is also silk, and although not an exact color match it is close. The yarn was the loom waste from a weaving project, and I've been saving the short thrums for a long time but they were perfect for this! The (fake, plastic) pearls are recycled from my old persian hat, which I'd like to redo anyway. The only thing new was the silk embroidery thread. I picked a simple, repetitive band pattern done in outline stitch and lazy daisies. It is probably not terribly authentic, but I think it has approximately the right aesthetic. I ran out of time before I wanted to wear it, so only the first three bands at the top are done, but eventually I want to extend the design along the entire length. (The finishing of the tube part was done in a way to make it easy to un-do later.)

26 June 2013

My Birgitta: interlacing diagram


My Birgitta: interlacing diagram
Originally uploaded by Catrijn.
This was a long time in the making - I know just enough Illustrator to really frustrate myself when something isn't working the way I want it to. Anyway: this is the interlacing pattern I used for my previously blogged Birgitta cap. This builds on the diagram presented in the MC&T article, but the end product is a little different.

07 April 2013

Birgitta cap - wrap up


Birgitta cap - worn
Originally uploaded by Catrijn.
I had planned to put up a diagram for my interlacing pattern before I showed what it looks like on, but I just haven't had time to sit down and do the technical drawing. So here you have it, what the cap looks like in practice.

As you can see, especially with the folds at the sides, it's a little bit too big. I made mine noticeably bigger than the original, and I think that ultimately the right size for me would be about halfway between the two. But I really love it anyway :)

I have so many things I want to start next, and not enough time for any of them...

28 March 2013

Birgitta cap - pleating and embroidery

My cap is done, and was very well received.

Here's a close-up of some of the finishing details: pleating the bottom edge into the band, and embroidery on the band.

For the pleating, I did it as gathers onto a short running stitch, and then pushed together almost as tightly as possible. I'd sewn about 3/4 of the band on the first edge ahead of time, and then pinned the pleats down to it, and easing a little bit of a curve at the front corner. The flat parts of the band were attached with running stitch, but I switched to backstitch over the pleats to make sure each fold was caught at least once, and ended up sewing that section a second time to flatten down the folds.

With one edge of the band attached, and folds pressed to mark where it would be turned over, I free-handed the embroidery as described in Dahl and Sturtewegan's article. It's very simple to do, and really makes the edge pop. I'm very glad I ultimately added it, since I'd been debating leaving it off.

Once all that was done, the band was turned under and finished with hidden slip stitch.

18 March 2013

Birgitta cap, race to the finish


Birgitta cap, starting front band
Originally uploaded by Catrijn.
I've gotten a lot done on my Birgitta cap since the last time I posted, but apparently I forgot to take photos of any of it? My deadline for finishing is in just a few days, though, so for now the time goes to getting it done and writing up documentation, with a final set of posts here to come later.

17 January 2013

Birgitta cap - working both sides toward the middle

I can't overstate how much easier it has been to work the looping threads with a more open base.

Right now, I've got the fourth looping thread almost finished (two along each fabric edge), and I'm trying to figure out exactly how I'm going to finish the middle.

For anyone working from the article in Medieval Clothing & Textiles 4 (Fig 6.15 on page 137), please note that there are some errors in the diagram. The first two drawings on the left have a different under/over pattern from the one at the bottom (which is correct). And as far as getting from the second one on the right to the last one, it might as well say "magic happens here". I'm not entirely convinced that the final diagram is even a possible pattern of continuous threads - I'll be making mine up as I go.

02 January 2013

A fresh start for the new year

On New Year's Day, I decided that I really did want a fresh start on my Birgitta cap. So I took scissors all the way up the back, and ripped it all out. I made all the modifications that I'd been pondering - I measured out all the spacing on the backing cloth beforehand. I sewed the outer fabric to the backing cloth firmly and at close spacing, rather than basting. I waxed my thread. I worked out in both directions from the middle, so that I could use a thread long enough to reach end-to-end with some to spare. And so far, I am much more optimistic about the result. Here's to a New Year, and not settling for something that makes you unhappy.

30 November 2012

My Birgitta cap, the part that went pear-shaped


First run of looped threads
Originally uploaded by Catrijn.


Second run of looped threads
Originally uploaded by Catrijn.
The first of the looped interlacing threads actually went pretty smoothly. Once I got the right pattern of over-under memorized, it worked up well and looked fairly good.

The second of the looped interlacing threads is another story entirely. The photo doesn't quite capture it (I'd need a dedicated macro lens set up), but the truth is that my eyes can't quite capture it - even my incredibly-nearsighted-when-uncorrected eyes have trouble seeing the details for this. It's incredibly hard to work, and the results... well I don't think they look as good as what I started with.

A lot of the problem is scale. The gap between the fabric edges where I'm working is down to barely 5mm - and the original was twice that! (8-12mm). I started with a > 10 mm gap between the two sides, but every set of stitches seems to pull it closer, whether I mean to or not. It might still be workable with a finer thread, but there's just not enough room for the one that I'm using (although I think it is a very appropriate weight for this type of work). There are smaller problems - waxing the thread to prevent it fuzzing out as I rework the same areas might have been helpful.

At this point I'm not sure what I'm going to do with this. I figured out how to manage well enough that I could probably keep going and finish it. I'm also tempted to cut the whole thing out and start over from scratch. The two seem about equally appealing (which is to say: Not At All).

26 November 2012

My Birgitta cap, the part that went well


Interlaced herringbone
Originally uploaded by Catrijn.
I'm always looking for low-maintenance ways to keep my hair covered at out of the way at events, plus I like funky hats in general. So I've had a reproduction of the St. Birgitta cap in the back of my mind for a while now. Since I was looking for a small, portable project, it seemed like the thing to do.

References: the article in Medieval Clothing and Textiles 4 is really good - recommended reading even with all the information that's available online. Karen Larsdatter has a collection of links for period illustrations and recreations.

First up: I have a big head, apparently. My pattern piece is substantially larger than the original, at 13 x 10.5 inches on the straight sides. But based on my mock-up, I don't think I'd want it any smaller.

I pulled out a little bit of really nice finely-woven linen I'd been saving, and started by hemming the two curved edges. Then I basted those edges down in parallel lines to a very stiff piece of cotton canvas in order to keep my spacing even. The interlacing herringbone worked up pretty quickly and easily. I ended up with five threads instead of the original six, because I got one of the cross directions wrong on the first thread I laid down, which meant the interlacing only worked right for an odd number. The only point of note was that I tended to pull the later threads tighter, so the opening is pulled smaller than I intended, and the first thread looks a bit loose and wobbly.

I needed a really long thread in order to work from end to end... to long for convenience, really, and some of them weren't actually long enough - the joins look kind of bad, too. If I was doing it again I might try working out in both directions from the middle, so I only had to deal with half the length at one time. Other than that, I really like how it looks at this stage. I was debating leaving it like this, and in retrospect I kind of wish that I had. But more on that next time...