I didn't get any pictures of it?
The red 1490s gown is done. It's fabulous, if I do say so myself. And every time I want to post about, I go looking through my photos for which one captures the overall result, and I can't find any. I have no photos of myself wearing this gown. I don't know how that slipped my mind. I guess I'm going to have to do a photo session at some point.
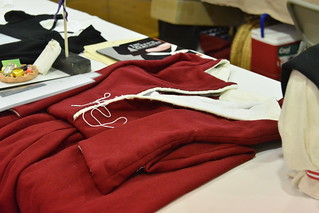
Since the last set of progress photos, it's all been finishing work. Strips of wool flannel around all the edges to mimic a lining, and larger sections pieced into the lower sleeves where it might show. Stitching down and/or whipping seam allowances and raw edges. The lacing rings for the front opening are set between the lining and the outer fabric, and the lining extends a bit such that it covers the gap I would otherwise get. This works well and provides a really nice look.
In other news, the April HSM challenge totally didn't happen for me. I went into the month without any ideas of what to do, and inspiration struck really, really late in the month, when I no longer had any time to work on it. I'll be cutting my losses and moving straight on to the next challenge.
Showing posts with label Continental early Tudor. Show all posts
Showing posts with label Continental early Tudor. Show all posts
05 May 2015


05 January 2015
Red overgown, first fitting

Overgown back pleats
Originally uploaded by Catrijn.
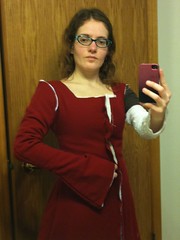
Testing fit of overgown
Originally uploaded by Catrijn.
02 January 2015
Getting the ball rolling on the red overgown
The continental 1490's project has been languishing while I searched high and low for a lining fabric. I wanted something white or off-white, heavy enough to not be sheer, in natural fibers, preferably wool, priced such that I could afford to do a full lining. This was not to be. Plan B is to embrace the medieval mindset and work with what I have. I'm going to interline with white linen, and then fake a richer lining of wool flannel at all the edges.
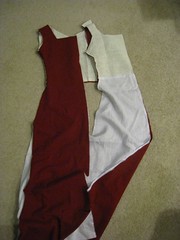
That decision gave me enough information to move forward. My primary fabric is a luscious red wool twill, in 2 remnants of 2 yards each. To maximize that limited resource, I cut pieces as I knew what shapes I needed, trying to leave the most usable yardage as I went. The bodice is cut from my kirtle pattern, with a bit of ease added but without the extra for folding into a strong lacing opening. This layer shouldn't be under stress, so that reinforcement isn't needed. In the back, I stopped it at the waist, just like the kirtle, but in the front I extended it all the way to the hem to remove the front waist seam. That seam still exists in the interlining, though, since I wanted to transition from heavier linen in the bodice to lightweight linen in the skirt. The photo shows this rather unusual construction order - I plan to draft the sleeves next, leaving the skirt back for absolute last, since that will be a simple rectangle, as big as I can make it at that point.
That decision gave me enough information to move forward. My primary fabric is a luscious red wool twill, in 2 remnants of 2 yards each. To maximize that limited resource, I cut pieces as I knew what shapes I needed, trying to leave the most usable yardage as I went. The bodice is cut from my kirtle pattern, with a bit of ease added but without the extra for folding into a strong lacing opening. This layer shouldn't be under stress, so that reinforcement isn't needed. In the back, I stopped it at the waist, just like the kirtle, but in the front I extended it all the way to the hem to remove the front waist seam. That seam still exists in the interlining, though, since I wanted to transition from heavier linen in the bodice to lightweight linen in the skirt. The photo shows this rather unusual construction order - I plan to draft the sleeves next, leaving the skirt back for absolute last, since that will be a simple rectangle, as big as I can make it at that point.
27 January 2014
Fuzzy fezzy felted hat
Combine friends, projects, and learning new things, and you might end up with an awesome weekend plus a cool new hat.
A friend of mine has recently been felting a lot of hats, and after watching her work on a few that were in different stages of finishing, I wanted to do one but couldn't figure out what style to go with. Once we realized we had a block that would work for the little pillbox/very short hennin type that would go with my transitional gown project, though, that had to happen.
We started with unspun roving piled in layers around a waterproof pattern that provided a resist. After a lot of soapy water, agitation, reheating, and rolling, it shrank down to this impressively thick hat blank.
After letting it dry overnight, I ironed it to get a nice smooth surface on the felt, and then we steamed it and aggressively stretched it to get it over the hat block in the picture. (The block is the middle and lower portions of one designed for a fez). It's not completely done - the bottom edge needs to be trimmed to the correct length, and it will probably also need some stiffening (wire and/or thinned glue, maybe?).
I can hardly wait to get this finished; it's going to be fabulous!

A friend of mine has recently been felting a lot of hats, and after watching her work on a few that were in different stages of finishing, I wanted to do one but couldn't figure out what style to go with. Once we realized we had a block that would work for the little pillbox/very short hennin type that would go with my transitional gown project, though, that had to happen.
We started with unspun roving piled in layers around a waterproof pattern that provided a resist. After a lot of soapy water, agitation, reheating, and rolling, it shrank down to this impressively thick hat blank.
After letting it dry overnight, I ironed it to get a nice smooth surface on the felt, and then we steamed it and aggressively stretched it to get it over the hat block in the picture. (The block is the middle and lower portions of one designed for a fez). It's not completely done - the bottom edge needs to be trimmed to the correct length, and it will probably also need some stiffening (wire and/or thinned glue, maybe?).
I can hardly wait to get this finished; it's going to be fabulous!
05 December 2013
A rookie mistake
I'm working on a matching chemise for the black transitional kirtle - a pretty simple piece of untailored, geometric cut sewing. That didn't stop me from making a really brain-dead mistake.
I had made a mock-up based on measurements, sewed it quickly by machine, and everything was fine. Cut the real one to be hand sewn to the same measurements, starting sewing, and what do you know, the sleeves don't fit at all (too tight in the elbows). Because I had used french seams with very scant seam allowance on the machine sewn one, and had given a more generous allowance on hand sewing, to make turning the edges for false-french finishing easier. And that was the difference between a sleeve that lets me bend my elbow and one that doesn't.
So... move all the seams out that quarter-inch, and deal with very scant allowances for turning. And feel like you really ought to be past this sort of mistake.

I had made a mock-up based on measurements, sewed it quickly by machine, and everything was fine. Cut the real one to be hand sewn to the same measurements, starting sewing, and what do you know, the sleeves don't fit at all (too tight in the elbows). Because I had used french seams with very scant seam allowance on the machine sewn one, and had given a more generous allowance on hand sewing, to make turning the edges for false-french finishing easier. And that was the difference between a sleeve that lets me bend my elbow and one that doesn't.
So... move all the seams out that quarter-inch, and deal with very scant allowances for turning. And feel like you really ought to be past this sort of mistake.
20 November 2013
Transitional gown project progress
I got the black kirtle finished enough to wear last weekend, and I'm really happy with it. Of course, I completely forgot to get a picture of how it turned out. I had been hoping that one of our roving photographers caught me, but so far I've only managed to find myself in the background. So that's mostly done - hemmed and seams finished. The sleeves are still a bit funky, might rip them out and start over, and I remain undecided on whether to add a lining for the bodice. I've moved on to a chemise with a matching neckline, which should go relatively quickly.
In the meantime, here are some roughly contemporary portraits:
Portrait of a Lady with a Carnation, Master of the Legend of Saint Ursula
Portrait of a Donatrix, Lucas Cranach the Elder
Portrait of a Female Donor, Jan Provost
And of course Portrait of Margaret of Austria, Jean Hey (called Master of Moulins)
In the meantime, here are some roughly contemporary portraits:
Portrait of a Lady with a Carnation, Master of the Legend of Saint Ursula
Portrait of a Donatrix, Lucas Cranach the Elder
Portrait of a Female Donor, Jan Provost
And of course Portrait of Margaret of Austria, Jean Hey (called Master of Moulins)
22 October 2013
Kirtle progress - sleeves and little details
I've continued working on the black kirtle as I have time, although there aren't any dramatic (or particularly photogenic) changes. I put hooks and eyes in for the skirt portion of the front opening, with the two edges overlapped the same way they are for the lacing so there aren't any visible gaps. Last night, I drafted out short little sleeves for it (pictures/mini-tutorial: 1 2 3 4 5 6). Sleeveless would be an option as well, I think, but both cases would usually have separate pin-on long sleeves if being worn without an overgown, and the sleeves I make for my earlier dresses don't come up quite far enough to the shoulder. In the interest of being able to re-use pieces, this dress will have short sleeves too. Now it's on to all the seam finishing for the bodice seams before I set in the sleeves. After that, seam finishing in the skirt, hemming, and deciding whether to add a lining in the bodice.
10 October 2013
Perseverance has its rewards
I put in the last dozen or so eyelets on the kirtle today. I am so sick of eyelets, it was really a case of having to force myself to work on them. But they are all in now, and I could really try the dress on for the first time without pins or basting.
I think I'm in love. I am so much more motivated to keep working on this, because I want to wear this dress pretty much immediately.

I think I'm in love. I am so much more motivated to keep working on this, because I want to wear this dress pretty much immediately.
25 September 2013
Eyelets are slow work
The picture isn't great (black on black), but I'm halfway through the eyelets for the front closure on the kirtle. This feels like it is going to take forever...

30 August 2013
Kirtle in progress - skirts attached
Here's the state of progress on the kirtle. There are four flared skirt panels (instead of rectangular with gores). I think you could make an argument for either cutting layout, but it's ultimately a practical decision to minimize seams on a handsewn garment. The two back panels have more flare than the front panels, and there's a small reverse box pleat at center back to take up some extra width in the skirt panels and match the bodice back width. The fabrics drapes very nicely (swish swish :) ). Next up are eyelets and finishing the front opening.

14 August 2013
Transitional gown images from the British library
Progress continues on the kirtle, but there's not much to show. I've cut the skirts, and I'm working my way through those long seams.
Instead, here's some link-spam from the British Library. Unfortunately, the BL's viewer, while very good, appears to be a bit 'sticky', in that these direct links may try to load the manuscript you just viewed instead of the one that's actually specified. If you have trouble, head to the manuscript index page (also linked), load the viewer from there, and then select the folio as needed. In all cases, I've selected a few images of particular interest, and there are generally several other pages that feature the style.
The Breviary of Queen Isabella of Castile - begun in the Netherlands in the 1480s, portions later
f.3v, shows back of gown
f.417r, St. Martha, c. 1500 - square neck kirtle
Hours of Joanna I of Castile - produced in Flanders 1486-1506
f.5r, lady in gown and working woman in kirtle
f.6r, alternative gown with a skinny V-neck
f.26r, miniature of Joanna of Castile. She's got wider sleeves than I'd normally categorize as being this style (probably later, and/or a regional difference), and her headwear is in the French hood style.
f.288r, additional miniature of Joanna of Castile
'London Rothschild Hours' or the 'Hours of Joanna I of Castile - southern Netherlands, c. 1500
f.2v, lady in gown and working woman in kirtle
f.7r, working women, including V-back kirtle
Filippus Albericus, Tabula Cebetis, De mortis effectibus and other poems - France, Central (Paris); 1507
f.6v, allegorical depictions (and not the virtuous ones)
Instead, here's some link-spam from the British Library. Unfortunately, the BL's viewer, while very good, appears to be a bit 'sticky', in that these direct links may try to load the manuscript you just viewed instead of the one that's actually specified. If you have trouble, head to the manuscript index page (also linked), load the viewer from there, and then select the folio as needed. In all cases, I've selected a few images of particular interest, and there are generally several other pages that feature the style.
The Breviary of Queen Isabella of Castile - begun in the Netherlands in the 1480s, portions later
f.3v, shows back of gown
f.417r, St. Martha, c. 1500 - square neck kirtle
Hours of Joanna I of Castile - produced in Flanders 1486-1506
f.5r, lady in gown and working woman in kirtle
f.6r, alternative gown with a skinny V-neck
f.26r, miniature of Joanna of Castile. She's got wider sleeves than I'd normally categorize as being this style (probably later, and/or a regional difference), and her headwear is in the French hood style.
f.288r, additional miniature of Joanna of Castile
'London Rothschild Hours' or the 'Hours of Joanna I of Castile - southern Netherlands, c. 1500
f.2v, lady in gown and working woman in kirtle
f.7r, working women, including V-back kirtle
Filippus Albericus, Tabula Cebetis, De mortis effectibus and other poems - France, Central (Paris); 1507
f.6v, allegorical depictions (and not the virtuous ones)
02 August 2013
Kirtle bodice drafting and adjustments
For the kirtle bodice, I pulled the basic shape of the pieces from my existing 15th c. cote pattern. I cut them directly onto the linen canvas I'm using for interlining, and basted that together as a muslin. After tightening up the fit in a couple places (the cote pattern is cut a little generously), I sketched in the basic neckline shape (square in front, V in back), leaving it a little high to be cut down and finalized on the actual garment. Once I was happy with it, I pulled out the basting and transferred the design to be kept as a pattern for later.
With that done, I cut copies of the pieces out of the outer fabric and started assembly (handsewing with black silk thread). The only difference between the interlining and the outer fabric is that the interlining has a wider extension at center front, to be turned back with a double fold to support eyelets, while the outer fabric will have only a single fold. I've also chosen to put all selvedge edges at the waist seam, which should give a very sturdy edge for attaching the skirts.
The picture here is after I've sewn side, back and shoulder seams, and has the adjusted neckline drawn in on the front. The angle on the corners is significantly sharper than what I initially sketched. And although it looks like there's a rise at center front, in practice that is stretched down around my bust, and appears flat and level. (Presumably, ladies with smaller busts would need a less severe adjustment, if any.) The back neckline also needs to be cut down to a slightly sharper V (about an inch lower than here, which is already lower than the initial design).

With that done, I cut copies of the pieces out of the outer fabric and started assembly (handsewing with black silk thread). The only difference between the interlining and the outer fabric is that the interlining has a wider extension at center front, to be turned back with a double fold to support eyelets, while the outer fabric will have only a single fold. I've also chosen to put all selvedge edges at the waist seam, which should give a very sturdy edge for attaching the skirts.
The picture here is after I've sewn side, back and shoulder seams, and has the adjusted neckline drawn in on the front. The angle on the corners is significantly sharper than what I initially sketched. And although it looks like there's a rise at center front, in practice that is stretched down around my bust, and appears flat and level. (Presumably, ladies with smaller busts would need a less severe adjustment, if any.) The back neckline also needs to be cut down to a slightly sharper V (about an inch lower than here, which is already lower than the initial design).
23 July 2013
The Next Big Thing
It's been a while since I did a grand-scale dress project, and I've got the itch. I'm pretty excited about the next thing I'm going to be working on.
Here's the setting: 1490-1500 Flemish - contemporary to the Henry VII era in England. We've got square (or W) necklines, but still a natural, mostly unstiffened silhouette. Waistlines have dropped back down after the V-neck Burgundian gown. Sleeves are still closely fitted, but might have just a hint of a bell around the lower arm. Skirts are flat at the waist and flared to the hem, at least in the front, although there is some fullness starting to gather in the back. Hats have come back down to earth, with black lappets and veils, but are still simple compared to the gable headdress and French hoods that will come later.
Project plan: I'm starting with the middle layer, a kirtle. I've got medium-weight black worsted wool from Mood Fabrics. Bodice to be cut from my basic cote pattern, straight front with eyelets for lacing, linen canvas for some support, and it should just need a new neckline. It'll have short sleeves, and I just need to decide if I want plain gored skirt or some pleats in the back. The Tudor Tailor books mention wool lining for this layer, but I think that'll be intolerably warm for the settings where I'll be wearing this - probably a lightweight linen lining, and even then maybe only the bodice. The chemise should be pretty easy once I've got the neckline set on the kirtle. And for the outer gown I've got some lovely red wool in the stash. I might do wool with wool lining for the gown - currently leaning toward a white wool flannel or similar. Last up is headgear, I've already got suitable jewelry, and the deadline for the whole thing is next March. No problem, right?
Resources: The Tudor Tailor and Queen's Servants books are really good for this, despite being concentrated a bit later and a different country there are a lot of similarities. Amalia Zavattini has a good collection of material, especially the image bibliography, although the focus is a broader than what I'm going for here. Mary-Grace of Gatland also has some inspiration pictures.
Examples:
Guiron le Courtois, fol. 009r
Annals of Hainaut, fol. 028r
French:
Book of Hours, MS Douce 72, fol. 002v
Book of Hours, MS Douce 72, fol. 045r (David and Bathsheba)
Book of Hours, MS Douce 72, fol. 077f
Book of Hours, MS Rawl. liturg. e. 36, fol. 090v
Book of Hours, MS Buchanan e. 3, fol. 032v
Book of Hours, MS Buchanan e. 3, fol. 037r
Le roman de la rose, MS Douce 195, fol. 001r
Le roman de la rose, MS Douce 195, fol. 002r
Le roman de la rose, MS Douce 195, fol. 007r
English:
Founder's and benefactors' book of Tewkesbury abbey, MS Top. Glouc. d. 2, fol. 015r
... and that's just what I found in the Bodleian's digital collection; I'll be trawling some other collections later.
Here's the setting: 1490-1500 Flemish - contemporary to the Henry VII era in England. We've got square (or W) necklines, but still a natural, mostly unstiffened silhouette. Waistlines have dropped back down after the V-neck Burgundian gown. Sleeves are still closely fitted, but might have just a hint of a bell around the lower arm. Skirts are flat at the waist and flared to the hem, at least in the front, although there is some fullness starting to gather in the back. Hats have come back down to earth, with black lappets and veils, but are still simple compared to the gable headdress and French hoods that will come later.
Project plan: I'm starting with the middle layer, a kirtle. I've got medium-weight black worsted wool from Mood Fabrics. Bodice to be cut from my basic cote pattern, straight front with eyelets for lacing, linen canvas for some support, and it should just need a new neckline. It'll have short sleeves, and I just need to decide if I want plain gored skirt or some pleats in the back. The Tudor Tailor books mention wool lining for this layer, but I think that'll be intolerably warm for the settings where I'll be wearing this - probably a lightweight linen lining, and even then maybe only the bodice. The chemise should be pretty easy once I've got the neckline set on the kirtle. And for the outer gown I've got some lovely red wool in the stash. I might do wool with wool lining for the gown - currently leaning toward a white wool flannel or similar. Last up is headgear, I've already got suitable jewelry, and the deadline for the whole thing is next March. No problem, right?
Resources: The Tudor Tailor and Queen's Servants books are really good for this, despite being concentrated a bit later and a different country there are a lot of similarities. Amalia Zavattini has a good collection of material, especially the image bibliography, although the focus is a broader than what I'm going for here. Mary-Grace of Gatland also has some inspiration pictures.
Examples:
Guiron le Courtois, fol. 009r
Annals of Hainaut, fol. 028r
French:
Book of Hours, MS Douce 72, fol. 002v
Book of Hours, MS Douce 72, fol. 045r (David and Bathsheba)
Book of Hours, MS Douce 72, fol. 077f
Book of Hours, MS Rawl. liturg. e. 36, fol. 090v
Book of Hours, MS Buchanan e. 3, fol. 032v
Book of Hours, MS Buchanan e. 3, fol. 037r
Le roman de la rose, MS Douce 195, fol. 001r
Le roman de la rose, MS Douce 195, fol. 002r
Le roman de la rose, MS Douce 195, fol. 007r
English:
Founder's and benefactors' book of Tewkesbury abbey, MS Top. Glouc. d. 2, fol. 015r
... and that's just what I found in the Bodleian's digital collection; I'll be trawling some other collections later.
Subscribe to:
Posts (Atom)