Showing posts with label articles. Show all posts

08 June 2014

A simple late 15th c. cap

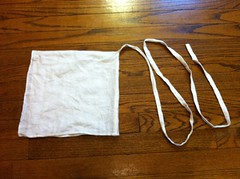
Late 15th c. cap
Late 15th c. cap
Originally uploaded by Catrijn.

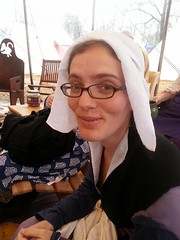
Wearing late 15th c. cap
Originally uploaded by Catrijn.
This is an incredibly simple piece of headwear - but it looks right, so why make it complicated? I think of this style as primarily 15th c., although it's probably plausible into the early 16th.
  1. Take a rectangle of fine linen, 22 by 12 inches. (These measurements fit my head - small adjustments may be necessary.)
  2. Hem all four sides.
  3. Fold in half, sewing the edge together to form the center-back seam.
  4. Attach a long tie to the point at the top of the head.
  5. There is no step 5!
To wear, secure hair close to head in braids or bun. Drape cap on head, hold tail snug to top of neck keeping front edge where you want it, wrap tail around head once, pull end through first loop in order to change directions and wrap around head the other way. Tuck end under previous wrap to secure, and flip the front edge back to frame the face.

29 May 2013

Quick, to the OR! Can this dress be saved?

The summer camping season is upon us! Which means it'd be nice to actually have a week's worth of medieval clothes. That don't involve trailing hems. Or coat-weight wool. Or any of the other lovely-yet-impractical things that I so enjoy. So it was time to dig through all the simpler stuff that hasn't been needed for a while (years, in my case), and see what still works and what doesn't.

Firmly in the "doesn't work" camp was a particolor cote in the late 14th to early 15th century style. It was not the first, but close to the first thing I made after joining the SCA, and definitely the first dress I made on this (drafted) pattern. It was never perfect, but it was serviceable. For instance, it's not lined or reinforced, even for the lacing, and so although it's in no danger of ripping out, it does pull and gap rather than laying flat. A bigger problem, though, was the shoulders. Blame archery, I guess, but my arms and shoulders are bigger than they used to be, and I basically couldn't move my arms forward with this dress the way it was.

I had saved enough scraps of both fabrics from this dress that I was pretty sure I could re-engineer the thing, so I set out on sleeve reconstruction surgery. This works better as a series of photos with commentary in the description:

The starting point: left, right
The existing fit problems: front, back
Re-cutting the armscye: start, middle, end, laid flat
Final shoulder seam adjustment: more angle
Replacement sleeve: test, pattern, front, back

Or just look at the whole set here.

I think this was a complete success, and I just have a few raw edges to finish now before it's completely done!
20 November 2007

Catrijn's most comfortable chemise

General purpose 15th c. chemise
Originally uploaded by Catrijn.
After a bit of experimentation, I've found a basic chemise design that's comfortable, simple to make, and works well with the majority of my historical wardrobe (that being clothes from 15th c. northwest Europe). If I venture to other times and places, I may need a different style of underwear, but when I just need a new chemise it's usually a copy of this one.

I use a simple geometric cut that's based on earlier tunic styles. While outerwear in this time uses increasingly complex tailoring, the rare depictions of chemises in art suggest that it continued to be a simple, loose garment. The main body panel is a large rectangle, folded over at the shoulder, with overall width slightly larger than half the bust measurement. Normally, this would produce a shoulder seam that falls down the arm, but pleats at center front and center back in the neckline pull the width together so that the shoulder seam falls on or near the natural shoulder. The sleeves are also rectangular, forming an untapered tube, with a square underarm gusset. Triangular gores in the side seams fill out the width of the chemise, with overall length being below knee to mid-calf. The neckline generally follows that of the gown it is to be worn under; mine typically have a low scoop neck, matching my 15th c. kirtles. I typically use 3-4 small box pleats at center front and center back in the neckline, but that is adjusted based on fit as I am finishing the garment.

For construction, nothing I have found beats lightweight linen, the lighter weight and finer weave, the better. I start assembly by sewing each sleeve to its gusset, then down the arm. Once each sleeve is assembled, I match the top of the sleeves to the shoulder point (mid-point on the length) of the body panel, and work down in both directions until the seams meet at the bottom of the gussets. Then I attach a gore to each side, front and back, and finally sew the side seams between the gores. Cutting the neckline is more an art than a science - start with the smallest hole that fits over your head and gradually trim away. The front needs to be lower (frequently a lot lower) than the back. The shape I end up with before I put in the pleats is a rectangle with rounded corners - there's a flat edge in front and back that will be taken up by the pleats, and a short straight section on the sides right where it hits the shoulder line. I finish the neckline with a single fold, and cover the raw edge on the inside with a length of 1/4 inch linen tape, sewn down with two rows of running stitch. This produces a very stable, neat neckline that won't roll or stretch out of shape.

17 July 2007

Catrijn's most comfortable hose

There's something wonderful about being able to pull a pattern out of the drawer, cut without making adjustments, sew it right up, and know that it's going to fit. After several years, I've finally reached that point with my hose. Which is a very good thing, as I try to replace all of my older pairs that I've worn out. Obviously, for something as close-fitting as hose, no commercial pattern can really do this - the fit really does need to be customized. But once you've got your own personal pattern, it's a glorious thing.

I've tried at least four different styles of hose patterns (and that's just the ones I remember), with various degrees of success. If you're only interested in the one I use now, skip to number 4. Note that in all cases, the leg piece is cut on the true bias.

Attempt 1 (1 piece): The first pair of hose I ever did were in an ultra-simple one-piece pattern. The one seam is down the back of the leg, under the heel and center of the foot all the way out to the toe. I think the reason I tried this approach is that it seemed like it would make fitting simpler - there's just one piece of fabric to pin on your leg while you contort yourself to try and get it to fit. In the end, though, the shortcut didn't pay off. It looks OK when you've got your toes pointed, but try to stand and walk around normally, and you'll find that there's an enormous amount of bunching around your ankle. Plus, at least in my hands, the toe area just didn't work at all.


Hose - style not recommended
Attempt 2 (2 pieces): The second style is a bit of an evolution of attempt 1. There's still one piece for the leg and the top of the foot, but instead of the fabric wrapping all the way around to a seam on the bottom, there's a separate sole piece, which is shaped like the outline of the foot. This is actually a pretty big improvement over the first attempt - the toe works, and they're substantially more comfortable. Unfortunately, there's still a lot of bunching around the ankle, and that neither looks nor feels good.


Hose pattern - recommended for hand-sewing
Attempt 3 (2 pieces): The third attempt was also a 2-piece pattern, but a slightly different one. This style, in contrast to the previous two, is historically documentable. (The citation usually given is one from an older article in Costume; the construction is good, but the article's evidence/logic for it being medieval is deeply flawed. I swear I have a better source for this style, if I can just find it...) The shape of the pieces are a bit more complex: the sole piece has extensions on each side that fold up toward the ankle bones, and these fit into a slit in the top piece, essentially forming a gusset. The main piece extends slightly under the heel before meeting the sole. This pattern is pretty comfortable, although I found that getting exactly the right shape for the pieces was a little tricky. The ankle area molds to the body nicely and doesn't bunch up. The main reason I don't use this style most of the time is that I find it goes together better by hand than by machine (and I'm usually in a hurry when I need new hose). When I have made it, I find it works best with lapped seams, rather than the more typical right-sides-together seams. Doing it this way also means you can get a double layer of fabric under the heel, pushing the fabric edges to the outside rather than having a seam directly under the heel.

Hose pattern - recommended

Attempt 4 (3 pieces): Although this pattern has the most pieces, it's not too much more difficult to assemble, and the fit is definitely worth it. The sole piece is like the one in attempt 2, an outline of the foot. The second piece covers the top of the foot. If you put just these two pieces together, it would look a bit like a slipper or mule. The third piece is of course the leg, and it also extends to the back of the heel. This is the pattern that I use almost exclusively now. Like type 3, it is documentable - and also highly comfortable. (See Crowfoot & Pritchard's reconstruction in Textiles and Clothing c.1150-c.1450; also this extant piece said to be from the Cluny Museum.) Assembly requires a little finagling, but isn't too bad. I like to use flat-fell seams, but a zig-zag stitch enclosing the raw edges works almost as well and is quite a bit easier. My construction order is to do the back of the leg seam first, forming a tube. Second, ease the upper into the front of the leg piece. Then finally, attach the sole. As usual, you'll want to check fit and do any seam finishing between each step. The sole seam is nearly impossible to flat-fell by machine, so I either do that by hand, or do a false French seam (turn the edges in towards each other, then do a straight stitch or overcast near their fold). Roll hem the top edge, and they're done.

What I haven't talked about so far is getting a pattern that fits. The pieces I've shown are what fit me, so you shouldn't expect to just enlarge them and get something that works. What I usually do is create a mock-up in muslin (calico for the Brits) - it can be pinned and sewn to check fit, and then unpicked to store as durable pattern pieces. Write and draw on it as necessary with tailor's chalk or just a regular pencil.

The easiest piece to start with is the sole - just an outline of your foot. It should be a fairly smooth outline, and a bit bigger than your foot all the way around. How much bigger depends on how much seam allowance you like - I use about 1 cm. Most people can use the same piece and its mirror image (i.e., upside down when you lay out the fabric) for left and right, but if your feet are substantially different, you may want separate left and right patterns - just be sure to label them well. The sole should be not be on the bias; the grain should run along with the length of the foot.

The second piece is the upper. At the toe, it should match your sole piece, but it then widens as you get further back on the foot. How much it widens will depend on the height of your instep. This piece should extend fairly far back on the foot - all the way back to were it joins the leg on top, and further back toward the heel at the sides. (The historical examples seem to have a more vertical than diagonal seam here, but I really like the fit of the diagonal.) How I work the shape out it is to start pinning a piece of fabric to the sole around my foot, working from the toe to the back. As you get to the ankle, start drawing in where you think the seam should go. Take your foot out, cut with a generous seam allowance, and try again, repeating as necessary. Like the sole, I usually cut the upper on the straight grain, although it is a little less crucial than the sole if it needs to be a little off grain to fit on your fabric.

The third piece, the leg, is the hardest to describe how to fit. It's not that hard to do, but much easier to demonstrate than to write about. First: it is absolutely critical that the leg be on the full bias (45 degrees). I like to iron a crease exactly on the bias in the center of my fabric, and while I'm working, I try to keep that crease straight up and down on the front of my shin. With the fabric draped over the front of your leg, start pinning down the back. Don't worry if it's not quite right at first; there's plenty of time to smooth things out later. If you've got a helper, this goes faster, but it's possible to do on your own too. You're aiming for a fit that is snug but not tight. It does need to be a bit looser in the ankle (so you can get your heel through) and in the knee (if you're doing men's hose up to the hip). Like you did with the upper, mark where the ankle seam is going to go, so you can trim away excess fabric. Take it off and look at where your pins fall - you should be able to see at least a vague outline of your leg. Start to pencil in a smooth curve, and re-pin along it. Now try to put it on again. If you can't get your foot through, widen the leg wherever it's too narrow. At this point it becomes a repeated process - move the pins in where it fits too loosely, move them out where it is too tight. After a few rounds, you'll probably want to switch to basting the seam rather than pinning it, to get a better feel for how it will actually fit.

Once you've got something you're happy with, assemble the rest of the mock-up and try it on. You'll probably need to do a bit of adjustment on the ankle seam to get the size of the top match the size of the bottom - this is normal, and keep in mind that it doesn't need to be exact. My top always comes out bigger than my sole, and I usually just pin them together as is, with the top just sticking out a bit further past the seam. Grab a ribbon or something to use as a garter to hold it up, and walk around. Try it on with your shoes. Kneel, dance, do whatever you'll want to be able to do. Is it binding or cutting in anywhere? Is it too baggy? Now's the time to make adjustments. Stick to a long basting stitch so that it's easy to take out a seam if necessary. If you've made just one, wear it inside-out on the other foot. Will symmetric hose work, or do you need separately fit rights and lefts? Keep fiddling with it until there's no doubt in your mind that it fits. If something's not working, and you can't figure it out, get other people to look at it. The point here is to not settle for something that's going to be uncomfortable.

So, at some point you are going to have a muslin mock-up that you like. Now what? Take it apart. As you go, permanently mark exactly where the seams are (pencil stays pretty well, as does pen or a fine-tip marker). Trim the seam allowances down to what you typically use, if necessary. This is your pattern, and it's ready to go. You might want to make just one or two pairs at first and wear them for a while, to double check that everything is good with the fit. Also, know the limits of your pattern. In my own experience, I can make hose from light or medium weight linen without additional fitting, but if I wanted a pair in wool, or a twill weave instead of tabby, I'd cut with a little extra ease all around, and spend some extra time doing fitting as I assembled them.

So go ahead and be brave, it doesn't take a ton of experience to do a custom-fit hose pattern, just a bit of patience, and trial-and-error. You'll notice that there was no math or geometry involved. And the payoff is huge.

06 May 2007

An apron dress pattern based on the Hedeby fragment

Let me preface this by saying that Viking-era Norse is totally outside the areas I normally research. As much as I am not an expert on the topics I normally write about, I am even less of an expert on this.

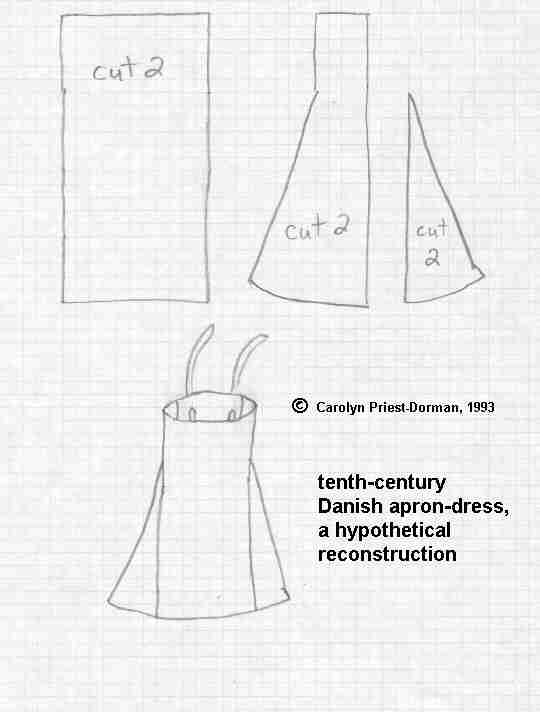
There's a nearly dizzying array of different apron dress styles and reconstruction theories. For this project, I knew that I specifically wanted one of the closed styles, with at least a little bit of tailoring, so that leaves out the wrapped, tubular, and open-front styles which I won't talk about at all. The primary evidence for this style of garment seems to come from a fragmentary find from Hedeby harbor (aka Haithabu). The find is dated approximately to the 10th century, in an area now in Germany near Denmark. The find was described by Inga Hågg in German; I do not have a copy of the original article. For reference I am using a translation found halfway down this pdf. [Note: This is a more direct link to the pertinent material.] I am working under the assumption that it does represent a fragment of an apron dress, and not some other unknown garment.

The picture for this post shows my drawing of the fragment itself (1:1 based on the measurements given in the article); it's sitting on top of the pieces I'm using for my garment, and the background is a 1 inch grid for size reference. There's a picture showing the full length here. The jagged black line represents the surviving edge of what was found; I've extended it to get a feel for the possible original shape. The main features to note are that both long edges show stitch holes along their length, and the top edge is hemmed. There's a vertical dart which was covered by a six-strand braid. Two areas of the wool are felted, apparently from wear: a band about 6 inches below the top of the piece, and the area around a hole in one corner. There's another hole where the dart meets the felted band, and the dart's widest point is here (it narrows above and below).

It's worth noting that there are a number of reconstructions based on similarly-shaped pieces (one two three four). Of these, the second and third seem to have been especially popular with re-enactors; they are essentially made from 3 Hedeby-shaped pieces cut on a fold, with or without additional gores. The first uses shaped fragments for it's side panels with rectangular front and back panels. The fourth uses 4 similarly shaped panels, but with front and back pieces significantly wider than those at the sides.

One of the biggest problems with interpreting the Hedeby fragment is its size. I don't just mean it's size as a relative to the entire garment (although it's not huge), but it's actual measurements. The top edge is only about 6 inches long. If one assumes that the garment is made of identical panels, 6 are needed to fit an approximately average-sized woman. Although I'm not at all sure, I suspect that this is the origin of the patterns that use three-fold symmetry, something that has always nagged me a bit. As far as I can tell, while two- and four-fold symmetry seem very common in early clothing construction, three-fold is extremely rare - I can't think of any other example. That's not to say it's impossible, but just that it strikes me as a weird. If, on the other hand, one assumes variable size panels and that the Hedeby fragment represents one of the smaller side panels, positioning of the hole which is thought to be a strap attachment point becomes practically under the arm.

The other point about size with regards to the fragment is its vertical measurement. As I mentioned above, the band of wear which almost certainly represents a belt is a mere six inches below the top of the piece. I am aware that very little belt hardware has been found in connection with the graves of Norse women, but a belt may have been simply tied, or fastened with hardware made of a material that wasn't preserved (perhaps bone or antler?). The widest part of the dart is also at this point, which supports my belief that this line represents the natural waist of the wearer.

Now, I don't have a particularly long torso (somewhat short, if anything), but six inches above my natural waist is still below my bust line. An apron dress made to the measurements of the fragment would have to sit below my chest, with brooches forming a metal Brunhilda-bra. Aside thinking that this would be absurd, I'll note that brooches in grave finds seem to have been positioned higher than that. Even if we propose that this represents the back, and the front piece would come higher, it is still very low cut and would require long straps. Practical considerations seem to dictate that the upper edge of the apron dress should be higher, with shorter straps, to help it stay up.

All of this is a very long way to get to the point of my new, out-on-a-limb theory: that the Hedeby fragment may represent not the dress of an adult woman, but a young girl. This would account for the apparently small size both in width and height of the piece - 4 identical panels of this size would be an appropriate size for a child, I think (note that I don't have any children to test this out on). This interpretation also allows the decorated dart seams to be in the front rather than the back. The placement of the strap does still seem to be a bit too far out to the side, but I've decided to test my theory by scaling the pieces up to my size (about 60-70% larger) and testing where straps would need to be.

So, in a nutshell, my pattern is 4 panels shaped similarly to the Hedeby fragment, but significantly larger, with straight seams at center front and center back, and shaped side seams. In my mock-up, I found that the flare at the side seam gave sufficient room at the hips and hem, and no additional gore pieces were needed. This can be cut efficiently from narrow cloth if the length of the garment is taken to be the entire width of the fabric (the top edge of the find is a selvedge, and the grain runs horizontally, rather than vertically). My dress would have required a fabric width of 34 inches for its below-knee length; I don't have any information on available fabric widths for this time - a narrow 22 inch fabric would produce a mid-thigh length garment on me, or a longer dress on a child.