Combine friends, projects, and learning new things, and you might end up with an awesome weekend plus a cool new hat.
A friend of mine has recently been felting a lot of hats, and after watching her work on a few that were in different stages of finishing, I wanted to do one but couldn't figure out what style to go with. Once we realized we had a block that would work for the little pillbox/very short hennin type that would go with my transitional gown project, though, that had to happen.
We started with unspun roving piled in layers around a waterproof pattern that provided a resist. After a lot of soapy water, agitation, reheating, and rolling, it shrank down to this impressively thick hat blank.
After letting it dry overnight, I ironed it to get a nice smooth surface on the felt, and then we steamed it and aggressively stretched it to get it over the hat block in the picture. (The block is the middle and lower portions of one designed for a fez). It's not completely done - the bottom edge needs to be trimmed to the correct length, and it will probably also need some stiffening (wire and/or thinned glue, maybe?).
I can hardly wait to get this finished; it's going to be fabulous!
Showing posts with label hats. Show all posts
Showing posts with label hats. Show all posts
27 January 2014


07 January 2014
The very pet-able hennin
The last project started in 2013 is the first one finished in 2014.
My first hennin was of buckram and wire construction. I've been pretty happy with it, and I've used it at least occasionally for years, but it was starting to get a bit beat up. So I decided to make a new one, and try a different construction method.
The structure of this one is made of two layers of heavy (but unstiffened) linen, with channels filled with reed. It collapses flat when not being worn, so it's pretty resistant to being crushed. The outer fabric is a rather luscious velvet (hence the pet-able hennin). I'd hoped to have enough of the velvet to do at least a band of drape for the front, but sadly there wasn't an appropriately shaped piece.
I also made a round bonnet to go with it, working from the pattern in The Queen's Servants, which worked really well.
The hat worked pretty well in practice, but I need to work in securing my understructure to keep everything steady. My black band under the hood kept slipping back, which threw everything off, and I think I need to pin the hat down to the hood, since the base of it isn't quite big enough to really grip my head. Overall, though, I'd rate it a success.

My first hennin was of buckram and wire construction. I've been pretty happy with it, and I've used it at least occasionally for years, but it was starting to get a bit beat up. So I decided to make a new one, and try a different construction method.
The structure of this one is made of two layers of heavy (but unstiffened) linen, with channels filled with reed. It collapses flat when not being worn, so it's pretty resistant to being crushed. The outer fabric is a rather luscious velvet (hence the pet-able hennin). I'd hoped to have enough of the velvet to do at least a band of drape for the front, but sadly there wasn't an appropriately shaped piece.
I also made a round bonnet to go with it, working from the pattern in The Queen's Servants, which worked really well.
The hat worked pretty well in practice, but I need to work in securing my understructure to keep everything steady. My black band under the hood kept slipping back, which threw everything off, and I think I need to pin the hat down to the hood, since the base of it isn't quite big enough to really grip my head. Overall, though, I'd rate it a success.
12 January 2009
Finished 'fleur-de-lys' gown with hat

I really had a great time at 12th Night in this outfit; the hat especially is just so much fun (and other people seemed to think so too, which always makes my day).
Final wrap-up on the project:
The dress I am mostly happy with, although it's been a long road with some serious doubts along the way. It doesn't look quite as nice as I originally imagined in my head, but it does still look good. The fabric, a rare find I just couldn't pass up, has a bit too much body to it to drape quite right. Coupled with my decision to go with a pullover style and skip a long opening, and you can't get the body-skimming fit and soft folds that the inspiration has. If I was doing this dress again, I'd either pick a fabric with a softer hand (let me know if you find any wool brocade, mmmkay?), or I'd put an invisible zipper in one of the side seams under the arm. Plausibly, the original might have been laced (front, back, or side, there's no way to know), but I just couldn't picture it, and the thought of putting stress-bearing eyelets into satin makes me want to run screaming.
The hat I'm more positive on; essentially my only reservation is that it's a little larger than I intended. I failed to account for the extra volume taken up by the covering of feathers, which was just a silly oversight. So it's even more over-the-top, and I can hardly be sad about that. My technique at sewing feathers has improved quite a bit too - it's harder to do on a solid base like this than a flat hat like the Tellebarrett where you can work from both the top and the bottom.
07 January 2009
Feathered hat progress
There's nothing like a deadline to get you moving on a project. I really want this hat finished for 12th Night, which is this weekend, as it will really make or break the outfit. It's looking good from the top, but the side shows the truth. And yes, it will be completely covered in feathers, aside from the inside band. Actually, I'm a bit further along, since I took these pictures before working on it last night. The bottom edge is now covered in as well, and I'm just starting to work on filling in the middle, overlapping feathers so the change in direction isn't so obvious. (For comfort, I've kept the stiff root end of the quills always away from the head opening, which means that the top and the bottom have feathers going in different directions.)
The large string of beads from the original inspiration will probably be a miss for this weekend because of time constraints, although I would still like to make it. I do, however, have a new pair of appropriate shoes that I got for Christmas, which makes me very happy.

The large string of beads from the original inspiration will probably be a miss for this weekend because of time constraints, although I would still like to make it. I do, however, have a new pair of appropriate shoes that I got for Christmas, which makes me very happy.
02 December 2008
Hats of Unusual Size
Very few historical outfits are complete without the appropriate headgear. Even when hats or veils aren't particularly called for, the right hairstyle can really put the finishing touch on an ensemble. And since I'm primarily working in the 15th century, I have a delightful variety of outlandish hats to choose from.
The hat I am working on at the moment will accompany the fleur-de-lys gown in the style from the Très Riches Heures. At its core, its really just a padded roll, albeit a very large one and extensively decorated. Because of this, it doesn't call for the wires or stiffening usually associated with hatmaking - just fabric, stuffing, and ordinary sewing tools.
Very narrow padded rolls can be made with just a straight tube of fabric, particularly if it is cut on the bias. As it is bent around the head, the inner portion of the ring automatically forms small folds. However, as they become larger, it becomes necessary to shape the fabric for the roll, as the folding and bunching would become excessive. In making my roll, I still started with a straight rectangle of fabric. I decided that the lengthwise seam would go along the outer edge, and then I put tucks in at even intervals such that the center line of the piece (which becomes the head opening, the smallest point) was much shorter than the two edges. If you're having trouble picturing that, here's how it works in practice: fold the fabric cross-wise at the point you want to put in the tuck. Stitch from edge to edge in a sideways V shape: very close to the fold at each end, and farther away at the center line. Carefully stitch the long edge, leaving an opening so that you don't form a donut which can't be turned rightside out. Stuff, pin or baste the opening closed, and try on. It may require several tests to get it right - expect the tucks to become more severe to shrink the head opening. It's also easy to add additional pieces to the end if the overall size is not big enough; just shape the seam like the other tucks. Starting with a long arc (2, really, for top and bottom) rather than a straight piece would probably reduce the need for tucks, but would also require being close to the correct size and shape from the first cut, as it would be more difficult to adjust.
I like a soft wool for the outer material; it has some give and provides a smooth silhouette. Many people go for cotton, but it can produce sharp creases and puckers which I think detract from the overall look. As for stuffing, while unspun wool seems the most likely candidate for an authentic material, polyester fiberfill is cheap, light, and readily available if you're working on a deadline. It is worth spending a little bit more to get the extra soft stuff, though. Keep in mind that it does have a tendency to poke through most materials if they are not very tightly woven - your particular design will dictate whether this will be a problem or not. Mine will be entirely hidden under the embellishment, so I'm not worried.
The hat I am working on at the moment will accompany the fleur-de-lys gown in the style from the Très Riches Heures. At its core, its really just a padded roll, albeit a very large one and extensively decorated. Because of this, it doesn't call for the wires or stiffening usually associated with hatmaking - just fabric, stuffing, and ordinary sewing tools.
Very narrow padded rolls can be made with just a straight tube of fabric, particularly if it is cut on the bias. As it is bent around the head, the inner portion of the ring automatically forms small folds. However, as they become larger, it becomes necessary to shape the fabric for the roll, as the folding and bunching would become excessive. In making my roll, I still started with a straight rectangle of fabric. I decided that the lengthwise seam would go along the outer edge, and then I put tucks in at even intervals such that the center line of the piece (which becomes the head opening, the smallest point) was much shorter than the two edges. If you're having trouble picturing that, here's how it works in practice: fold the fabric cross-wise at the point you want to put in the tuck. Stitch from edge to edge in a sideways V shape: very close to the fold at each end, and farther away at the center line. Carefully stitch the long edge, leaving an opening so that you don't form a donut which can't be turned rightside out. Stuff, pin or baste the opening closed, and try on. It may require several tests to get it right - expect the tucks to become more severe to shrink the head opening. It's also easy to add additional pieces to the end if the overall size is not big enough; just shape the seam like the other tucks. Starting with a long arc (2, really, for top and bottom) rather than a straight piece would probably reduce the need for tucks, but would also require being close to the correct size and shape from the first cut, as it would be more difficult to adjust.
I like a soft wool for the outer material; it has some give and provides a smooth silhouette. Many people go for cotton, but it can produce sharp creases and puckers which I think detract from the overall look. As for stuffing, while unspun wool seems the most likely candidate for an authentic material, polyester fiberfill is cheap, light, and readily available if you're working on a deadline. It is worth spending a little bit more to get the extra soft stuff, though. Keep in mind that it does have a tendency to poke through most materials if they are not very tightly woven - your particular design will dictate whether this will be a problem or not. Mine will be entirely hidden under the embellishment, so I'm not worried.
30 August 2007
A hat diary in one post: 16th c. Persian tiara
I've slowly been amassing enough garments to have one complete ensemble for dressing in 16th c. Persian style. One of the last pieces is appropriate headgear, specifically this hat/tiara from Duchess Roxane Farabi's site. I've largely followed the outline she gives for creating the style, with some minor changes.
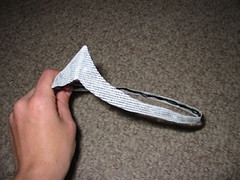 I started by twisting wire to create a frame for the overall shape of the piece, fitting it to my head as I went along. This essentially looked like a wire circlet with a single point in front. I then glued a piece of buckram around the outside to create a smoother silhouette. A picture of the back gives a better view of what the wire frame looked like.
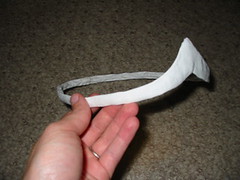 I then covered the buckram and wire frame in a double layer of lightweight white linen. It is secured by simply gluing it down on the inside of the band. Around the skinny portions of the hat, the fabric wrapped around from the front is plenty to cover the inside band; but on the point I've added an extra piece of fabric to completely cover up the wire.
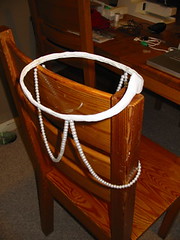 For the dangling strands, I've used glass bead faux pearls; they're strung on the fishing-line-like stuff that they came on. The front strand is a bit longer than the side ones so that it's long enough to hang below my chin. I glued the ends of the strands directly to the inside of the hat, and that's one thing I might do differently. Because the stringing material doesn't absorb glue at all, it had to be held in place carefully for quite a long time to get it to set.
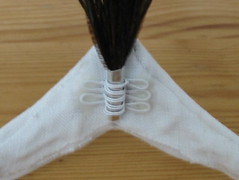 The feathers for the spray are known as peacock herl. They're sewn into strands and sold as yard goods; I bought just an inch and used less than a quarter of it. (Although specialty feather places do sell them, unless you need a large quantity, they're more easily available from places that sell supplies for making fly fishing lures.) To form the spray, I wrapped and knotted thread around the base of my feathers to form a secure bundle. I then took a small piece of sheet aluminum and used pliers to coil it around the bundle, forming a solid base. Once the base was formed, I wrapped wire around it to mold a holder of exactly the right size, with some extra loops to provide a surface to glue to the hat.
So that's pretty much it - fun with tacky glue and some random craft supplies. This picture is of the state of my Persian clothes shortly after the hat was originally finished.
 I started by twisting wire to create a frame for the overall shape of the piece, fitting it to my head as I went along. This essentially looked like a wire circlet with a single point in front. I then glued a piece of buckram around the outside to create a smoother silhouette. A picture of the back gives a better view of what the wire frame looked like.
 I then covered the buckram and wire frame in a double layer of lightweight white linen. It is secured by simply gluing it down on the inside of the band. Around the skinny portions of the hat, the fabric wrapped around from the front is plenty to cover the inside band; but on the point I've added an extra piece of fabric to completely cover up the wire.
 For the dangling strands, I've used glass bead faux pearls; they're strung on the fishing-line-like stuff that they came on. The front strand is a bit longer than the side ones so that it's long enough to hang below my chin. I glued the ends of the strands directly to the inside of the hat, and that's one thing I might do differently. Because the stringing material doesn't absorb glue at all, it had to be held in place carefully for quite a long time to get it to set.
 The feathers for the spray are known as peacock herl. They're sewn into strands and sold as yard goods; I bought just an inch and used less than a quarter of it. (Although specialty feather places do sell them, unless you need a large quantity, they're more easily available from places that sell supplies for making fly fishing lures.) To form the spray, I wrapped and knotted thread around the base of my feathers to form a secure bundle. I then took a small piece of sheet aluminum and used pliers to coil it around the bundle, forming a solid base. Once the base was formed, I wrapped wire around it to mold a holder of exactly the right size, with some extra loops to provide a surface to glue to the hat.
So that's pretty much it - fun with tacky glue and some random craft supplies. This picture is of the state of my Persian clothes shortly after the hat was originally finished.
Subscribe to:
Posts (Atom)