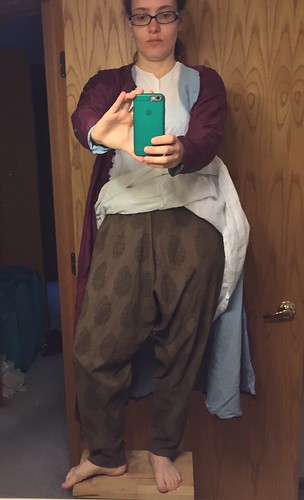
For the brown challenge, I made a pair of salwar to wear with my 16th c. Persian clothes. They are made of a lightweight, block-printed cotton from India that was originally cream with black, which I then overdyed to brown. The pattern is incredibly simple: two tapered tubes. They're held up by a separate cord or thin belt. The cut is the same as the closest extant items I'm aware of, which are Ottoman Turkish pants from the same time period. Those ones were very high status, and made from brocades that look fairly stiff. Persian silhouettes are generally softer and more fluid that Turkish ones, and cotton and block printing were both available. I choose this print because it preserves at large scale the design aesthetic - large individual motifs, well separated by blank space, and largely symmetrical. The motif itself is probably a bit too complex, but is not glaringly bad.
The Challenge: September - Brown
Fabric: 2.5 yds block-printed cotton
Pattern: none
Year: 16th c. Persian
How historically accurate is it:Matches (limited) information - materials speculative.
Total cost: $40.
Showing posts with label Persian. Show all posts
Showing posts with label Persian. Show all posts
02 October 2015


11 April 2014
The previously-promised Persian braid case
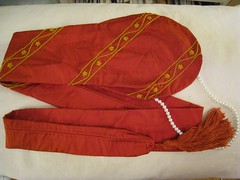
Here are some pictures of the (mostly) finished braidcase. This was almost entirely a stash project. The main fabric is a red silk - it is medium weight with a strong hand, somewhat similar to a dupioni but with very few slubs. The tassel is also silk, and although not an exact color match it is close. The yarn was the loom waste from a weaving project, and I've been saving the short thrums for a long time but they were perfect for this! The (fake, plastic) pearls are recycled from my old persian hat, which I'd like to redo anyway. The only thing new was the silk embroidery thread. I picked a simple, repetitive band pattern done in outline stitch and lazy daisies. It is probably not terribly authentic, but I think it has approximately the right aesthetic. I ran out of time before I wanted to wear it, so only the first three bands at the top are done, but eventually I want to extend the design along the entire length. (The finishing of the tube part was done in a way to make it easy to un-do later.)

04 April 2014
Upping my game, Persian style
One of my long-term projects has been to slowly rehab and improve my Persian clothes. I made my first set many years ago, essentially on a whim, and entirely from fabric out of the stash. It's a lot of fun to wear something completely different than I normally do (and to hang out with my awesome Persian-persona friends), but it really wasn't up to my normal standards. So one of my goals has been to fix, replace, and add pieces for gradual improvement.
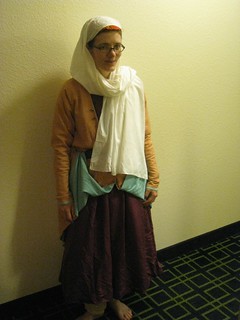
Here, I've swapped out my first coat layer for the new silk one I made this winter, although much of the interesting detail is hidden. (Please forgive the low-light hotel room photo) You can also glimpse just the tiniest bit of my braid case peeking out under the veil - a teaser for another post hopefully appearing soon. Next up? I need more bling! I definitely need to add jewelry, and I think my next coat should be a brocade.
Here, I've swapped out my first coat layer for the new silk one I made this winter, although much of the interesting detail is hidden. (Please forgive the low-light hotel room photo) You can also glimpse just the tiniest bit of my braid case peeking out under the veil - a teaser for another post hopefully appearing soon. Next up? I need more bling! I definitely need to add jewelry, and I think my next coat should be a brocade.
21 February 2014
Button loops and bead buttons for the Persian coat
Last weekend, I finally got through the last bit of finishing for my new coat, which was the closures for the front opening. I used small round glass beads for buttons, building a short thread shank right on the front edge. Then I made a finger-loop braid using silk sewing thread and the first braid described on Phiala's string page.
I attached the braid to the opposite edge using a whip stitch that alternately pierced the braid and the fabric. At each point where I needed a loop, I took a few extra stitches to secure the braid, made a loop and took two stitches in place going around the braid rather than piercing it. This left the loop temporarily adjustable and allowed me to tighten to just the right size for the buttons. Once the size was set, I took several stitches in place, piercing both layers of braid at the crossover, before moving down the edge toward the next one.
The end result is a very delicate, fine finish, and it works really well.

I attached the braid to the opposite edge using a whip stitch that alternately pierced the braid and the fabric. At each point where I needed a loop, I took a few extra stitches to secure the braid, made a loop and took two stitches in place going around the braid rather than piercing it. This left the loop temporarily adjustable and allowed me to tighten to just the right size for the buttons. Once the size was set, I took several stitches in place, piercing both layers of braid at the crossover, before moving down the edge toward the next one.
The end result is a very delicate, fine finish, and it works really well.
03 September 2007
16th c. Persian ensemble, with finished hat
This is my 16th c. Persian ensemble, with the previously blogged hat. I've got a deceptive amount of clothing on here: both visible coats are fully lined, plus the chemise-type layer and pants beneath. So it's not well suited to hot weather, yet somehow I always seem to wear it in the summertime anyway. I do like this outfit a lot; it feels very comfortable and relaxed.
My pirahan (chemise) is white lightweight linen, and the salwar (pants) are a soft, drapey linen in pale yellow. (At least, it was supposed to be linen; it feels suspiciously like a blend, though.) My inner coat is white cotton lined with a purple linen/cotton blend. The outer coat is definitely the nicest piece - peach silk twill, lined with a turquoise linen/cotton blend. All of these are based on the patterns at Roxane Farabi's website. The tiara secures a small, rectangular linen veil. I frequently also drape a my largest linen veil as a chador, but the heat and wind on this particular day made it beyond impractical.

My pirahan (chemise) is white lightweight linen, and the salwar (pants) are a soft, drapey linen in pale yellow. (At least, it was supposed to be linen; it feels suspiciously like a blend, though.) My inner coat is white cotton lined with a purple linen/cotton blend. The outer coat is definitely the nicest piece - peach silk twill, lined with a turquoise linen/cotton blend. All of these are based on the patterns at Roxane Farabi's website. The tiara secures a small, rectangular linen veil. I frequently also drape a my largest linen veil as a chador, but the heat and wind on this particular day made it beyond impractical.
30 August 2007
A hat diary in one post: 16th c. Persian tiara
I've slowly been amassing enough garments to have one complete ensemble for dressing in 16th c. Persian style. One of the last pieces is appropriate headgear, specifically this hat/tiara from Duchess Roxane Farabi's site. I've largely followed the outline she gives for creating the style, with some minor changes.
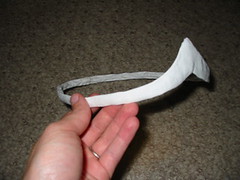
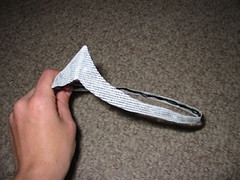 I started by twisting wire to create a frame for the overall shape of the piece, fitting it to my head as I went along. This essentially looked like a wire circlet with a single point in front. I then glued a piece of buckram around the outside to create a smoother silhouette. A picture of the back gives a better view of what the wire frame looked like.
 I then covered the buckram and wire frame in a double layer of lightweight white linen. It is secured by simply gluing it down on the inside of the band. Around the skinny portions of the hat, the fabric wrapped around from the front is plenty to cover the inside band; but on the point I've added an extra piece of fabric to completely cover up the wire.
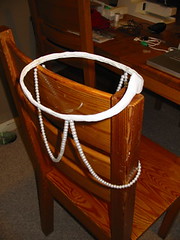 For the dangling strands, I've used glass bead faux pearls; they're strung on the fishing-line-like stuff that they came on. The front strand is a bit longer than the side ones so that it's long enough to hang below my chin. I glued the ends of the strands directly to the inside of the hat, and that's one thing I might do differently. Because the stringing material doesn't absorb glue at all, it had to be held in place carefully for quite a long time to get it to set.
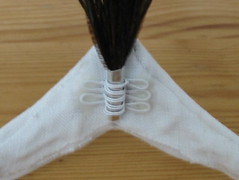 The feathers for the spray are known as peacock herl. They're sewn into strands and sold as yard goods; I bought just an inch and used less than a quarter of it. (Although specialty feather places do sell them, unless you need a large quantity, they're more easily available from places that sell supplies for making fly fishing lures.) To form the spray, I wrapped and knotted thread around the base of my feathers to form a secure bundle. I then took a small piece of sheet aluminum and used pliers to coil it around the bundle, forming a solid base. Once the base was formed, I wrapped wire around it to mold a holder of exactly the right size, with some extra loops to provide a surface to glue to the hat.
So that's pretty much it - fun with tacky glue and some random craft supplies. This picture is of the state of my Persian clothes shortly after the hat was originally finished.
 I started by twisting wire to create a frame for the overall shape of the piece, fitting it to my head as I went along. This essentially looked like a wire circlet with a single point in front. I then glued a piece of buckram around the outside to create a smoother silhouette. A picture of the back gives a better view of what the wire frame looked like.
 I then covered the buckram and wire frame in a double layer of lightweight white linen. It is secured by simply gluing it down on the inside of the band. Around the skinny portions of the hat, the fabric wrapped around from the front is plenty to cover the inside band; but on the point I've added an extra piece of fabric to completely cover up the wire.
 For the dangling strands, I've used glass bead faux pearls; they're strung on the fishing-line-like stuff that they came on. The front strand is a bit longer than the side ones so that it's long enough to hang below my chin. I glued the ends of the strands directly to the inside of the hat, and that's one thing I might do differently. Because the stringing material doesn't absorb glue at all, it had to be held in place carefully for quite a long time to get it to set.
 The feathers for the spray are known as peacock herl. They're sewn into strands and sold as yard goods; I bought just an inch and used less than a quarter of it. (Although specialty feather places do sell them, unless you need a large quantity, they're more easily available from places that sell supplies for making fly fishing lures.) To form the spray, I wrapped and knotted thread around the base of my feathers to form a secure bundle. I then took a small piece of sheet aluminum and used pliers to coil it around the bundle, forming a solid base. Once the base was formed, I wrapped wire around it to mold a holder of exactly the right size, with some extra loops to provide a surface to glue to the hat.
So that's pretty much it - fun with tacky glue and some random craft supplies. This picture is of the state of my Persian clothes shortly after the hat was originally finished.
Subscribe to:
Posts (Atom)