Two years ago I said: "I'm learning a lot about late period tailoring, construction and finishing. But there have definitely been some wrinkles. So, I guess, go in with some caution, and if something doesn't seem right to your purposes, you don't have to just trust it."
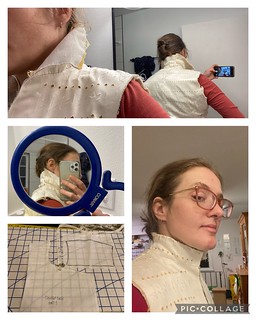
So yeah! The straight front women's doublet in MMv2 has a collar drafted to height L-o. Maybe that's just perfect for the style you're going for - tall, rolled over, probably worn open. If you want a straight, closed collar that fits under your chin, you can bring that whole thing down to L-d. (and still use one dedo for tapering the front). Really. Photo collage shows before and after.
Anyway, if you want to see actual content from me, you'll have more luck over at @catrijnmakes on Instagram.
Showing posts with label 16th c.. Show all posts
Showing posts with label 16th c.. Show all posts
06 December 2022


31 January 2021
Please do not mind the zombie post
So, what could get me to write a new post for a dead blog? Did you guess irritation/frustration?
I'm very slowly working on a project to extend my wardrobe into the end of SCA period, around 1580-1600. I'm primarily using M. Gnagy's Modern Maker series (books and videos) for patterning and construction, with portrait references for stylistic details. The kirtle continues to be a major workhorse of a woman's outfit, so that's where I started. It's my first time using the Bara system.
If you're not familiar, the Bara system, used in the late Spanish tailors' books, is a proportional drafting system. The units of measure are subdivided fractions of body measurements like chest, waist, and height. Starting with a tape or string of the correct total measure, it is marked down in half, thirds, quarters, sixths, eighths, and even smaller divisions. It essentially shifts the math to a different point in the process. If I need to mark 1/4 of a chest measurement of 38in or 96cm, in a modern system, I'd do the division, grab a single tape measure in standard units, and mark at 9.5in or 24cm. In the Bara system, I pick up the measure labeled 38in, and mark at the line marked 1/4 (Q). It's an interesting way of thinking. I like that this makes the old pattern manuals more interpretable and accessible. That said, I've made more mistakes using this system than I ever have in any other kind of drafting. Two tips from my mistakes. First, a tape that has any stretch or give is NOT your friend. Cotton twill tape? Right out. Try for tabby woven, and artificial fibers are probably better. Who'd think I'd ever say that. Second, get yourself some alphabet charms, put them on safety pins, and attach them to the tapes in use. I'm not even kidding. I've made so many errors just by grabbing the wrong one.
The other thing to comment on is the drafts themselves. I don't know how much of the problem comes from each of various sources - no draft is truly universal, using Spanish patterns for a Dutch style, or inherent issues. My kirtle skirt I ended up doing completely twice (and actually cutting a third time) because the result of the draft was not what I wanted or expected. If you're using the pattern in v.2 p.162-163 and want the look of p.175 or 177, increase the waist measurents significantly (I believe I ended at W-QQQ for both front and back), and you may need to increase the bottom width to keep proportion, perhaps L-BM. The second part is to closely observe the length between side and center. Each side is drafted to L-BM, and so is the center... until you drop the waist curve. Now the front and back length is significantly shorter. Maybe this is just right for wearing over the bum pad? But for my look, it just gave me an uneven hem that was an absolute pain to fix. If doing it again, I'd lengthen the bottom as well when drawing in the waist curve. For my still in the drafting stage doublet, the initial draft fit pretty well, except having a very high waist cut around sides and back. I'm lengthening by 1.5-2" to hit the waist line of my kirtle, which is still slightly above my natural waist. I'm not tall, I'm petite; I don't think of myself as having an unusually long torso.
I don't want it to come across like I'm bashing the Modern Maker. I'm learning a lot about late period tailoring, construction and finishing. But there have definitely been some wrinkles. So, I guess, go in with some caution, and if something doesn't seem right to your purposes, you don't have to just trust it. I'm not entirely happy with this kirtle, but I'm just so DONE with it and I'm moving on.

I'm very slowly working on a project to extend my wardrobe into the end of SCA period, around 1580-1600. I'm primarily using M. Gnagy's Modern Maker series (books and videos) for patterning and construction, with portrait references for stylistic details. The kirtle continues to be a major workhorse of a woman's outfit, so that's where I started. It's my first time using the Bara system.
If you're not familiar, the Bara system, used in the late Spanish tailors' books, is a proportional drafting system. The units of measure are subdivided fractions of body measurements like chest, waist, and height. Starting with a tape or string of the correct total measure, it is marked down in half, thirds, quarters, sixths, eighths, and even smaller divisions. It essentially shifts the math to a different point in the process. If I need to mark 1/4 of a chest measurement of 38in or 96cm, in a modern system, I'd do the division, grab a single tape measure in standard units, and mark at 9.5in or 24cm. In the Bara system, I pick up the measure labeled 38in, and mark at the line marked 1/4 (Q). It's an interesting way of thinking. I like that this makes the old pattern manuals more interpretable and accessible. That said, I've made more mistakes using this system than I ever have in any other kind of drafting. Two tips from my mistakes. First, a tape that has any stretch or give is NOT your friend. Cotton twill tape? Right out. Try for tabby woven, and artificial fibers are probably better. Who'd think I'd ever say that. Second, get yourself some alphabet charms, put them on safety pins, and attach them to the tapes in use. I'm not even kidding. I've made so many errors just by grabbing the wrong one.
The other thing to comment on is the drafts themselves. I don't know how much of the problem comes from each of various sources - no draft is truly universal, using Spanish patterns for a Dutch style, or inherent issues. My kirtle skirt I ended up doing completely twice (and actually cutting a third time) because the result of the draft was not what I wanted or expected. If you're using the pattern in v.2 p.162-163 and want the look of p.175 or 177, increase the waist measurents significantly (I believe I ended at W-QQQ for both front and back), and you may need to increase the bottom width to keep proportion, perhaps L-BM. The second part is to closely observe the length between side and center. Each side is drafted to L-BM, and so is the center... until you drop the waist curve. Now the front and back length is significantly shorter. Maybe this is just right for wearing over the bum pad? But for my look, it just gave me an uneven hem that was an absolute pain to fix. If doing it again, I'd lengthen the bottom as well when drawing in the waist curve. For my still in the drafting stage doublet, the initial draft fit pretty well, except having a very high waist cut around sides and back. I'm lengthening by 1.5-2" to hit the waist line of my kirtle, which is still slightly above my natural waist. I'm not tall, I'm petite; I don't think of myself as having an unusually long torso.
I don't want it to come across like I'm bashing the Modern Maker. I'm learning a lot about late period tailoring, construction and finishing. But there have definitely been some wrinkles. So, I guess, go in with some caution, and if something doesn't seem right to your purposes, you don't have to just trust it. I'm not entirely happy with this kirtle, but I'm just so DONE with it and I'm moving on.
20 November 2013
Transitional gown project progress
I got the black kirtle finished enough to wear last weekend, and I'm really happy with it. Of course, I completely forgot to get a picture of how it turned out. I had been hoping that one of our roving photographers caught me, but so far I've only managed to find myself in the background. So that's mostly done - hemmed and seams finished. The sleeves are still a bit funky, might rip them out and start over, and I remain undecided on whether to add a lining for the bodice. I've moved on to a chemise with a matching neckline, which should go relatively quickly.
In the meantime, here are some roughly contemporary portraits:
Portrait of a Lady with a Carnation, Master of the Legend of Saint Ursula
Portrait of a Donatrix, Lucas Cranach the Elder
Portrait of a Female Donor, Jan Provost
And of course Portrait of Margaret of Austria, Jean Hey (called Master of Moulins)
In the meantime, here are some roughly contemporary portraits:
Portrait of a Lady with a Carnation, Master of the Legend of Saint Ursula
Portrait of a Donatrix, Lucas Cranach the Elder
Portrait of a Female Donor, Jan Provost
And of course Portrait of Margaret of Austria, Jean Hey (called Master of Moulins)
29 June 2010
Accessories: Partlet Edition
I recently finished a simple partlet that I hope to wear with my Kampfrau dress. It's a lightweight coating-style black wool, lined with lightweight white linen because I can be very sensitive to wool around my neck. I'm not really going to talk about the design of it, since I used someone else's pattern rather than doing my own research, but there are a couple finishing details that are worth mentioning.
The first is that the linen ties that are used for the side fastenings extend under the hem all the way around the bottom edge, both front and back. This should reduce the danger of stress on the corners pulling the partlet out of shape, since the tabby tape is quite sturdy and unlikely to stretch.
The second thing is the way that the lining is attached. With a garment like this, you really don't want the lining to shift around or peek out at the sides, which can happen with a simple bag lining. After assembling the outer fabric, I attached the lining pieces one-by-one, directly to the outer fabric. To get them lined up correctly, start by laying the matching pieces out flat, wrong sides together. Pin outwards from the center, allowing the edges to be uneven if matching them would cause the lining to pucker. Once you've pinned to within a couple centimeters of the edge, then you can turn the two raw edges toward each other and pin together, and any slack is taken up by simply allowing it to have a deeper seam allowance. You do this all around the edges, and also possibly at the internal seams, but I choose to leave the seams until both lining pieces were in, and then sew those pieces together while simultaneously catching them down to the seam allowances from the outer fabric. There's a photo of the stitches I used, but I should note that they're just what seemed to work at the time, rather than being especially documentable.

The first is that the linen ties that are used for the side fastenings extend under the hem all the way around the bottom edge, both front and back. This should reduce the danger of stress on the corners pulling the partlet out of shape, since the tabby tape is quite sturdy and unlikely to stretch.
The second thing is the way that the lining is attached. With a garment like this, you really don't want the lining to shift around or peek out at the sides, which can happen with a simple bag lining. After assembling the outer fabric, I attached the lining pieces one-by-one, directly to the outer fabric. To get them lined up correctly, start by laying the matching pieces out flat, wrong sides together. Pin outwards from the center, allowing the edges to be uneven if matching them would cause the lining to pucker. Once you've pinned to within a couple centimeters of the edge, then you can turn the two raw edges toward each other and pin together, and any slack is taken up by simply allowing it to have a deeper seam allowance. You do this all around the edges, and also possibly at the internal seams, but I choose to leave the seams until both lining pieces were in, and then sew those pieces together while simultaneously catching them down to the seam allowances from the outer fabric. There's a photo of the stitches I used, but I should note that they're just what seemed to work at the time, rather than being especially documentable.
03 September 2007
16th c. Persian ensemble, with finished hat
This is my 16th c. Persian ensemble, with the previously blogged hat. I've got a deceptive amount of clothing on here: both visible coats are fully lined, plus the chemise-type layer and pants beneath. So it's not well suited to hot weather, yet somehow I always seem to wear it in the summertime anyway. I do like this outfit a lot; it feels very comfortable and relaxed.
My pirahan (chemise) is white lightweight linen, and the salwar (pants) are a soft, drapey linen in pale yellow. (At least, it was supposed to be linen; it feels suspiciously like a blend, though.) My inner coat is white cotton lined with a purple linen/cotton blend. The outer coat is definitely the nicest piece - peach silk twill, lined with a turquoise linen/cotton blend. All of these are based on the patterns at Roxane Farabi's website. The tiara secures a small, rectangular linen veil. I frequently also drape a my largest linen veil as a chador, but the heat and wind on this particular day made it beyond impractical.

My pirahan (chemise) is white lightweight linen, and the salwar (pants) are a soft, drapey linen in pale yellow. (At least, it was supposed to be linen; it feels suspiciously like a blend, though.) My inner coat is white cotton lined with a purple linen/cotton blend. The outer coat is definitely the nicest piece - peach silk twill, lined with a turquoise linen/cotton blend. All of these are based on the patterns at Roxane Farabi's website. The tiara secures a small, rectangular linen veil. I frequently also drape a my largest linen veil as a chador, but the heat and wind on this particular day made it beyond impractical.
30 August 2007
A hat diary in one post: 16th c. Persian tiara
I've slowly been amassing enough garments to have one complete ensemble for dressing in 16th c. Persian style. One of the last pieces is appropriate headgear, specifically this hat/tiara from Duchess Roxane Farabi's site. I've largely followed the outline she gives for creating the style, with some minor changes.
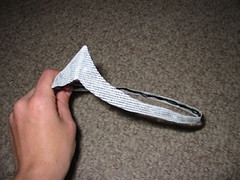 I started by twisting wire to create a frame for the overall shape of the piece, fitting it to my head as I went along. This essentially looked like a wire circlet with a single point in front. I then glued a piece of buckram around the outside to create a smoother silhouette. A picture of the back gives a better view of what the wire frame looked like.
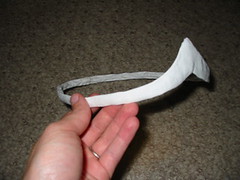 I then covered the buckram and wire frame in a double layer of lightweight white linen. It is secured by simply gluing it down on the inside of the band. Around the skinny portions of the hat, the fabric wrapped around from the front is plenty to cover the inside band; but on the point I've added an extra piece of fabric to completely cover up the wire.
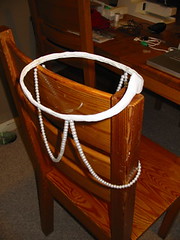 For the dangling strands, I've used glass bead faux pearls; they're strung on the fishing-line-like stuff that they came on. The front strand is a bit longer than the side ones so that it's long enough to hang below my chin. I glued the ends of the strands directly to the inside of the hat, and that's one thing I might do differently. Because the stringing material doesn't absorb glue at all, it had to be held in place carefully for quite a long time to get it to set.
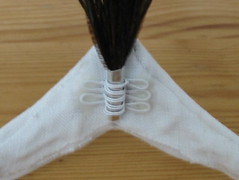 The feathers for the spray are known as peacock herl. They're sewn into strands and sold as yard goods; I bought just an inch and used less than a quarter of it. (Although specialty feather places do sell them, unless you need a large quantity, they're more easily available from places that sell supplies for making fly fishing lures.) To form the spray, I wrapped and knotted thread around the base of my feathers to form a secure bundle. I then took a small piece of sheet aluminum and used pliers to coil it around the bundle, forming a solid base. Once the base was formed, I wrapped wire around it to mold a holder of exactly the right size, with some extra loops to provide a surface to glue to the hat.
So that's pretty much it - fun with tacky glue and some random craft supplies. This picture is of the state of my Persian clothes shortly after the hat was originally finished.
 I started by twisting wire to create a frame for the overall shape of the piece, fitting it to my head as I went along. This essentially looked like a wire circlet with a single point in front. I then glued a piece of buckram around the outside to create a smoother silhouette. A picture of the back gives a better view of what the wire frame looked like.
 I then covered the buckram and wire frame in a double layer of lightweight white linen. It is secured by simply gluing it down on the inside of the band. Around the skinny portions of the hat, the fabric wrapped around from the front is plenty to cover the inside band; but on the point I've added an extra piece of fabric to completely cover up the wire.
 For the dangling strands, I've used glass bead faux pearls; they're strung on the fishing-line-like stuff that they came on. The front strand is a bit longer than the side ones so that it's long enough to hang below my chin. I glued the ends of the strands directly to the inside of the hat, and that's one thing I might do differently. Because the stringing material doesn't absorb glue at all, it had to be held in place carefully for quite a long time to get it to set.
 The feathers for the spray are known as peacock herl. They're sewn into strands and sold as yard goods; I bought just an inch and used less than a quarter of it. (Although specialty feather places do sell them, unless you need a large quantity, they're more easily available from places that sell supplies for making fly fishing lures.) To form the spray, I wrapped and knotted thread around the base of my feathers to form a secure bundle. I then took a small piece of sheet aluminum and used pliers to coil it around the bundle, forming a solid base. Once the base was formed, I wrapped wire around it to mold a holder of exactly the right size, with some extra loops to provide a surface to glue to the hat.
So that's pretty much it - fun with tacky glue and some random craft supplies. This picture is of the state of my Persian clothes shortly after the hat was originally finished.
05 March 2007
Finished Kampfrau gown
This is my finished early 16th c. German common woman's outfit. I'm very pleased with how everything turned out. Gown is heavy wool and trimmed in a lighter wool, with bodice lined and interlined in linen; sewn with silk and some linen thread and closes with hooks and eyes. Hemd (chemise) is lightweight linen, sewn with linen and smocked with black silk embroidery thread; closes with two pairs of hooks and eyes at the neck. Hat is wool bedecked in ostrich feathers, shape held by 8 gauge copper wire. The set-up under the hat is a fine example of last-minute materials-on-hand costuming - I'm using a couple of skeins of wool yarn to create the wulst bulge (fake braids would be preferable - easier to arrange and less squishy) and the veil over it is neither the right size or shape (but workable with enough pins and patience). The gown and hat used patterns from Reconstructing History; the chemise is my own design.

18 February 2007
In which Catrijn learns to smock
This is the hemd (chemise, shift, whatever) I'm working on to go with the green and black kampfrau gown. I've got a little under a week to get everything finished and ready to go, and it looks like I'll make it. The gown itself is finished and I've got feathers on my hat, so all that's left is this, and it mostly just needs seam finishing and hemming.
This is the first time I've done smocking, and it seems to be turning out all right. (I'm very much a learn by doing type of person.) My main reference for this was a book called The Art of Manipulating Fabric. It's a manual on a lot of very interesting techniques for shaping flat fabric into objects with volume and texture. Most of the stuff is not particularly useful for garment sewing, but some is, and it's all fun to look at. Anyway, I did three rows of gathering (dot pick-up on a 1/2 inch grid) using polyester upholstery thread (strong and slides easily). The smocking itself is done in a silk embroidery thread.
The biggest problems I had were with tension (I was nervous about pulling too tight when I started, which of course meant that things ended up much too loose) and trying to get the finished result to a particular size (in this case, to match my neck). The gathering threads are tied off at the correct length, but the smocking would relax to a longer length if they were cut out (like they would normally be) so I might need to leave them in. Either that, or go back and add additional tighter rows to stabilize it. I also need to figure out what I'm going to do for closure on it. Maybe a pair of ties at the top and bottom edge, tacked down to the first half inch or so of pleats?

This is the first time I've done smocking, and it seems to be turning out all right. (I'm very much a learn by doing type of person.) My main reference for this was a book called The Art of Manipulating Fabric. It's a manual on a lot of very interesting techniques for shaping flat fabric into objects with volume and texture. Most of the stuff is not particularly useful for garment sewing, but some is, and it's all fun to look at. Anyway, I did three rows of gathering (dot pick-up on a 1/2 inch grid) using polyester upholstery thread (strong and slides easily). The smocking itself is done in a silk embroidery thread.
The biggest problems I had were with tension (I was nervous about pulling too tight when I started, which of course meant that things ended up much too loose) and trying to get the finished result to a particular size (in this case, to match my neck). The gathering threads are tied off at the correct length, but the smocking would relax to a longer length if they were cut out (like they would normally be) so I might need to leave them in. Either that, or go back and add additional tighter rows to stabilize it. I also need to figure out what I'm going to do for closure on it. Maybe a pair of ties at the top and bottom edge, tacked down to the first half inch or so of pleats?
08 January 2007
Modelling the in-progress Kampfrau gown
I finally got enough hooks and eyes onto the dress to model it. Actually, I ran out of hooks and eyes just above waist level, which is why I'm holding the rest of the opening closed. There's a photo of the back here. What remains to be done is attaching the skirt permanently (it is just pinned now) and sleeves, obviously. Actually I must say that I really like this as a sleeveless gown - I'm thinking that some time I might want to make one in a lighter weight wool for summer wear, like this woodcut of a seamstress. Sure, it's a very rare style, but my main pursuit in the SCA is as a seamstress, so it's not too inappropriate.
This does serve to illustrate why I don't like hooks and eyes as a closure mechanism for non-overlapping edges, but in this case I couldn't think of a better way to do it. The gapping is perfectly even, so it's not like I've set them too far apart, it's just that the edges curl out a little. I've already tacked down the ends of the hooks, or else it would be much worse, and I'm thinking I may try to tack down more of the eyes as well. If that doesn't fix it, I may resign myself to basting the opening closed when I wear it.
As you can see, I also started the hat. It's made of basically the same wool fabric as the guards, but with the non-napped side out instead. If you're working from Reconstructing History pattern 505 (German accessories) be careful when you cut the underside piece - it needs to be 70-75 inches long to go all the way around (same measurement as you need of wire) - on my copy of the pattern, at least, the printed piece is only half that long (18x7.5 inches, cut on fold for total length of 36 inches). As for wire, I used 8 gauge solid copper wire from Home Depot (it's in electrical on the cut to order spools; you'll need to get an employee to measure it off for you, just like at the fabric store). It's very sturdy (possibly overkill, but I'm okay with that). Now I just need to obtain feathers. Sure, you see some hats that are just plain, but I really enjoy going all out : )

This does serve to illustrate why I don't like hooks and eyes as a closure mechanism for non-overlapping edges, but in this case I couldn't think of a better way to do it. The gapping is perfectly even, so it's not like I've set them too far apart, it's just that the edges curl out a little. I've already tacked down the ends of the hooks, or else it would be much worse, and I'm thinking I may try to tack down more of the eyes as well. If that doesn't fix it, I may resign myself to basting the opening closed when I wear it.
As you can see, I also started the hat. It's made of basically the same wool fabric as the guards, but with the non-napped side out instead. If you're working from Reconstructing History pattern 505 (German accessories) be careful when you cut the underside piece - it needs to be 70-75 inches long to go all the way around (same measurement as you need of wire) - on my copy of the pattern, at least, the printed piece is only half that long (18x7.5 inches, cut on fold for total length of 36 inches). As for wire, I used 8 gauge solid copper wire from Home Depot (it's in electrical on the cut to order spools; you'll need to get an employee to measure it off for you, just like at the fabric store). It's very sturdy (possibly overkill, but I'm okay with that). Now I just need to obtain feathers. Sure, you see some hats that are just plain, but I really enjoy going all out : )
30 December 2006
Kampfrau gown assembly
I've sewn all the pleats down onto the linen tape, and then pinned the whole thing onto the bodice to re-check fit. I apparently drafted the bodice a bit too long-waisted, and had to move the skirts about an inch higher than expected. It's just as well, because the bottom edge otherwise would have needed to be shortened. The extra-wide seam allowance is nice too, because it looks like I'll need to tack the backside of the pleats down to it in order to keep the seam allowance pointing down rather than up. I think I need to put in most of the hooks and eyes so I can actually try it on properly before I actually sew the waist seam, since it's hard to tell how high or low the center front will hang when you're just holding the edges together with your hands while you're wearing it.
Obviously, I don't have a dress form, so it's a little hard to set gowns up for display or photography. I almost bought one this week, but they are expensive, and I spent my money on fabric instead. (6 yards silk-faced brocade, navy blue with gold fleur-de-lis!) Once the front closure is ready, I can hopefully get some pictures with me modeling it.

Obviously, I don't have a dress form, so it's a little hard to set gowns up for display or photography. I almost bought one this week, but they are expensive, and I spent my money on fabric instead. (6 yards silk-faced brocade, navy blue with gold fleur-de-lis!) Once the front closure is ready, I can hopefully get some pictures with me modeling it.
27 December 2006
Kampfrau gown - skirt assembled and pleated
Since the last update, I've sewn the side seams and a front opening on the skirt panels, and, as the picture shows, pinned the pleats in place. I've pleated onto a linen tape that is cut and marked to the measurements of the bottom of the bodice. That gives me a bit more stability to pick things up and move them around compared to just pinning the fabric to itself. I can also completely sew down the pleats before attaching to the bodice, while still being assured that it will line up correctly.
I've used a combination of stacked pleats and box pleats, which are structurally and visually similar. The skirt panels are divided equally between the four bodice sections, but the back sections are significantly narrower than the front, so I was able to get 5-to-1 stacked pleats all across the back. (I find that stacked pleats behave a bit better than the roll pleats that Kass mentions in the directions. Both styles have the same take-up.) Because the front sections are wider, I have just a couple of stacked pleats at the sides and then switch over to box pleats. This leads to less fullness in the front, which isn't really a bad thing, but if I'd had enough material, I might have preferred to add width to the front skirt panel so that I could do stacked pleats all the way around. It seems to hang quite nicely, though, so I'm happy with the way it is. Of course, the material has so much body that it quickly falls out of the pleats and into much larger, looser folds.
Next, I'm going to sew the pleats down to the stay tape, and then attach the skirts to the bodice. Then I'll either put in the front closure (hooks and eyes, I think) or finally get started on the sleeves. I still haven't decided whether I want to line the sleeves, though, and I''m not totally sure what fabrics I'll use for the cuffs. (I cut pieces for doing main fabric + contrast fabric, but I'm thinking of maybe doing both sides in the contrast fabric.)

I've used a combination of stacked pleats and box pleats, which are structurally and visually similar. The skirt panels are divided equally between the four bodice sections, but the back sections are significantly narrower than the front, so I was able to get 5-to-1 stacked pleats all across the back. (I find that stacked pleats behave a bit better than the roll pleats that Kass mentions in the directions. Both styles have the same take-up.) Because the front sections are wider, I have just a couple of stacked pleats at the sides and then switch over to box pleats. This leads to less fullness in the front, which isn't really a bad thing, but if I'd had enough material, I might have preferred to add width to the front skirt panel so that I could do stacked pleats all the way around. It seems to hang quite nicely, though, so I'm happy with the way it is. Of course, the material has so much body that it quickly falls out of the pleats and into much larger, looser folds.
Next, I'm going to sew the pleats down to the stay tape, and then attach the skirts to the bodice. Then I'll either put in the front closure (hooks and eyes, I think) or finally get started on the sleeves. I still haven't decided whether I want to line the sleeves, though, and I''m not totally sure what fabrics I'll use for the cuffs. (I cut pieces for doing main fabric + contrast fabric, but I'm thinking of maybe doing both sides in the contrast fabric.)
15 December 2006
Kampfrau gown - skirt update
I've sewn the guards down to the skirt panels; about two evenings worth of work. I did end up moving the top band down by about an inch, so the spacing is a bit better. Other than that, though, the panels look a lot like they did when the guards were just positioned rather than sewn, so no new pictures yet. I probably won't have much of a chance to work on this project until after Christmas.
11 December 2006
Kampfrau gown - skirt panels
These are the two skirt panels laid out with the slashed guards on top. They look kind of skimpy when they're just flat like that, but the pattern tells me that two 60 inch panels is quite reasonable, so I'm just going with it - that's all the fabric I have.
I bought a rotary cutter and mat just to do the little football cutouts on the guards. That was a lot easier than using scissors like I did for the bodice. The corners aren't half as precise as I'd like, and I had to go back and trim most of them with scissors, but really they look pretty good when you're not peering at them from 3 inches away. The only thing I'm thinking about changing is the spacing of the bands; I might move them closer together. I need to get them pinned down where they are now, though, so I can hold it up to see for sure.

I bought a rotary cutter and mat just to do the little football cutouts on the guards. That was a lot easier than using scissors like I did for the bodice. The corners aren't half as precise as I'd like, and I had to go back and trim most of them with scissors, but really they look pretty good when you're not peering at them from 3 inches away. The only thing I'm thinking about changing is the spacing of the bands; I might move them closer together. I need to get them pinned down where they are now, though, so I can hold it up to see for sure.
30 November 2006
Kampfrau gown - bodice assembled but unlined
Progress on the kampfrau gown has been slow, mostly due to lack of time. Since the last update, I've finished the cutouts on the guards for the bodice, and sewn them down. I've also sewn down all of my edges and seam allowances (except armscye and waist, which will be finished later). Kass's instructions have you doing this in the same step as fitting in the lining, using a prick stitch, but given the thickness of my fabric (and hence it's extreme reluctance to hold a nice folded edge), I decided to do two separate steps. The edges are held down with a running stitch going through both layers of wool and interlining, but not coming out all the way to the top of the guards. At the side and back seams, the seam allowances are only tacked down into the interlining, since a crisp edge is not as important. When I put in the lining (actually about halfway done now, but not in this picture) I'll just use a small hem stitch and secure the lining into the already folded down edges, rather than going all the way through.

06 November 2006
Kampfrau bodice pieced
My linen for interlining came in, so I've now got the main bodice sections sewn together. I've also gotten the cutouts done in just one of the guard pieces, shown here lying on top of its corresponding piece, but not sewn down. I did start with just slashed openings, but much like I had expected, the slashes only opened up nicely when they were free, and not secured to a solid backing fabric. So I changed over to these disc-shaped cutouts, which look just about right to me. Fortunately, the black wool won't fray at all unless picked at, so it doesn't need to be turned. I'm planning to sew down the guards, close the shoulder seam, and put off adding the lining until pretty late in the construction process.

19 October 2006
Guarded optimism
I've cut all the main pieces for the kampfrau gown. The fabric is a fairly heavy wool melton in a muted green - the same fabric that I used for the 1470s Burgundian gown. I found scraps big enough for the bodice back and cuff pieces; the bodice front and sleeves (on the bias) were cut from my remaining yardage as efficiently as I could manage, and there was just barely enough left for two skirt panels (full fabric width ~59" x waist to hem ~39"). There really aren't any pieces left that are big enough to do anything with. I don't have anything on hand that would work well for interlining, so a lot of the construction is going to have to wait until I can get some ordered. I've got lightweight linen for the lining, but I don't want to cut that until I'm almost ready to put it in.
That just leaves cutting the guards from my accent fabric (a fulled and napped medium-heavy black wool). The skirt guards are clear enough, since they're just straight strips. The guarding for the top, on the other hand, threw me for a bit of a loop. The only guidance from the pattern is straight strips 2 or 3 inches wide. One option would be to use rectangular strips and piece them around the neckline, making joins at the corners. The other option is to use a pre-shaped piece that echoes the edge of the neckline. Two considerations pushed me toward the second option. First, since my guards will be slashed, I really want as much structual integrity as possible - the bulk of seams and joins won't help in getting smooth and even slashing. Second, most of other people's reproductions that I really admire seem to use continuous, shaped pieces - or at least they look that way in photos. It's much more apparent that this is the way to go with the slightly earlier, more rounded neckline.
So I ended up doing guard pieces that are essentially cut-outs of the front and back pieces. I started 5/8" in from the neckline and center front opening (to allow room for finishing without losing guard width) and made them an even 2" wide. The plan is to attach them after doing the interlining, but before totally assembling the bodice with the lining.
My only remaining question is how exactly to do the slashes. I'm afraid that if I just cut a slit, the fabric behind won't really show through, so I might need to do a slightly wider cutout that actually removes material. I'm hoping that's not the case though, since I think I'd have trouble getting the cutouts to be even and consistent. Stitching the guards down might stretch the opening enough to make the slash noticeable, but I don't know if it'll be enough. I suppose I'll just have to experiment with some scraps.
That just leaves cutting the guards from my accent fabric (a fulled and napped medium-heavy black wool). The skirt guards are clear enough, since they're just straight strips. The guarding for the top, on the other hand, threw me for a bit of a loop. The only guidance from the pattern is straight strips 2 or 3 inches wide. One option would be to use rectangular strips and piece them around the neckline, making joins at the corners. The other option is to use a pre-shaped piece that echoes the edge of the neckline. Two considerations pushed me toward the second option. First, since my guards will be slashed, I really want as much structual integrity as possible - the bulk of seams and joins won't help in getting smooth and even slashing. Second, most of other people's reproductions that I really admire seem to use continuous, shaped pieces - or at least they look that way in photos. It's much more apparent that this is the way to go with the slightly earlier, more rounded neckline.
So I ended up doing guard pieces that are essentially cut-outs of the front and back pieces. I started 5/8" in from the neckline and center front opening (to allow room for finishing without losing guard width) and made them an even 2" wide. The plan is to attach them after doing the interlining, but before totally assembling the bodice with the lining.
My only remaining question is how exactly to do the slashes. I'm afraid that if I just cut a slit, the fabric behind won't really show through, so I might need to do a slightly wider cutout that actually removes material. I'm hoping that's not the case though, since I think I'd have trouble getting the cutouts to be even and consistent. Stitching the guards down might stretch the opening enough to make the slash noticeable, but I don't know if it'll be enough. I suppose I'll just have to experiment with some scraps.
17 October 2006
Kampfrau gown - initial mock-up


I'm starting a new project: a Kampfrau gown in green with black guards, to look very much like this one. I'll be using Reconstructing History's pattern for 1520s German Commonwoman's Gowns, which is unusual for me (I typically draft my own). I picked the colors based on what I have enough leftover yardage of, but I thnk the scheme will work. I just need to remember not to go with green next time I buy for a big project so that I don't end up too monochromatic ^_^

So far, I've made and fitted a muslin mock-up for the main bodice pieces (shown above - back on the left and front on the right). The pieces were traced directly from the pattern; the solid pink lines mark my new cutting lines. It's worth noting that the front piece is about an inch long than the back piece at the side seam - this is on purpose and the pieces should be eased to fit, but the directions don't actually mention that. I ended up losing the ease in the course of multiple pinnings and adjustments, which is why I needed to trim off much more on the front than the back. Although in the end it looks like I just worked the side seam in symmetrically, the intermediate stages looked a lot less similar to the original pieces. I've thought about trying to draft the ease back in before cutting my main fabric, but I'm not sure it would be worth it. I do wish the pattern had marked an underbust adjustment point (rather than just chest and waist at the top and bottom corners) - that would have saved me a lot of grief in drawing out the initial pattern. I should have known better, since I'm fairly familiar with the 15th c. supportive styles, but you need a snug fit in the ribcage in order to get some support from a gown, and I just wasn't going to get that from the straight-edged pieces that I started with. Fortunately, the straps and neckline seem to work for me without adjustment.
Subscribe to:
Posts (Atom)