I've tried at least four different styles of hose patterns (and that's just the ones I remember), with various degrees of success. If you're only interested in the one I use now, skip to number 4. Note that in all cases, the leg piece is cut on the true bias.
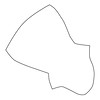
Attempt 1 (1 piece): The first pair of hose I ever did were in an ultra-simple one-piece pattern. The one seam is down the back of the leg, under the heel and center of the foot all the way out to the toe. I think the reason I tried this approach is that it seemed like it would make fitting simpler - there's just one piece of fabric to pin on your leg while you contort yourself to try and get it to fit. In the end, though, the shortcut didn't pay off. It looks OK when you've got your toes pointed, but try to stand and walk around normally, and you'll find that there's an enormous amount of bunching around your ankle. Plus, at least in my hands, the toe area just didn't work at all.
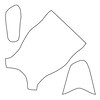
Attempt 4 (3 pieces): Although this pattern has the most pieces, it's not too much more difficult to assemble, and the fit is definitely worth it. The sole piece is like the one in attempt 2, an outline of the foot. The second piece covers the top of the foot. If you put just these two pieces together, it would look a bit like a slipper or mule. The third piece is of course the leg, and it also extends to the back of the heel. This is the pattern that I use almost exclusively now. Like type 3, it is documentable - and also highly comfortable. (See Crowfoot & Pritchard's reconstruction in Textiles and Clothing c.1150-c.1450; also this extant piece said to be from the Cluny Museum.) Assembly requires a little finagling, but isn't too bad. I like to use flat-fell seams, but a zig-zag stitch enclosing the raw edges works almost as well and is quite a bit easier. My construction order is to do the back of the leg seam first, forming a tube. Second, ease the upper into the front of the leg piece. Then finally, attach the sole. As usual, you'll want to check fit and do any seam finishing between each step. The sole seam is nearly impossible to flat-fell by machine, so I either do that by hand, or do a false French seam (turn the edges in towards each other, then do a straight stitch or overcast near their fold). Roll hem the top edge, and they're done.
What I haven't talked about so far is getting a pattern that fits. The pieces I've shown are what fit me, so you shouldn't expect to just enlarge them and get something that works. What I usually do is create a mock-up in muslin (calico for the Brits) - it can be pinned and sewn to check fit, and then unpicked to store as durable pattern pieces. Write and draw on it as necessary with tailor's chalk or just a regular pencil.
The easiest piece to start with is the sole - just an outline of your foot. It should be a fairly smooth outline, and a bit bigger than your foot all the way around. How much bigger depends on how much seam allowance you like - I use about 1 cm. Most people can use the same piece and its mirror image (i.e., upside down when you lay out the fabric) for left and right, but if your feet are substantially different, you may want separate left and right patterns - just be sure to label them well. The sole should be not be on the bias; the grain should run along with the length of the foot.
The second piece is the upper. At the toe, it should match your sole piece, but it then widens as you get further back on the foot. How much it widens will depend on the height of your instep. This piece should extend fairly far back on the foot - all the way back to were it joins the leg on top, and further back toward the heel at the sides. (The historical examples seem to have a more vertical than diagonal seam here, but I really like the fit of the diagonal.) How I work the shape out it is to start pinning a piece of fabric to the sole around my foot, working from the toe to the back. As you get to the ankle, start drawing in where you think the seam should go. Take your foot out, cut with a generous seam allowance, and try again, repeating as necessary. Like the sole, I usually cut the upper on the straight grain, although it is a little less crucial than the sole if it needs to be a little off grain to fit on your fabric.
The third piece, the leg, is the hardest to describe how to fit. It's not that hard to do, but much easier to demonstrate than to write about. First: it is absolutely critical that the leg be on the full bias (45 degrees). I like to iron a crease exactly on the bias in the center of my fabric, and while I'm working, I try to keep that crease straight up and down on the front of my shin. With the fabric draped over the front of your leg, start pinning down the back. Don't worry if it's not quite right at first; there's plenty of time to smooth things out later. If you've got a helper, this goes faster, but it's possible to do on your own too. You're aiming for a fit that is snug but not tight. It does need to be a bit looser in the ankle (so you can get your heel through) and in the knee (if you're doing men's hose up to the hip). Like you did with the upper, mark where the ankle seam is going to go, so you can trim away excess fabric. Take it off and look at where your pins fall - you should be able to see at least a vague outline of your leg. Start to pencil in a smooth curve, and re-pin along it. Now try to put it on again. If you can't get your foot through, widen the leg wherever it's too narrow. At this point it becomes a repeated process - move the pins in where it fits too loosely, move them out where it is too tight. After a few rounds, you'll probably want to switch to basting the seam rather than pinning it, to get a better feel for how it will actually fit.
Once you've got something you're happy with, assemble the rest of the mock-up and try it on. You'll probably need to do a bit of adjustment on the ankle seam to get the size of the top match the size of the bottom - this is normal, and keep in mind that it doesn't need to be exact. My top always comes out bigger than my sole, and I usually just pin them together as is, with the top just sticking out a bit further past the seam. Grab a ribbon or something to use as a garter to hold it up, and walk around. Try it on with your shoes. Kneel, dance, do whatever you'll want to be able to do. Is it binding or cutting in anywhere? Is it too baggy? Now's the time to make adjustments. Stick to a long basting stitch so that it's easy to take out a seam if necessary. If you've made just one, wear it inside-out on the other foot. Will symmetric hose work, or do you need separately fit rights and lefts? Keep fiddling with it until there's no doubt in your mind that it fits. If something's not working, and you can't figure it out, get other people to look at it. The point here is to not settle for something that's going to be uncomfortable.
So, at some point you are going to have a muslin mock-up that you like. Now what? Take it apart. As you go, permanently mark exactly where the seams are (pencil stays pretty well, as does pen or a fine-tip marker). Trim the seam allowances down to what you typically use, if necessary. This is your pattern, and it's ready to go. You might want to make just one or two pairs at first and wear them for a while, to double check that everything is good with the fit. Also, know the limits of your pattern. In my own experience, I can make hose from light or medium weight linen without additional fitting, but if I wanted a pair in wool, or a twill weave instead of tabby, I'd cut with a little extra ease all around, and spend some extra time doing fitting as I assembled them.
So go ahead and be brave, it doesn't take a ton of experience to do a custom-fit hose pattern, just a bit of patience, and trial-and-error. You'll notice that there was no math or geometry involved. And the payoff is huge.