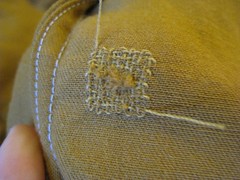
Although the early fall is my busiest time for travel and events, by late October or November, I'm well into the slow part of the year. That means it's time to look carefully at my most used clothing, checking for anything in need of repair. Simple mending, such as repairing a seam where the thread has snapped, I do without even questioning it. Holes or tears affecting the structure of the fabric are a bigger question mark, and varies a bit depending on how much time and money went in to the piece initially. I really do try to get long life out of the garments I make, though, perhaps more than is usual? I'm still wearing things I've had a decade or more, and they've all been mended and in some cases altered more than once. Pictured here is the result of darning a small tear near the hem of my Moy gown. Brick stitch embroidery also continues - I think I'm about halfway done - but that's not exactly a great spectator sport.
19 November 2014
08 June 2014
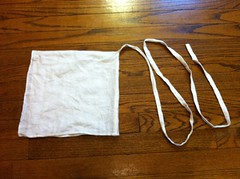
A simple late 15th c. cap
Late 15th c. cap
Originally uploaded by Catrijn.
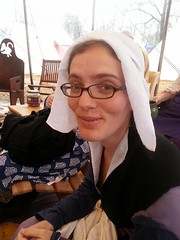
Wearing late 15th c. cap
Originally uploaded by Catrijn.
- Take a rectangle of fine linen, 22 by 12 inches. (These measurements fit my head - small adjustments may be necessary.)
- Hem all four sides.
- Fold in half, sewing the edge together to form the center-back seam.
- Attach a long tie to the point at the top of the head.
- There is no step 5!
14 May 2014
Mostly quiet on the sewing front
I've been on a bit of a hiatus from my big sewing projects, so I haven't had a lot of new material to post here. I did remake the sleeves on the black kirtle (much better!), and I just need to add a lining and a new lacing cord to consider that finished. The next step is the outer gown, and although I know I want to fully line it, I'm not sure with what. Until I figure that out, that project's on hold.
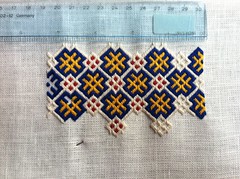
I've been working on the embroidered pouch in little bits here and there. Right now, I need to decide on my finished dimensions before I go much farther. The current width is about the minimum for me to get my hand into comfortably; I'm strongly leaning towards adding another half-repeat which would put it at about 5 inches, for more room and better symmetry. The finished pouch should be approximately square, so I'll need to embroider something twice as tall as it is wide.
I've been working on the embroidered pouch in little bits here and there. Right now, I need to decide on my finished dimensions before I go much farther. The current width is about the minimum for me to get my hand into comfortably; I'm strongly leaning towards adding another half-repeat which would put it at about 5 inches, for more room and better symmetry. The finished pouch should be approximately square, so I'll need to embroider something twice as tall as it is wide.
29 April 2014
New project: embroidered pouch
I have long admired (and coveted) the brick stitch pouches that a few of my friends have. So there was only one solution... make my own! Richard Wymarc's article on brick stitch embroidery is fantastically helpful, and I've adapted the pattern from one of the extant pieces to use the colors I wanted. I'm working with commercial silk embroidery floss on a 32ct linen ground. The embroidery itself is fairly simple, and now that I've got the pattern well established, it's easier to work without looking at my diagram too often. Still, no completely filled design is exactly fast to work...

11 April 2014
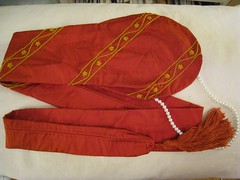
The previously-promised Persian braid case
Here are some pictures of the (mostly) finished braidcase. This was almost entirely a stash project. The main fabric is a red silk - it is medium weight with a strong hand, somewhat similar to a dupioni but with very few slubs. The tassel is also silk, and although not an exact color match it is close. The yarn was the loom waste from a weaving project, and I've been saving the short thrums for a long time but they were perfect for this! The (fake, plastic) pearls are recycled from my old persian hat, which I'd like to redo anyway. The only thing new was the silk embroidery thread. I picked a simple, repetitive band pattern done in outline stitch and lazy daisies. It is probably not terribly authentic, but I think it has approximately the right aesthetic. I ran out of time before I wanted to wear it, so only the first three bands at the top are done, but eventually I want to extend the design along the entire length. (The finishing of the tube part was done in a way to make it easy to un-do later.)

04 April 2014
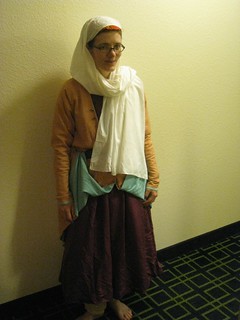
Upping my game, Persian style
One of my long-term projects has been to slowly rehab and improve my Persian clothes. I made my first set many years ago, essentially on a whim, and entirely from fabric out of the stash. It's a lot of fun to wear something completely different than I normally do (and to hang out with my awesome Persian-persona friends), but it really wasn't up to my normal standards. So one of my goals has been to fix, replace, and add pieces for gradual improvement.
Here, I've swapped out my first coat layer for the new silk one I made this winter, although much of the interesting detail is hidden. (Please forgive the low-light hotel room photo) You can also glimpse just the tiniest bit of my braid case peeking out under the veil - a teaser for another post hopefully appearing soon. Next up? I need more bling! I definitely need to add jewelry, and I think my next coat should be a brocade.
Here, I've swapped out my first coat layer for the new silk one I made this winter, although much of the interesting detail is hidden. (Please forgive the low-light hotel room photo) You can also glimpse just the tiniest bit of my braid case peeking out under the veil - a teaser for another post hopefully appearing soon. Next up? I need more bling! I definitely need to add jewelry, and I think my next coat should be a brocade.
06 March 2014
See you at Gulf Wars!
I've got a few fun new projects to show, and I'd really hoped to get some photos taken and posted this week. But I've run out of time, and the things have been packed into tubs instead, and there's really still far too much to get done before I hit the road.
21 February 2014
Button loops and bead buttons for the Persian coat
Last weekend, I finally got through the last bit of finishing for my new coat, which was the closures for the front opening. I used small round glass beads for buttons, building a short thread shank right on the front edge. Then I made a finger-loop braid using silk sewing thread and the first braid described on Phiala's string page.
I attached the braid to the opposite edge using a whip stitch that alternately pierced the braid and the fabric. At each point where I needed a loop, I took a few extra stitches to secure the braid, made a loop and took two stitches in place going around the braid rather than piercing it. This left the loop temporarily adjustable and allowed me to tighten to just the right size for the buttons. Once the size was set, I took several stitches in place, piercing both layers of braid at the crossover, before moving down the edge toward the next one.
The end result is a very delicate, fine finish, and it works really well.
27 January 2014
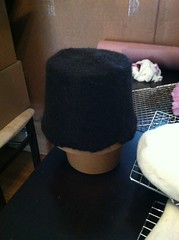
Fuzzy fezzy felted hat
Combine friends, projects, and learning new things, and you might end up with an awesome weekend plus a cool new hat.
A friend of mine has recently been felting a lot of hats, and after watching her work on a few that were in different stages of finishing, I wanted to do one but couldn't figure out what style to go with. Once we realized we had a block that would work for the little pillbox/very short hennin type that would go with my transitional gown project, though, that had to happen.
We started with unspun roving piled in layers around a waterproof pattern that provided a resist. After a lot of soapy water, agitation, reheating, and rolling, it shrank down to this impressively thick hat blank.
After letting it dry overnight, I ironed it to get a nice smooth surface on the felt, and then we steamed it and aggressively stretched it to get it over the hat block in the picture. (The block is the middle and lower portions of one designed for a fez). It's not completely done - the bottom edge needs to be trimmed to the correct length, and it will probably also need some stiffening (wire and/or thinned glue, maybe?).
I can hardly wait to get this finished; it's going to be fabulous!
16 January 2014
Second finished thing of 2014: man's tunic
There's a lot going on in this photograph, which includes several of my nearest and dearest.
But the reason it's on the blog here is the green tunic on the man second from the right. It's a simple tunic in a suit-weight wool. I'm still debating adding contrast bands via appliqué to the neckline and wrists, but it's finished as is and might stay that way. I think it fits him pretty well, at any rate.

But the reason it's on the blog here is the green tunic on the man second from the right. It's a simple tunic in a suit-weight wool. I'm still debating adding contrast bands via appliqué to the neckline and wrists, but it's finished as is and might stay that way. I think it fits him pretty well, at any rate.
07 January 2014
The very pet-able hennin
The last project started in 2013 is the first one finished in 2014.
My first hennin was of buckram and wire construction. I've been pretty happy with it, and I've used it at least occasionally for years, but it was starting to get a bit beat up. So I decided to make a new one, and try a different construction method.
The structure of this one is made of two layers of heavy (but unstiffened) linen, with channels filled with reed. It collapses flat when not being worn, so it's pretty resistant to being crushed. The outer fabric is a rather luscious velvet (hence the pet-able hennin). I'd hoped to have enough of the velvet to do at least a band of drape for the front, but sadly there wasn't an appropriately shaped piece.
I also made a round bonnet to go with it, working from the pattern in The Queen's Servants, which worked really well.
The hat worked pretty well in practice, but I need to work in securing my understructure to keep everything steady. My black band under the hood kept slipping back, which threw everything off, and I think I need to pin the hat down to the hood, since the base of it isn't quite big enough to really grip my head. Overall, though, I'd rate it a success.
Subscribe to:
Posts (Atom)