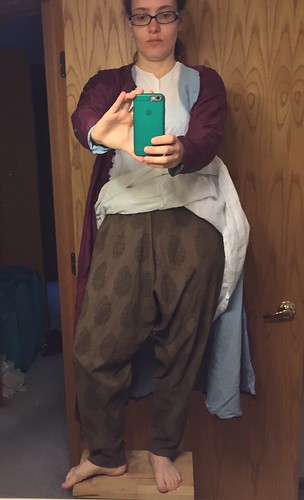
For the brown challenge, I made a pair of salwar to wear with my 16th c. Persian clothes. They are made of a lightweight, block-printed cotton from India that was originally cream with black, which I then overdyed to brown. The pattern is incredibly simple: two tapered tubes. They're held up by a separate cord or thin belt. The cut is the same as the closest extant items I'm aware of, which are Ottoman Turkish pants from the same time period. Those ones were very high status, and made from brocades that look fairly stiff. Persian silhouettes are generally softer and more fluid that Turkish ones, and cotton and block printing were both available. I choose this print because it preserves at large scale the design aesthetic - large individual motifs, well separated by blank space, and largely symmetrical. The motif itself is probably a bit too complex, but is not glaringly bad.
The Challenge: September - Brown
Fabric: 2.5 yds block-printed cotton
Pattern: none
Year: 16th c. Persian
How historically accurate is it:Matches (limited) information - materials speculative.
Total cost: $40.
02 October 2015
18 August 2015
Running to stand still
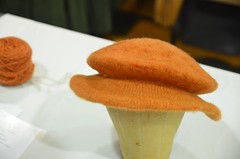
I have been making things, but none of it has really felt ... blog-worthy? I made a wool hood for myself, very basic. I felted another hat - this one went a lot more smoothly than the first one. Both of those were tied to the HSM July challenge (accessories). The brick stitch pouch is death by a thousand stitches (and then another thousand, and another...). It's halfway through August, and the only ideas I've had for the HSM challenge would be multi-month projects. Unless inspiration strikes, I'll be skipping this one. I do have a plan for September, though, and I've even ordered fabric.
22 July 2015
Historical Sew Monthly: not going as planned
I think I'm falling off the HSM wagon. I did make an entry for the June challenge - men's 14th c. braies and hose, but they didn't turn out as well as I'd hoped. Usable, yes, and they look decent (although late in the day I had a *lot* of sag in the hose), but there are definitely things I'll change when I attempt this again. Minor adjustments on the hose, but I'll probably start from scratch with different construction for the braies.
For the July Accessories challenge, I wanted to finish my brick-stitch pouch. I knew that was going to be a stretch goal, and it's not going to happen. If I had left it the size I originally started with, it would be done by now. If I could leave it at the size after the first enlargement, I could probably still finish, although it'd be tight. And in both cases I would have a pouch that wouldn't hold my new phone (at all, or comfortably, respectively). And so I need to embark on a second round of enlargement. My heart sinks at the thought of it. I am tired of this project.
I may see about doing something else smaller for the July challenge, but my energy for working on projects has been pretty low. I did start a hat (felted, not sewn), but I'll need to borrow some of the tools to finish it, which isn't going to happen in the next week.
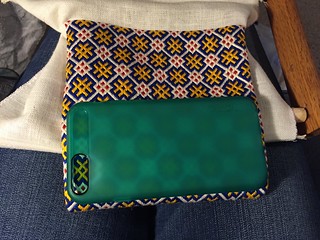
28 May 2015
Practical sometimes means boring
Practicality is ... replacing basics that don't fit even when you'd much rather sew something interesting. Since I normally hang out in the 15th century, anything before the mid-14th c. is "early period" to me. I use those eras a lot, though, especially when camping, because they are simple and fairly uncomplicated. My undertunics are cut pretty much identically to my tunics, with two exceptions: shorter hem and snug underbust. The width of the body panels at the bottom of the sleeve gussets is only slightly bigger than my rib cage measurement. It's a little tricky to squeeze in and out of, but it provides enough support for light to medium activities. (Pinning the neckline closed also helps.) The downside is, while the nice loose tunics are accommodating of weight fluctuation, the more fitted layer not so much.
The Challenge: May - Practicality
Fabric: 2 yds handkerchief linen
Pattern: none
Year: 8th-13th c. Ish.
How historically accurate is it:Eh. Not a lot of solid details on underwear from this time period, but undyed linen in a rectangular tunic cut is consistent with what we know. Construction is modern (machine, French seams).
Total cost: $15-20 each.
05 May 2015
Next time: remember to take pictures
I didn't get any pictures of it?
The red 1490s gown is done. It's fabulous, if I do say so myself. And every time I want to post about, I go looking through my photos for which one captures the overall result, and I can't find any. I have no photos of myself wearing this gown. I don't know how that slipped my mind. I guess I'm going to have to do a photo session at some point.
Since the last set of progress photos, it's all been finishing work. Strips of wool flannel around all the edges to mimic a lining, and larger sections pieced into the lower sleeves where it might show. Stitching down and/or whipping seam allowances and raw edges. The lacing rings for the front opening are set between the lining and the outer fabric, and the lining extends a bit such that it covers the gap I would otherwise get. This works well and provides a really nice look.
In other news, the April HSM challenge totally didn't happen for me. I went into the month without any ideas of what to do, and inspiration struck really, really late in the month, when I no longer had any time to work on it. I'll be cutting my losses and moving straight on to the next challenge.
16 April 2015
Bonus stashbusting flat cap
Bonus HSM! Yarn stashbusting! This is my handspun, a 3-ply worsted in roughly DK weight. Hand-dyed with madder. The knitting itself is not too complicated - all stockinette, with increases and decreases, and just a little fiddly joining the brim layers. The hardest part was getting the rate of decrease right so that it sits mostly flat instead of being conical.
The Challenge: March - Stashbusting
Fabric: Originally, undyed Romney roving
Pattern: Gagiana beret, modified
Year: 1st half of 16th century
How historically accurate is it:There's not much I could do to make it more period.
Total cost: Wool was probably around $20, dyeing was more expensive (but partly start-up costs for basic supplies)
14 April 2015
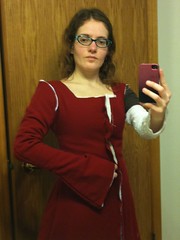
Red dress teaser
I've got a backlog of things to post about - I have actually been working on things, just not blogging about them. Here's a teaser for the now-completed red dress project.
07 March 2015
Letting the fabric sing
Have you ever dug through your stash and found yourself saying "Wow, I forgot I had something this nice"? This fabric is luscious and shouldn't be allowed to sit in the bottom of a storage container any longer. More than 10 years ago, I bought a bundle of remnants of coating wool off ebay, all black but not all the same fabric. 2 matching lengths went into a modern coat that I seldom wear but still like, another pair went into a medieval coat that gets much more use, and one lighter weight one has been used for several hats and other accessories. I had one 2yd cut left, a lovely heavyweight with a nice nap (not strongly directional, almost velvety) - not enough for a big project, but too nice to waste. And so, an immensely simple project, a half-circle cloak. I was able to get about a 45 inch neck to hem length by piecing the bottom corners in both front and back. There's a small seam on the left shoulder to help it lay nicely, and the right shoulder is overlapped and pinned, but could also be sewn. The seams were done in a small whipstitch that was then 'popped' out to be completely flat with the fabric edges abutted. No treatment of cut edges was necessary.
The Challenge: March - Stashbusting
Fabric: 2 yds coating wool
Pattern: none, based on Bocksten bog man's cloak
Year: 1st half of 14th century
Notions:Silk sewing thread.
How historically accurate is it:Very. Period materials and construction. Pattern is modified to take advantage of wider loom-width, rather than introducing piecing just to match the original. Right shoulder is pinned rather than sewn, but I might still change that.
Total cost: Stash fabric so old I can't guess what I paid for it.
25 February 2015
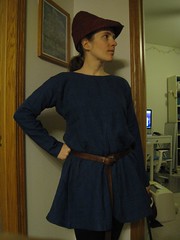
A blue, blue tunic
Slowly but surely. February's Challenge is Blue, and I had a couple of different stash fabrics to choose from. Most of them are already paired with a planned project, and ultimately the most practical one won out. Very occasionally, I get to participate in equestrian activities, and although I can ride in a dress, there are times where I'd just rather not. So, for the first time ever, I'm working on historical mens clothes for myself. I'm targeting mid-14th century, and not super fancy. I've got existing tunics that have the fit I wanted, so I pulled measurements from there and then just brought the hemline up to mid-thigh. I have accessories for a decent look, but what I still don't have are appropriate men's undergarments for a complete outfit. Hopefully I can work that in to an upcoming challenge :)
The Challenge: February - Blue
Fabric: 2 yds med-heavy linen
Pattern: Drafted from measurements; style is basically that of "T-tunic the Period Way"
Year: 1340ish
Notions:1/4" linen tape for finishing neckline
How historically accurate is it: Eh. Looks good, but up close the details aren't right. I can't document dyed linen outerwear for this era, but it's comfortable.
Total cost: Stash fabric, estimated value $15.
28 January 2015
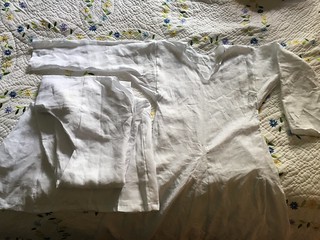
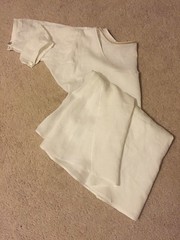
An 18th c. shift
The first finished object of 2015 is a humble shift. January's Challenge is Foundations, and I interpreted that as the thing that comes first, the base layer. After the fact, though, thinking about the inspiration more broadly, I still like my choice. In my experience, correct underwear is one of the things that help me achieve not just costumes, but historical clothing. I don't mean just in getting the look right, although there certainly is that, but also in mindset. When I'm dressed, this shift won't be seen at all. But I'll know.
This shift is based on the style from around 1770. I used simple geometric construction, and really the differences from a medieval version are minor. Construction was all machine, due to time constraints, and the finished result looks like a plain white shirt, exactly what it is. Seams are flat-felled and the neckline is finished by turning under and binding with a narrow linen tape. My favorite detail is the reproduction sleeve buttons, sourced from Wm. Booth, Draper. The buttonholes turned out fairly well, which I'm very pleased with since I have struggled with them in the past.
The Challenge: January - Foundations
Fabric: 1.5 yds handkerchief linen
Pattern: Online sources, primarily Mara Riley and Sharon Ann Burnston
Year: 1770s
Notions:1/4" linen tape, pewter buttons
How historically accurate is it: Middling. Pattern and materials are accurate, all-machine construction is not.
Total cost: Stash fabric, estimated value $25. Buttons, $9.
12 January 2015
Biting off more than I can chew: Historical Sew Monthly!
I perpetually have the problem that my project ideas and ambitions vastly exceed my available time to work on them. This is only exacerbated by the fact that I enjoy planning and starting projects more than finishing them. At the same time, though, I love challenges and pushing myself. And this year, I want to dip my toes into the water of the Historical Sew Monthly. I have no idea how I'm going to add these things onto my already full plate, but having concrete goals is seriously motivating. The first step is try to match up project ideas with different months. In addition to the set themes, my overall goals for participating this year are to work from stash when possible, and to do projects from my someday/maybe list. Not necessarily things I would have sewn anyway, but ideas I've daydreamed about that deserve to actually happen, and new skills or eras I've wanted to learn.
- January - Foundations: You can never have too many chemises. I can think of at least 3 styles for which I don't have enough (or in one case, any!) linens.
- February - Colour Challenge Blue: This could go any number of ways. I need to look through the stash to see what blues I have (blue is one of my favorites, so the question is not whether, but how much). I also have a much-loved blue dress that needs to be seriously re-done if I want to wear it again.
- March - Stashbusting: Again, lots of options here. Tentatively, men's hosen in a gray wool-linen blend I have tons of.
- April - War & Peace: This one could be difficult for me; I don't have any ideas yet.
- May - Practicality: I've been meaning to make a lightweight wool tunic that goes with my rust sleeveless surcoat. Simple and practical if ever anything was.
- June - Out of Your Comfort Zone: My first thought is to build on the hosen from March and work on more menswear. I also have some ideas for new skills - mostly revolving around accessories, and some non-clothing textiles
- July - Accessorize: As the date gets closer, I'll need to evaluate whether I'll be able to make the deadline, but I want to finish the brick stitch pouch that I started last year.
- August - Heirlooms & Heritage: This is an interesting one - I mentally associate heirloom sewing with much more recent history (say, 1800-1950) than the period I usually do. Maybe this is an excuse to branch out into the Victorian bustle styles I so admire?
- September - Colour Challenge Brown:I've just made a dress out of what I think is the only brown I had in the stash, so that won't do. I think I'll start watching for nice brown fabrics, and base the project around what I find.
- October - Sewing Secrets: I'd like to do another German 16th c. dress, with slits hidden in the pleats to reach a pouch hidden under the skirt.
- November - Silver Screen: Step one is to watch a bunch of movies, since I've never seen many of the period classics!
- December - Re-do: The most likely candidates here are Stashbusting and Practicality... or both at once.
05 January 2015
Red overgown, first fitting

Overgown back pleats
Originally uploaded by Catrijn.
Testing fit of overgown
Originally uploaded by Catrijn.
02 January 2015
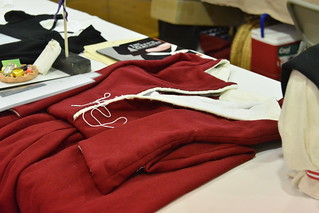
Getting the ball rolling on the red overgown
The continental 1490's project has been languishing while I searched high and low for a lining fabric. I wanted something white or off-white, heavy enough to not be sheer, in natural fibers, preferably wool, priced such that I could afford to do a full lining. This was not to be. Plan B is to embrace the medieval mindset and work with what I have. I'm going to interline with white linen, and then fake a richer lining of wool flannel at all the edges.
That decision gave me enough information to move forward. My primary fabric is a luscious red wool twill, in 2 remnants of 2 yards each. To maximize that limited resource, I cut pieces as I knew what shapes I needed, trying to leave the most usable yardage as I went. The bodice is cut from my kirtle pattern, with a bit of ease added but without the extra for folding into a strong lacing opening. This layer shouldn't be under stress, so that reinforcement isn't needed. In the back, I stopped it at the waist, just like the kirtle, but in the front I extended it all the way to the hem to remove the front waist seam. That seam still exists in the interlining, though, since I wanted to transition from heavier linen in the bodice to lightweight linen in the skirt. The photo shows this rather unusual construction order - I plan to draft the sleeves next, leaving the skirt back for absolute last, since that will be a simple rectangle, as big as I can make it at that point.
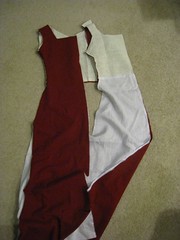
That decision gave me enough information to move forward. My primary fabric is a luscious red wool twill, in 2 remnants of 2 yards each. To maximize that limited resource, I cut pieces as I knew what shapes I needed, trying to leave the most usable yardage as I went. The bodice is cut from my kirtle pattern, with a bit of ease added but without the extra for folding into a strong lacing opening. This layer shouldn't be under stress, so that reinforcement isn't needed. In the back, I stopped it at the waist, just like the kirtle, but in the front I extended it all the way to the hem to remove the front waist seam. That seam still exists in the interlining, though, since I wanted to transition from heavier linen in the bodice to lightweight linen in the skirt. The photo shows this rather unusual construction order - I plan to draft the sleeves next, leaving the skirt back for absolute last, since that will be a simple rectangle, as big as I can make it at that point.
Subscribe to:
Posts (Atom)