26 December 2010
Housecleaning
I recently lost my access to a small webhosting account where I had just a few images. I've gone through the ones that I know were broken and fixed them, but if you see any other placeholders indicating a missing image, leave a comment so that I can replace it. Unfortunately, I have nothing else to report - my new job keeps me quite busy, and I haven't had time to pick up the needle in months.
29 August 2010
Sleeves for the Robe Anglais
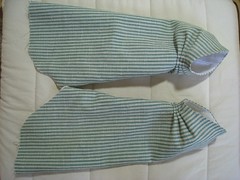
I decided that I wanted really simple sleeves to go with this dress, so I drafted these from one of the examples in Arnold's Patterns of Fashion. They came together really nicely and happened to fit well with only the most minor of adjustments (I needed a little more flare at the top of the seam). They're lined in a lightweight linen, a bit nicer and finer than the medium-weight I used for the bodice lining.
01 August 2010
Project déjà vu
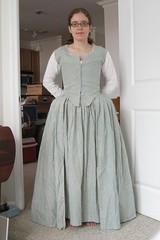
At first glance, this progress photo on my 18th c. dress looks a lot like the previous one that I posted last year. But in the details, there's actually been some progress. The petticoat is hemmed, and many of the bodice seams are sewn rather than pinned or basted. I turned up a deep seam allowance on the lower edge of the bodice, which helps the waist-to-hip transition not seem so severe. (These gowns do have low waists, significantly bellow the natural waist, but it's still possible to make them too low.)
In the photo, the skirt pleats are pinned in but not sewn, and only draped into place under the bodice edge. Also, the front opening is just messily pinned to the stays to hold it in place temporarily. I've since sewn down the pleats and pinned the whole section to where it will attach to the bodice (interior exterior). Because I got ahead of myself and finished the lining and outer fabric of the bodice together at the lower edge, that leaves the top of the skirt with raw edges exposed on the inside of the dress, but I'm not going to re-do it just so that I can hide them between the bodice layers - this is technically just my practice gown, and no one will see!
I'm pretty confident about the fit of it at this point, so the next steps will be putting in hidden hooks and eyes for front closure, making minor adjustments around the neckline and shoulders, and adding sleeves.
29 June 2010
Accessories: Partlet Edition
I recently finished a simple partlet that I hope to wear with my Kampfrau dress. It's a lightweight coating-style black wool, lined with lightweight white linen because I can be very sensitive to wool around my neck. I'm not really going to talk about the design of it, since I used someone else's pattern rather than doing my own research, but there are a couple finishing details that are worth mentioning.
The first is that the linen ties that are used for the side fastenings extend under the hem all the way around the bottom edge, both front and back. This should reduce the danger of stress on the corners pulling the partlet out of shape, since the tabby tape is quite sturdy and unlikely to stretch.
The second thing is the way that the lining is attached. With a garment like this, you really don't want the lining to shift around or peek out at the sides, which can happen with a simple bag lining. After assembling the outer fabric, I attached the lining pieces one-by-one, directly to the outer fabric. To get them lined up correctly, start by laying the matching pieces out flat, wrong sides together. Pin outwards from the center, allowing the edges to be uneven if matching them would cause the lining to pucker. Once you've pinned to within a couple centimeters of the edge, then you can turn the two raw edges toward each other and pin together, and any slack is taken up by simply allowing it to have a deeper seam allowance. You do this all around the edges, and also possibly at the internal seams, but I choose to leave the seams until both lining pieces were in, and then sew those pieces together while simultaneously catching them down to the seam allowances from the outer fabric. There's a photo of the stitches I used, but I should note that they're just what seemed to work at the time, rather than being especially documentable.
14 June 2010
Off-topic: where I've been
We interrupt your regularly scheduled programming for this important announcement:
It's been very quiet here, but there's a good reason for that. Last week, I successfully defended my Ph.D. thesis, completing many years of hard work to earn my degree. My professional field is unrelated to historical clothing, so I'm not going to go into details here, but with that finished, I may have more time to return to my hobbies. I've got a little time off before I start my new job, so I hope to get back in the swing of things soon!
It's been very quiet here, but there's a good reason for that. Last week, I successfully defended my Ph.D. thesis, completing many years of hard work to earn my degree. My professional field is unrelated to historical clothing, so I'm not going to go into details here, but with that finished, I may have more time to return to my hobbies. I've got a little time off before I start my new job, so I hope to get back in the swing of things soon!
05 April 2010
Housebook dress: Finished
I've covered the inspiration and construction in previous posts, so there's not a lot to say other than here's the finished product.
The chemises worn with this dress seem somewhat variable - some aren't visible, and those that are seem to have various cuts and styles, so I haven't made one particular for this gown (although a low-necked smocked one would be great). I've accessorized with a smocked linen apron. The pleats in the headwrap are sewn down for convenience, although linen does hold a nice edge with just ironing. I've got a fairly sizeable stuffed pad for the halo effect underneath; again, sizes in the artwork are variable from apparently none to quite large ones. It's set up like this: split hair, braid from just behind ears, loop around front and bobby pin above ears; clip stuffed roll (wulst) to now secured hair (mine has raw fabric edges around the inside which I can catch with small barrettes); drape pleated edge of veil over forehead, and secure front two corners to each other at back of head with one or two straight pins (I like longish brass ones for this); smooth out remainder of veil, twist remaining corners and tuck under; fin.
The chemises worn with this dress seem somewhat variable - some aren't visible, and those that are seem to have various cuts and styles, so I haven't made one particular for this gown (although a low-necked smocked one would be great). I've accessorized with a smocked linen apron. The pleats in the headwrap are sewn down for convenience, although linen does hold a nice edge with just ironing. I've got a fairly sizeable stuffed pad for the halo effect underneath; again, sizes in the artwork are variable from apparently none to quite large ones. It's set up like this: split hair, braid from just behind ears, loop around front and bobby pin above ears; clip stuffed roll (wulst) to now secured hair (mine has raw fabric edges around the inside which I can catch with small barrettes); drape pleated edge of veil over forehead, and secure front two corners to each other at back of head with one or two straight pins (I like longish brass ones for this); smooth out remainder of veil, twist remaining corners and tuck under; fin.
02 April 2010
Housebook dress: Construction
When I set out to make this dress, I had grand visions of ultra-simple geometric construction, where with just a few cuts and strategic manipulation of the shoulders, the whole dress (including the pleats) would just fall into place. My theory was that it might be cut similarly to my contemporary Burgundian gown, with the the neckline being a straight edge continuous with the front seam. Two days of draping mock-ups pretty much debunked the theory though - that combination just doesn't work. It works for a V-neckline that's fairly narrow and deep, either with or without pleats - and I'd put that forward as a strong possibility for one of the other styles seen in the Housebook (deep V with lacing, no pleats). But to get the wide V neckline, you introduce a pretty sharp bend in the fabric edge, which produces nice folds which radiate from a point (like in the Burgundian), but you just don't get the straight, even pleats that you need for the look I wanted.
So in the end, I scrapped my radical ideas and went with approximately the same design as I've seen everyone else use for this dress. The dress is built on top of medium-weight linen lining cut from my basic 15th c. fitted dress pattern. The lining is only cut to hip-length, and doesn't include sleeves, but it provides all the structure for the dress. The wool on top is cut in sort of the same way, but there's an extra width of fabric where the center front or back seam would normally be (here's the layout for the front, before I've cut the side seams). The front and back are cut from a single piece each, and the seams flair out past the hips until they reach the full width of the fabric, and are a straight tube from that point down. Then, when the left and right halves are pulled together, all the extra fabric in the middle is massaged down into rolled pleats, 3 on each side. Some judicious snipping of the fabric is required to get them to lay down smoothly, and it's best to chalk out the desired width of each roll ahead of time. I also inserted a piece of wool flannel between the lining and the outer layer for the pleats, to give them more body (although I probably overdid it). For sewing the pleats themselves, I started by dividing the fabric evenly and stitching down the crease lines (this will be hidden, so it doesn't have to be super neat, just fairly straight). I then rolled a pleat as tightly as I could and pinned the edge down to the next crease line to hold it while I went back to hemstitch it down. It helps to plan ahead so you don't end up having to sew between two pleats that have already been rolled. There's a picture of my in-progress pleats here.
The sleeves are fairly simple, with a standard curved sleevehead, and a gentle bell-shaped curve to the cuff. Mine are cut in two pieces, but just because of the shape and size of the fabric I had remaining at that point. I haven't included any real closure mechanism on the front opening, and I'm currently playing with just sewing it up for wear. (This works OK, but I go through a fair bit of silk thread doing it - maybe not practical long term.) The next post will show how it all turned out.
31 March 2010
Housebook dress: Inspiration
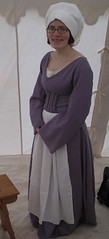
I was fortunate to be able to attend an event earlier in March where some VIPs (dear friends of mine) had a cultural theme of late 15th c. German. Now, about half of my wardrobe is passably late 15th c. Dutch/Flemish, and that's close enough, right? Well it could have been, but I decided I wanted at least one dress that really screamed German, and to me that meant a Housebook or Durer style dress. Those terms are a bit nebulous, covering a fair range of styles, but more specifically, I took my inspiration from these images at Myra's page for the Master of the Housebook. (I've linked directly to an internal frame there, the main site is here.)
The look I was shooting for is shown well in the first painting (Pair of Lovers), as well as several prints in the third section (Lady with owl and AN in her escutcheon, Lady with radishes in her escutcheon, Pair of Lovers, and the lady on the right in Young man and two girls). All of these are circa 1475-1485, and have several distinctive features. The dresses are fitted from shoulder to waist, have a wide-set neckline between V- and scoop-shape, and have vertical padded pleats or rolls at the centerline beneath the bust. The bottom of the gown is loose and fairly voluminous, as are the sleeves, which seem to have a slight flare or bell shape. The headdress features looped braids at the side of the face with most of the head covered by a veil arrangement, most of which have multiple pleats at the front edge. Some are clearly more extravagant in detail and embellishment that others, but I think this is a good sample to have a feel for the style.
The dress is finished at this point, and I didn't photograph enough of the process to really make a good dress diary, but there should be two more posts on this soon, covering the overall design and construction, and the finished product.
23 March 2010
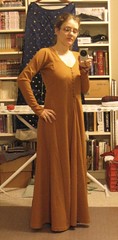
Taymouth Hours gown
I first saw this particular illustration from the Taymouth Hours (ca. 1325-1350) a couple years ago, and I've wanted a dress in this style ever since. It's a woman, hunting a rabbit, and the dress she wears seems like it'd be very practical for shooting in the cooler parts of the year. It's short enough to not to get muddy, leaves the arms relatively free, and can be quite warm depending on materials. Mine is a somewhat light wool herringbone, fully lined with a moderately fulled wool flannel. (The originals probably would have been fur-lined, based both on artwork and written accounts, but that's above and beyond what I wanted to do in terms of work.) It's only slightly fitted, and pulls on over the head, so there's no laces or closures to be hidden. In the picture, I'm wearing it over my Moy gown recreation, which is a comfortable combination. (Please excuse the askew veil - that's the peril of forgetting to check a mirror!)
The cut of the outer fabric is quite sparing, just 2 yards of 60 inch fabric. The front and back main body panels were about 4 feet, and fit side by side, with the last 2 feet for side gores and sleeves. The lining actually required quite a bit more fabric, probably 3+ yards, for two reasons. First, after fulling the flannel it was no longer wide enough for two body panels, so those required separate lengths. Second, the turn back is fairly deep, so that had to be longer, plus it and the sleeves required a second interlining layer of the white flannel to be opaque over such a dark background.

The cut of the outer fabric is quite sparing, just 2 yards of 60 inch fabric. The front and back main body panels were about 4 feet, and fit side by side, with the last 2 feet for side gores and sleeves. The lining actually required quite a bit more fabric, probably 3+ yards, for two reasons. First, after fulling the flannel it was no longer wide enough for two body panels, so those required separate lengths. Second, the turn back is fairly deep, so that had to be longer, plus it and the sleeves required a second interlining layer of the white flannel to be opaque over such a dark background.
01 March 2010
Moy gown: eyelets done, hemmed, and now for sleeves
I got some work on my Moy gown done while watching the Olympics, which means that it now has eyelets for the front opening (10 per side, 1 inch apart, arranged for spiral lacing). With the front closure done, I could check how it's hanging, so now the hem is also done. All that's left on the body is to turn under the neckline, and then it's time to finish the sleeves. The original has many tiny buttons for sleeve closures, and that's part of my plan for my version as well. That will have to wait though, because I want to wear this at Gulf Wars (about two weeks away), and that amount of handwork is just Not Going To Happen. So, as a temporary measure, the sleeves will be basted closed, with just some minimal finishing to prevent fraying, and I'll come back to the buttons at some point when I have more time.
21 February 2010
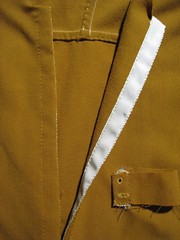
Moy gown facings
This is the front opening of my version of the Moy gown, ready for eyelets (a change from the original, which had buttons at front). I've done just a single turn under of the edge, covered with a silk grosgrain ribbon which I was eventually able to find at Wm. Booth Draper. The scrap at lower right shows at test eyelet (which turned out well) and a test buttonhole (which decidedly didn't). Looks like I'll need to practice those a bit before I get to the sleeves on this gown.
Subscribe to:
Posts (Atom)