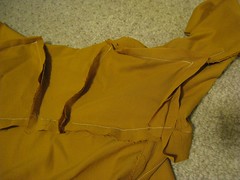
I've been working on the Moy gown in fits and spurts. I'm actually farther along than is shown at right - many of the seams are finished and flat-felled now, although others are still just basted. I've decided to use machine sewing for assembly, but hand sewing for flat-felling, since that will show through a bit on the front.
The picture is trying to show one of the key fitting adjustments that I needed to make on this dress. The gown has a really bizarre construction, centered around these huge four-sided gussets that go over the shoulder blade. It's like if you took the sleeve and square gusset from a tunic, and rotated it and pulled it back so the lower point of the gusset almost reaches your spine. Anyway, you start with an essentially rectangular sleeve - flat across the top, and it doesn't start to taper until about the elbow. However, the gusset, for the original example and I think for most people, will be longer across the top than it is along the side. Rather than matching the both corners of the top of the sleeve to the corners of the gusset, what you want to do is this. First, match the top corner of the sleeve to the top back corner of the gusset (upper left of gusset in photo). Pin/baste/sew this out to the gusset corner where the sides of the sleeves will meet. Now, match up the sleeve edges starting at the wrist, and work backwards up toward the gusset, trying to match evenly without stretching the top or bottom piece. Just before you reach the corner of the gusset, I recommend tacking the sides of the sleeve together for an inch or two (the rest is left open for buttons later). Now that everything is matched up at the corner, sew the remaining portion of the sleeve to the side of the gusset. You will have a bunch of extra fabric from the sleeve, but don't try to ease it to fit the gusset, just let it hang past the end and it will be trimmed off later (lower right of gusset in photo). As you attach the front of the sleeve to the body of the dress, you can gradually taper down the excess until it is down to your normal seam allowance (additional pictures).
Once I finish these last few seams, I should be ready to start working on the closures. I'd like to find some silk tabby tape to use as a facing and reinforce the buttonholes, like is shown in the MoL Textiles and Clothing book, but I haven't found anything that seems appropriate yet. I'm pretty sure that satin ribbon is not what I want, but I'm not finding much else right now.
07 December 2009
14 November 2009
They're more like guidelines
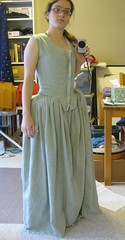
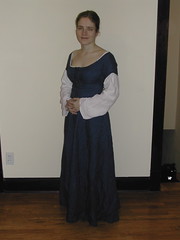
So, after the let-down caused by actually following the pattern directions, I'm going to consider them more like 'suggestions', starting with re-drafting the top of the skirt portion. Here's a picture of the new piece, laid out flat. And, as you can see with the pleats set in, the top of the skirts reach the waist without pulling the hemline up. So, at right, is the current stage of fitting (see also: back).
I'm pretty happy with this stage of fitting, although I'm still working out a few wrinkles in the outer fabric. I'm going to cut the neckline wider, and possibly a bit lower, and neither the skirts or the petticoat have been hemmed to length yet (they'll be closer to ankle length). I am second-guessing the shape of the bum roll a little, it seems too abrupt and angular to me.
I'm pretty happy with this stage of fitting, although I'm still working out a few wrinkles in the outer fabric. I'm going to cut the neckline wider, and possibly a bit lower, and neither the skirts or the petticoat have been hemmed to length yet (they'll be closer to ankle length). I am second-guessing the shape of the bum roll a little, it seems too abrupt and angular to me.
26 October 2009
Does this make my butt look big?
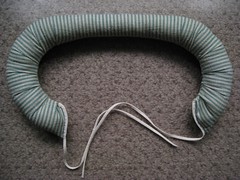
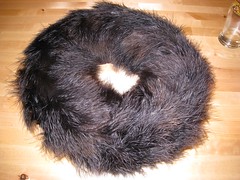
So, there's good news and bad news on the 18th c. English dress. First, I found a scrap big enough to make a bumroll, shown at right. I would have liked a little bit more length so that I could taper the ends in and not have the ties coming out at such an odd angle. It fits well, though, and puts a fair bit of emphasis on my already not-that-small hips, as it should.
The bad is the dress itself. Right after cutting the back and skirts, I looked at the pieces and had a sinking feeling. Here's a picture of the problem. It's not the uneven skirt widths; I had only attached one side so far, and that was cut extra wide so that I could either do double-depth pleats, or trim it down as necessary. No, it's how the top edge of the skirts goes straight across, several inches below the waistline of the bodice that it needs to join to. A quick glance at Arnold confirmed my suspicion, that the panels need to be sloped upward toward the waist. Here's another picture, showing what this does to the hemline. That's without the hip roll, which would only make it worse. It could be salvaged, although to make the hem even, I'd have to cut it much shorter than I want to.
Fortunately, I have tons of extra material, so I'll cut completely new dress pieces that are shaped correctly. The panels I already have I'll change to a petticoat to wear with the dress; I'll need to piece them to get decent length, and I can hide the seam under a band of self trimming, or something like that. It's incredibly frustrating, though. If I didn't have so much material, a drafting error like this could have completely ruined the project. It's enough to make me think I should always just work from scratch instead of relying on other people or companies.
23 October 2009
Just one wafer-thin mint...
It might be time to admit that I have a problem. Once I have all the materials on hand to start a project, it gradually but inexorably becomes irresistible. So although my plate is already full with everything else I'm working on, I just couldn't not start the 18th c. open robe anglais I've been thinking of.
Actually, I was really itching to cut into the the main fabric (a linen-cotton blend with narrow printed stripes - inexpensive for a trial run of the design). But reading through the instructions, it became sadly clear that I couldn't start there. So instead, I cut the bodice lining and started the fitting on that instead. Now, this is really a draped gown - you can't work straight from a flat pattern and expect it to work. But I don't have a dressmaking form, or even a fitting helper - so I'm trying to drape a bodice on myself while wearing stays, and that's a contortionist act if ever there was one. I started by basting the fronts together, then putting pins at the corners of the side-back seams while wrapping it around me, at which point it was held together enough to not fall off, and I could set the shoulder straps. Maybe I just got lucky, but the straps really fell right into place the first time. At that point, I pinched close to an inch out of the side seams and re-set those corner pins, then ripped out the front basting to take it off again. While I had it off, I switch the side seams to overlapped rather than right sides together, and re-pinned a tentative seam line. Then it's an iterative process: put on, carefully pin front seam where the basting had been, pull on seams to see how much room is left (and make a mental note), unpin fronts, take off, adjust seams (measuring to keep the two sides even), repeat. It was easiest for me to work down from the top - getting the underarm just right before worrying too much about the waist. I think it took about 2 hours to get the fitting done. Really, an assistant or a dress dummy would have made this a lot easier. There are some fitting photos here when I was almost finished - I did one more round of adjustments afterward.
Actually, I was really itching to cut into the the main fabric (a linen-cotton blend with narrow printed stripes - inexpensive for a trial run of the design). But reading through the instructions, it became sadly clear that I couldn't start there. So instead, I cut the bodice lining and started the fitting on that instead. Now, this is really a draped gown - you can't work straight from a flat pattern and expect it to work. But I don't have a dressmaking form, or even a fitting helper - so I'm trying to drape a bodice on myself while wearing stays, and that's a contortionist act if ever there was one. I started by basting the fronts together, then putting pins at the corners of the side-back seams while wrapping it around me, at which point it was held together enough to not fall off, and I could set the shoulder straps. Maybe I just got lucky, but the straps really fell right into place the first time. At that point, I pinched close to an inch out of the side seams and re-set those corner pins, then ripped out the front basting to take it off again. While I had it off, I switch the side seams to overlapped rather than right sides together, and re-pinned a tentative seam line. Then it's an iterative process: put on, carefully pin front seam where the basting had been, pull on seams to see how much room is left (and make a mental note), unpin fronts, take off, adjust seams (measuring to keep the two sides even), repeat. It was easiest for me to work down from the top - getting the underarm just right before worrying too much about the waist. I think it took about 2 hours to get the fitting done. Really, an assistant or a dress dummy would have made this a lot easier. There are some fitting photos here when I was almost finished - I did one more round of adjustments afterward.
05 October 2009
1470s Burgundian gown
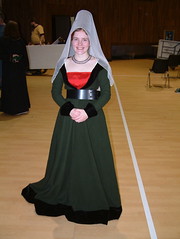
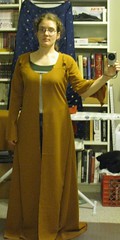
From the archives: the green Burgundian V-neck gown that I made in 2005-2006.
Few dresses are as iconic of medieval fashion as the V-neck gown that was popular in the court of the Dukes of Burgundy around 1475, thus called by reenactors the Burgundian gown. The fashion extended to nearby regions as well, of course, particularly the Low Countries which were held by Burgundy at that time, and similar styles were seen in France and England. This style of gown is an overgown, being worn over a chemise and a foundation gown; artwork of the period seems to indicate it was made of fairly thick material and fully lined, often with fur. As such, this is a very warm dress, and would replace a cloak or coat. There are some illustrations and paintings that seem to indicate velvet was also a possible lining option, based on color and painted texture, and I have at least one unusual example that shows a blue and gold brocade instead.
Construction details: Unlined gown of heavy-weight 100% wool melton, with silk velvet trim; hand-sewn with silk thread. The body construction uses four main panels, with selvage edges at front and back center seams. The V neckline is opened by pulling the selvage edge out to the side, not by cutting away material. In the back, the opening is filled in by a triangular piece. The side seams were shaped by draping to the body, and then gradually widen into the A-line skirt. The front opening extends slightly lower than the bottom of the belt; there are a few lacing rings on the inside edge to hold it closed. The sleeves are bias-cut to allow a closer fit, although they are slightly too long for me. I have chosen to only place the trim material at collar, cuff, and hem, where it shows, rather than fully lining the gown, due to the very limited quantities of silk velvet that I had. (It was taken from a vintage dress which had already been ruined by someone else's attempts at alterations.) The inset panel is a rectangle of red silk, pinned to the undergown layer. The gown neckline, as it has a tendency to pull out wider than I like, is also pinned down under the collar, to hold it in place.
Other details: I'm also wearing a beaded necklace, and a silk gauze veil over a truncated hennin, about which I might blog later. I will note that the veil is catching the flash in this photo, and is much more sheer under normal lighting conditions.
19 September 2009
Two left sleeves
Well, it doesn't look too impressive at this stage, but my Moy gown is now cut and (mostly) basted into shape. There's a lot left unfinished - I haven't slipped the front sleeve gores in, or the front or back skirt gores, and the seams are either temporary or only pinned so far.
Some of the apparent fitting problems here are artifacts; most of the pulling at the bust goes away with the appropriate (lack of) undergarments. That and I need to start the gores about an inch or two higher. The one thing that I will need to correct shows in the back - those pulls across the shoulder piece. The y-shaped shoulder piece is currently eased into the gusset in that section - I need to see whether the problem is just the pins, in which case it would lay flat once it's sewn and distributed more evenly. Otherwise I'll trim the piece down and eliminate the ease; the fabric has enough give that it doesn't seem to need it anyway.
As for the post title, I forgot to check whether my sleeves were right sides together before I cut the slit for the front gore, the one part of the piece that's asymmetrical. And of course, they were both facing up and I ended up with two identical left sleeves. I had plenty of extra fabric to cut another sleeve, but it's just a silly waste that could have been easily avoided.
14 September 2009
Small victories
The muslin for the Moy gown has been beaten into submission, more or less. After following the pattern instructions initially, to understand the spatial relationships of the pieces, it was easiest to make adjustments by ignoring them completely. I'll have to do most of the work again, since I wouldn't expect the wool twill I'm using for the real thing to behave the same way as cotton muslin, but I have a lot better idea of what needs to happen. The yoke/shoulder strap piece is one that I'll actually cut differently, as the initial one was much too long for me, but the others can mostly be massaged into place and trimmed down as needed.
09 September 2009
Problem child
I cut pieces and assembled a muslin for a Moy gown tonight. On one hand, I'm glad I didn't do this with 'real' fabric. On the other hand, I'm sorry I didn't just study the line drawings and then drape/draft from scratch, since that's probably what I'm going to be doing next. I might pick apart the muslin and see if the pieces are salvageable if I come at the assembly differently, but what I've got now fits so badly that I can't even see how to start adjusting it.
21 July 2009
Sleeveless surcoat, first fitting
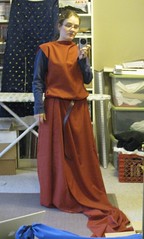
The sleeveless surcoat is shaping up quite nicely, thanks to the wonder of rectangular construction. Here I've got all the main seams just pinned together so I can check the fit.
My main inspiration for this project is the attendants in these two images from the Manesse Codex, and also this one from the Luttrell Psalter. The Luttrell Psalter is a somewhat later manuscript, and high fashion has clearly moved on to the iconic sideless surcoat, but the older, more generously cut style is still seen on this working woman. For comparison, the Manesse Codex also has many images of contemporary but somewhat higher-status versions of the sleeveless surcoat (e.g., 1 2 3).
Although I haven't cut the shoulders or the neckline yet, I think it's already looking pretty good, at least when belted. Hanging straight down, it looks a little skimpy, because the fullness is concentrated at the sides. The extra material hanging off the front and back main panels is enough to do front and back gores, although they won't be quite as wide as the side gores, and the piecing will unfortunately require a horizontal seam. However, I think it's the best option, and it will use every available inch of material.
24 June 2009
Finished strapless stays
So, here they are, the finally finished 18th century strapless stays. Only took about 10 times longer than I expected (granted, that includes many, many months of inactivity on the project). The edges are bound with a wool twill tape. The half-inch width looks just right when folded over and in place, but something slightly wider might have been easier to work with - maybe 5/8", but not more than 3/4", I think.
So, a summary of the project: mid- to late- 18th century strapless stays, in a very lightweight worsted wool twill, with linen interlining (2 layers) and lining, boned with half-oval reed (2 per channel, flat sides together), bound with wool twill tape. Machine sewn with the exception of eyelets, binding, and slipping the lining in. Working with the reed was not as hard as I expected, although my channels were a shade too narrow, and a lot of force was required to insert the reeds (and quite a few were broken in the process). Slightly wider channels might also have reduced the amount of take-up I had, which exacerbated some fitting difficulties. The pattern (J.P. Ryan) was reasonably clear, although more detail on how to do the boning, particularly around the tabs would have been appreciated. One tab in particular ends up being awkwardly small; it might be better not to even shape the tabs until later in the project (e.g., when placing the channels) rather than setting them in the initial pattern pieces. Regarding fit, the pattern seems true to the size chart - which should be a caution flag if your proportions are significantly different; also the pattern is significantly short-waisted, which works out well for me, but less so for other people. I probably won't use this pattern again, but that's largely because I don't think I'll need or want another pair of stays in this particular style.

So, a summary of the project: mid- to late- 18th century strapless stays, in a very lightweight worsted wool twill, with linen interlining (2 layers) and lining, boned with half-oval reed (2 per channel, flat sides together), bound with wool twill tape. Machine sewn with the exception of eyelets, binding, and slipping the lining in. Working with the reed was not as hard as I expected, although my channels were a shade too narrow, and a lot of force was required to insert the reeds (and quite a few were broken in the process). Slightly wider channels might also have reduced the amount of take-up I had, which exacerbated some fitting difficulties. The pattern (J.P. Ryan) was reasonably clear, although more detail on how to do the boning, particularly around the tabs would have been appreciated. One tab in particular ends up being awkwardly small; it might be better not to even shape the tabs until later in the project (e.g., when placing the channels) rather than setting them in the initial pattern pieces. Regarding fit, the pattern seems true to the size chart - which should be a caution flag if your proportions are significantly different; also the pattern is significantly short-waisted, which works out well for me, but less so for other people. I probably won't use this pattern again, but that's largely because I don't think I'll need or want another pair of stays in this particular style.
08 June 2009
The List, 2009 version
Every few years, I take some time to write up a big list of sewing projects I'd like to do, and since it had been a while since the last one, it seemed like time to do a bit of planning again. Not to mention that the fabric stash has had much greater inflow than outflow recently, so there was a lot of material that needed to be assigned to projects.
I just got new patterns for the Moy gown, and an open robe anglais, so both of those are on the list of course. The Moy gown has been assigned a mustard-gold worsted wool twill, and I'm debating whether to interline the torso section in linen. I'm also thinking I might switch from buttons to lacing for the front opening, so that I can wear it comfortably under other gowns, more in the 14th century continental style. Definitely keeping buttons on the sleeves though. Starting that project is on hold at least until I can get another bolt of muslin, though, because the construction is bizarre and mandates a mock-up, even if just to understand how it goes together. The only major concern is whether my back length is so short that it throws off the shoulders.
The open robe anglais is likely to be a long-term, slow-moving project. The 18th century stays I've been working on are finally actually finished (pictures and wrap-up soon, hopefully), which means that I can start building out, but I also need to do some research on the rest of the undergarments, like shifts and petticoats, and figure out whether I also need pocket-hoops or equivalent. What I'm thinking at the moment is that instead of a mock-up, I can find some relatively inexpensive cotton in a plausibly 18th c. print, and use that for a test run of the dress before moving to a nice fabric like silk taffeta, and hopefully end up with two wearable dresses instead of one.
The smocked apron I posted on last month was actually on the List, so I can declare success on that one already. One of the other, simpler projects I have planned is a tunic and sleeveless surcoat in the Manesse Codex style. The tunic is going to be in a light grey summer-weight wool, with narrow, buttoned wrists but otherwise quite loose. For the surcoat, I'm using a rust-colored wool, also very lightweight, which is already cut into body and gore pieces, and should go together quickly as soon as I decide between machine or hand sewing.
Some of the other items on the List are things that didn't get done in the last iteration: a pendant-sleeve gown, using the same herringbone twill as the apron dress; an early-16th century Dutch formal gown; more hose; and accessories like a partlet and proper wustlhaube for the German gown. Some are just nebulous ideas: 6+ yards of lilac wool that might become a bliaut, or maybe not; something Indian - maybe Mughal, maybe Deccani, maybe Rajput; and some non-clothing sewing projects like bedspreads and cushions
20 May 2009
Smocked Apron, part 3
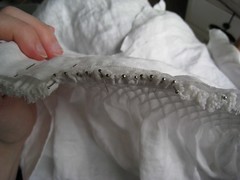
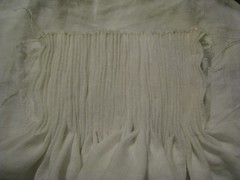
The last stage of making the apron is attaching it to a narrow waistband which extends past the edges into long ties. Between part 2 and today's entry, I hemmed the raw edges around the sides and bottom of the apron panel. Ideally, this should have been done at the very beginning of the project, before pleating, but it didn't present any problems since I purposely left a little width unpleated so that I would have room to turn a hem under.
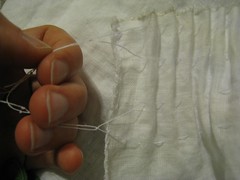
 Step 8: Stretch the smocking out to the desired width, and pin to the band starting with the two ends, then the middle, and then further subdividing to get the distribution even. You generally want a gentle amount of stretching: enough to open up the pleats, but not too much, which can cause the smocking to curl up on itself. As shown in the photo, for the initial pinning you want to pin the "valleys" of the pleats to the band, not flattening down the tops of the pleats yet. The edge of the band should be on straight grain and lined up with the top of the pleats, and at this point I haven't cut it to width yet. The band should be long enough to extend past the edges of the apron, but doesn't have to be a long enough for the ties in a single piece, as it can be pieced later.
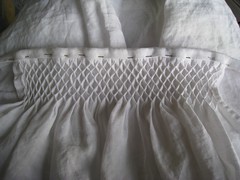
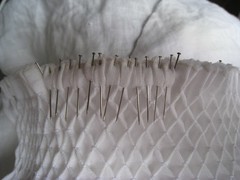 Step 9: Once the apron panel is secured, and you are happy with the width and the way it hangs, start flattening the pleats. I try to massage each standing pleat into a tiny (inverted) box pleat, so that the 'top' of the pleat is still roughly centered, rather than falling to one side.
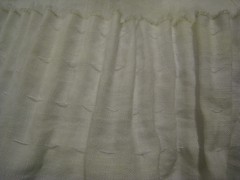
 This top view of the same stage shows how much this compresses the depth of the smocking.
 Step 10: At this point, there are a very large number of pins holding the apron to the band. You'll need to stitch these down, either by hand or machine. If doing machine stitching, work closer to the raw edge, so that it can be hidden once the band is folded over to the front. Once all the pins are out we can fold the band down to it's final width. The band is folded in the back (possibly farther from the edge than the stitching line), folded over the top and down to the same depth in the front, and tucked under for a finished edge. If necessary, trim the band to the appropriate width, and/or add additional pieces of the same width to lengthen the ties. Extend the folds to the end of the ties (basically, raw edges folded in, then folded in half again). At the very ends of the ties, fold the ends in first to hide those raw edges.
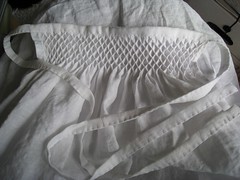 Step 11: Stitch the band to the apron, being sure to catch the folds in both the front and the back, and sew down the length of the ties for a finished apron.
18 May 2009
Smocked Apron, part 2
Part two for this smocked apron consists of the actual smocking stitches. Smocking has been described (accurately, I think) as embroidery on pleats, rather than a flat ground. And like the various other forms embroidery, smocking has it's own set of stitches. Fortunately, however, they tend to be simple (most are variants on backstitch) and they are generally worked in straight rows rather than figured designs. The stitch I have picked for this apron is honeycomb stitch, which opens up into a diamond lattice when finished.
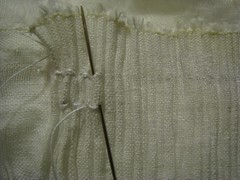 Step 5: For thread, I am using a medium weight white linen thread (35/2). Linen thread is particularly good for smocking, as it can be pulled snugly and won't slide back when not under tension, unlike silk. In the photo at right, I have just started the first row of stitches. You can see very faint pencil lines marking the row so that I stay in a straight line; these will wash out later. Also note that I've left some unworked width at the top, because we will be attaching the top edge to a band for the apron ties later.
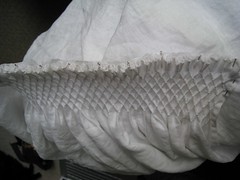
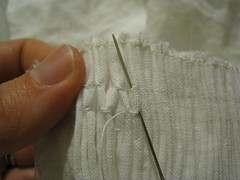 Here, I'm pulling the pleats apart a little to show the structure of the stitch, and how it creates the diamond pattern.
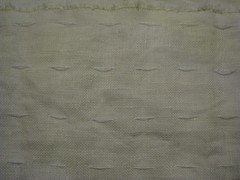
 Step 6: Because I'm only using the one stitch, I just repeat it until I've filled the entire pleated area. The bottom row here is a bit sloppy - this is because the last gathering thread is actually between the two halves of the last row of honeycomb stitch, so those stitches were worked over loose folds rather than tightly organized pleats. Which is why you should always pleat a larger area than you think you need - it can be difficult to get the last row to line up correctly, and better to have extra room than run over the edge.
 Step 7:Once the smocking stitches are complete, carefully snip the gathering threads and pull them out, letting the fabric relax to a natural width. If you look carefully, you can see the structure, with each of the original pleats zig-zagging back and forth.
16 May 2009
Smocked Apron, part 1
An apron is one of those accessories that can really make the look of an outfit, particularly when dressing in the style of a working woman. (They don't disappear from the clothes of richer women, until you get to very formal court attire, they just get fancier and more decorative.) Aprons aren't just for women, either, some men wore them too (cooks, feast servers, butchers, etc., as well as specialized aprons for field workers and blacksmiths). Karen Larsdatter has an good collection of images of aprons.
The particular apron I am making here is a relatively fancy smocked apron, worn by women in the late 15th and early 16th centuries. I have tried to provide enough detailed photographs of the process that it could be used as a tutorial on making a similar apron, or and introduction to smocking in general. For more detailed reference, I suggest The Art of Manipulating Fabric, which has detailed instructions on several smocking techniques.
Materials: a large square of lightweight white linen, approximately 30 inches per side. It is helpful, but not necessary, to have the top edge be a selvedge. Light and medium weights of white thread.
Step 1: The first step is to run gathering threads. They will be used to pull the fabric into straight, even pleats, and it's important to spend the extra time to get them right. These threads will be removed from the final project, and it is important that they be both strong and very smooth. Because of that, I've used a smooth-finish cotton thread, even though I'm using linen thread everywhere else in the project. Polyester is fine too; just avoid colors that might bleed.
The gathering threads are stitched in a grid pattern of running stitch. The length of the stitches determines the depth of the pleats. What most important is that the threads are in straight, parallel rows, and that the stitches line up in vertical columns, going in and out in the same place. With practice and patience, this can be done by eye, matching the weave of the fabric to keep lines straight, but it's generally easier to mark out a grid with fabric chalk ahead of time. Knot the threads so they don't pull through, but don't secure them to the fabric
 Step 2:As you go, you'll want to loosely gather up the fabric onto the threads, to make sure the pleats will fold up evenly.
 Step 3:You want to have enough gathering threads that the pleats are secured for the entire area you plan to do smocking over. I recommend adding at least one more than you think you're going to need (you'll see why in part two). Once all the threads are in, tie them together in pairs on one side, and then you can start gathering the fabric into tight pleats.
 Step 4:As you tight the pleats down onto the gathering threads, you may need to manually adjust some of the folds to lie flat, especially down at the last row of gathering. Fingerpress the correct crease into anything that's not behaving. Once the pleats are tight enough, tie off the threads at the other side. You do really want to make it as tight as you can - you don't want the pleats to be able to slide around on the foundation threads.
The particular apron I am making here is a relatively fancy smocked apron, worn by women in the late 15th and early 16th centuries. I have tried to provide enough detailed photographs of the process that it could be used as a tutorial on making a similar apron, or and introduction to smocking in general. For more detailed reference, I suggest The Art of Manipulating Fabric, which has detailed instructions on several smocking techniques.
Materials: a large square of lightweight white linen, approximately 30 inches per side. It is helpful, but not necessary, to have the top edge be a selvedge. Light and medium weights of white thread.
The gathering threads are stitched in a grid pattern of running stitch. The length of the stitches determines the depth of the pleats. What most important is that the threads are in straight, parallel rows, and that the stitches line up in vertical columns, going in and out in the same place. With practice and patience, this can be done by eye, matching the weave of the fabric to keep lines straight, but it's generally easier to mark out a grid with fabric chalk ahead of time. Knot the threads so they don't pull through, but don't secure them to the fabric
10 May 2009
Blue linen foundation gown
Additional pictures: back view
Here's one from the archives: a dress I've had for a while, but haven't written up here yet. This is a blue linen gown/kirtle that's a very basic part of my 15th century wardrobe. I have several similar ones, but this one in particular is cut with a very wide and very low neckline for wearing with my Burgundian court gown (about which I will hopefully write soon); however I also wear it with an earlier houppelande, and by itself with pin-on sleeves.
Construction Details: Unlined linen gown, handsewn with linen thread. Four-panel construction with waist seam; skirt portion has gores at front, back, and sides. Eyelets are on a separate strip to ease working with panels which are curved at the center front opening. This eyelet strip is four layers of fabric thick, to prevent buckling and gathering (2 layers of the outer fabric, and 2 layers of a more densely woven medium-weight linen). The eyelets are densely worked, approximately 5/8 inch apart on each side, approximately 3/8 inch back from the edge, and staggered between sides for spiral lacing.
Known Problems: The two main problems with this gown are both the choice of fabric. Firstly, I cannot document either colored linen, or linen used as an outer garment for this time and place. My best justification is how comfortable it is in the summer. The second problem is structural: the fabric is simply too coarsely woven to be really good for this style. I think I have had to mend this more times than anything else I own, because in seams under stress, the fabric will pull out of the stitching, one thread at a time. I think I've now fixed all the problem areas with reinforcement and multiple lines of stitching, but a tighter weave would have performed better.
09 May 2009
18th c. strapless stays: nearly finished (no, really this time)
I had to rip out my center insert to re-do the boning channels, because they were neither straight nor even. While I was at it, I did a lot of basted fitting to double check whether I really needed it. In the end, I trimmed the new piece down to a mere 1 inch finished width. It doesn't seem like it ought to make that much of a difference, but it really does. That one inch is the difference between va-va-voom 18th c. cleavage, and spilling over the top in an embarrassing fashion. We've all seen the woman who makes you say "That isn't supposed to be an underbust bodice..." - I don't want to be that woman.
Once the fitting was finally finished, I adjusted the seams on the lining to match, and attached it with a big whipstitch at top and bottom, and a neat hemstitch at the back opening beside the eyelets. Here's a picture of the inside. All that's left to do is bind the edges.
In retrospect, I think a lot of the trouble I had with fitting these had to do with my method for enlarging them, as it relates to my shape. I followed the pattern directions, which have you widen each of the 10 pieces equally. Generally this is sound. However, if you're adding several inches at the bust, it really does matter whether the extra size is mostly breast, or mostly ribcage. For me, my waist and (more importantly) overall ribcage would fit the pattern size - the difference is DDs. The upshot is that the back pieces probably didn't need to be enlarged - my back, from side to side, isn't any wider than the original pieces. I should have concentrated the increase at the sides and front. I the end, I made it work and I think they'll be serviceable, but if I ever get it in to my head to do another pair, I'll probably start from a different base; maybe try to find a pattern or extant example that has a larger bust to waist ratio.
28 April 2009
Another foray into the 18th century?
What with my new copy of Fashion in Detail, working on the strapless stays, and a trip to the Fort Frederick Market Fair this weekend, I seem to have the 18th century on the brain. The dress that has really caught my fancy is this one in the V&A's collection. It is English, estimated at mid 1770s, in a pumpkin color that I'd probably look awful in. If you don't have the book for reference, the front is flat with a round neck and open skirts. What I really like about is the way it is at once both quite plain and finely detailed. I also love the back pleats that run continuously down from the top of the bodice (where they are stitched down) all the way down through the skirts without any sign of piecing or a waist seam.
I'm not sure that I want to start this gown, but I'm starting to plan out how I would approach it if I decide to. I need to look through Bradfield's Costume in Detail, as there are likely a few similar gowns in there, and it's as good an excuse as any to pick up the relevant volume of Arnold's Patterns of Fashion. Kass from Reconstructing History has a photo diary of making a closed gown with similar details, and of course there's also her pattern for an open robe anglais. J. P. Ryan also has a Robe a l'Anglaise pattern, which based solely on the line drawings on the covers might be closer to the style I'm looking for. On the down side, though, her patterns are single-size-per-envelope, which would mean a significant amount of redrafting. If anyone happens to know of other resources which document this particular gown more completely (it's certainly in good enough shape to be patterned from), I'd be more than happy to hear about it.
As for the progress on the strapless stays, they perplex me at every turn. My center front insert is trimmed down to 2 1/8", and boned with more reed, and I'm really quite happy with the fit. But if I lace to comfortably snug, the back edges touch, suggesting that maybe I didn't need to enlarge them after all? And yet I can assure you they were really too tight before. In theory, they're now ready for lining and binding, but I may rip out and re-sew the new section one more time, because the seamlines aren't as straight as I'd like.
17 April 2009
Facing the music
So, after months and months of a mixture of avoidance and denial, the truth is obvious: the strapless stays are not likely to stretch out to my size, and neither will I shrink to theirs. Rather than abandoning them, I'm still going to try to make them work. So tonight, I pulled the reed out of a few channels on either side of the center front, and picked open that seam. I managed to find all the materials that I had started with, and I drafted out an additional piece to insert. I cut it about 6 inches wide, plus seam allowances, although I think I'll only need 4 inches or less of extra room. I've left the rest of the boning in, so I should be able to get a good idea of the final fit. Except for the fact that I'm out of white thread (?!), which means that this is on hold again at least until I can get to the store.
Adding a large adjustment like this in just one spot, rather than distributing it throughout all the pieces, will change the shape of the stays a bit, although hopefully not too much. The dips for the arms will move around towards the back, and although they were too far forward in the current incarnation, I might need to trim down the side front points for comfort. The center front point will also be notably longer if I keep the current slope of the edge, although, again, I can trim it down as needed.
Adding a large adjustment like this in just one spot, rather than distributing it throughout all the pieces, will change the shape of the stays a bit, although hopefully not too much. The dips for the arms will move around towards the back, and although they were too far forward in the current incarnation, I might need to trim down the side front points for comfort. The center front point will also be notably longer if I keep the current slope of the edge, although, again, I can trim it down as needed.
16 April 2009
Books: Fashion in Detail
Oh, my poor neglected blog. Today's (brief) note is about availability of some very nice books. New high-quality softcover editions of the V&A's Seventeenth and Eighteenth-Century Fashion in Detail, and Nineteenth-Century Fashion in Detail have been released this spring (earlier editions were becoming hard to find). Both are full of close-up, full-color photographs of extant garments, with brief descriptions and line drawings of the complete items. They are absolutely beautiful, very affordable, and highly recommended if they correspond to your periods of interest. They're particularly useful for finishing and embellishment ideas; slightly less useful for complete garment reconstruction, since there aren't full-length photos.
12 January 2009
Finished 'fleur-de-lys' gown with hat

I really had a great time at 12th Night in this outfit; the hat especially is just so much fun (and other people seemed to think so too, which always makes my day).
Final wrap-up on the project:
The dress I am mostly happy with, although it's been a long road with some serious doubts along the way. It doesn't look quite as nice as I originally imagined in my head, but it does still look good. The fabric, a rare find I just couldn't pass up, has a bit too much body to it to drape quite right. Coupled with my decision to go with a pullover style and skip a long opening, and you can't get the body-skimming fit and soft folds that the inspiration has. If I was doing this dress again, I'd either pick a fabric with a softer hand (let me know if you find any wool brocade, mmmkay?), or I'd put an invisible zipper in one of the side seams under the arm. Plausibly, the original might have been laced (front, back, or side, there's no way to know), but I just couldn't picture it, and the thought of putting stress-bearing eyelets into satin makes me want to run screaming.
The hat I'm more positive on; essentially my only reservation is that it's a little larger than I intended. I failed to account for the extra volume taken up by the covering of feathers, which was just a silly oversight. So it's even more over-the-top, and I can hardly be sad about that. My technique at sewing feathers has improved quite a bit too - it's harder to do on a solid base like this than a flat hat like the Tellebarrett where you can work from both the top and the bottom.
07 January 2009
Feathered hat progress
There's nothing like a deadline to get you moving on a project. I really want this hat finished for 12th Night, which is this weekend, as it will really make or break the outfit. It's looking good from the top, but the side shows the truth. And yes, it will be completely covered in feathers, aside from the inside band. Actually, I'm a bit further along, since I took these pictures before working on it last night. The bottom edge is now covered in as well, and I'm just starting to work on filling in the middle, overlapping feathers so the change in direction isn't so obvious. (For comfort, I've kept the stiff root end of the quills always away from the head opening, which means that the top and the bottom have feathers going in different directions.)
The large string of beads from the original inspiration will probably be a miss for this weekend because of time constraints, although I would still like to make it. I do, however, have a new pair of appropriate shoes that I got for Christmas, which makes me very happy.
The large string of beads from the original inspiration will probably be a miss for this weekend because of time constraints, although I would still like to make it. I do, however, have a new pair of appropriate shoes that I got for Christmas, which makes me very happy.
Subscribe to:
Posts (Atom)