I've sewn all the pleats down onto the linen tape, and then pinned the whole thing onto the bodice to re-check fit. I apparently drafted the bodice a bit too long-waisted, and had to move the skirts about an inch higher than expected. It's just as well, because the bottom edge otherwise would have needed to be shortened. The extra-wide seam allowance is nice too, because it looks like I'll need to tack the backside of the pleats down to it in order to keep the seam allowance pointing down rather than up. I think I need to put in most of the hooks and eyes so I can actually try it on properly before I actually sew the waist seam, since it's hard to tell how high or low the center front will hang when you're just holding the edges together with your hands while you're wearing it.
Obviously, I don't have a dress form, so it's a little hard to set gowns up for display or photography. I almost bought one this week, but they are expensive, and I spent my money on fabric instead. (6 yards silk-faced brocade, navy blue with gold fleur-de-lis!) Once the front closure is ready, I can hopefully get some pictures with me modeling it.
30 December 2006

27 December 2006
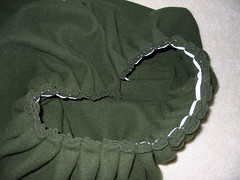
Kampfrau gown - skirt assembled and pleated
Since the last update, I've sewn the side seams and a front opening on the skirt panels, and, as the picture shows, pinned the pleats in place. I've pleated onto a linen tape that is cut and marked to the measurements of the bottom of the bodice. That gives me a bit more stability to pick things up and move them around compared to just pinning the fabric to itself. I can also completely sew down the pleats before attaching to the bodice, while still being assured that it will line up correctly.
I've used a combination of stacked pleats and box pleats, which are structurally and visually similar. The skirt panels are divided equally between the four bodice sections, but the back sections are significantly narrower than the front, so I was able to get 5-to-1 stacked pleats all across the back. (I find that stacked pleats behave a bit better than the roll pleats that Kass mentions in the directions. Both styles have the same take-up.) Because the front sections are wider, I have just a couple of stacked pleats at the sides and then switch over to box pleats. This leads to less fullness in the front, which isn't really a bad thing, but if I'd had enough material, I might have preferred to add width to the front skirt panel so that I could do stacked pleats all the way around. It seems to hang quite nicely, though, so I'm happy with the way it is. Of course, the material has so much body that it quickly falls out of the pleats and into much larger, looser folds.
Next, I'm going to sew the pleats down to the stay tape, and then attach the skirts to the bodice. Then I'll either put in the front closure (hooks and eyes, I think) or finally get started on the sleeves. I still haven't decided whether I want to line the sleeves, though, and I''m not totally sure what fabrics I'll use for the cuffs. (I cut pieces for doing main fabric + contrast fabric, but I'm thinking of maybe doing both sides in the contrast fabric.)
15 December 2006
Kampfrau gown - skirt update
I've sewn the guards down to the skirt panels; about two evenings worth of work. I did end up moving the top band down by about an inch, so the spacing is a bit better. Other than that, though, the panels look a lot like they did when the guards were just positioned rather than sewn, so no new pictures yet. I probably won't have much of a chance to work on this project until after Christmas.
11 December 2006
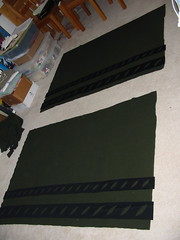
Kampfrau gown - skirt panels
These are the two skirt panels laid out with the slashed guards on top. They look kind of skimpy when they're just flat like that, but the pattern tells me that two 60 inch panels is quite reasonable, so I'm just going with it - that's all the fabric I have.
I bought a rotary cutter and mat just to do the little football cutouts on the guards. That was a lot easier than using scissors like I did for the bodice. The corners aren't half as precise as I'd like, and I had to go back and trim most of them with scissors, but really they look pretty good when you're not peering at them from 3 inches away. The only thing I'm thinking about changing is the spacing of the bands; I might move them closer together. I need to get them pinned down where they are now, though, so I can hold it up to see for sure.
I bought a rotary cutter and mat just to do the little football cutouts on the guards. That was a lot easier than using scissors like I did for the bodice. The corners aren't half as precise as I'd like, and I had to go back and trim most of them with scissors, but really they look pretty good when you're not peering at them from 3 inches away. The only thing I'm thinking about changing is the spacing of the bands; I might move them closer together. I need to get them pinned down where they are now, though, so I can hold it up to see for sure.
30 November 2006
Kampfrau gown - bodice assembled but unlined
Progress on the kampfrau gown has been slow, mostly due to lack of time. Since the last update, I've finished the cutouts on the guards for the bodice, and sewn them down. I've also sewn down all of my edges and seam allowances (except armscye and waist, which will be finished later). Kass's instructions have you doing this in the same step as fitting in the lining, using a prick stitch, but given the thickness of my fabric (and hence it's extreme reluctance to hold a nice folded edge), I decided to do two separate steps. The edges are held down with a running stitch going through both layers of wool and interlining, but not coming out all the way to the top of the guards. At the side and back seams, the seam allowances are only tacked down into the interlining, since a crisp edge is not as important. When I put in the lining (actually about halfway done now, but not in this picture) I'll just use a small hem stitch and secure the lining into the already folded down edges, rather than going all the way through.
20 November 2006
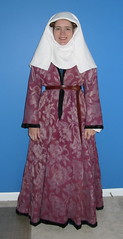
Early 15th c. houppelande with veils
I made this houppelande a couple of years ago, but I think it has always suffered from a lack of appropriate headgear. So this week I made up three new linen veils to arrange in the style of this portrait by Campin. Dates for that painting seem to be around 1430.
The houppelande was originally a 'scraps project' - in other words, what can I make out of this fabric that was leftovers from somebody else. It is a poly-cotton damask originally in an off-white tone-on-tone pattern. Several bottles of RIT later, and it's pretty nice in color (if not in design) since the polyester and cotton threads take up dye quite differently. It's cut without any sort of pattern in a very basic A-line shape, and fully lined in a very short pile faux fur. I'm wearing a linen chemise and short-sleeved kirtle underneath. The chemise sleeves are a bit long, which is why one is peeking out.
The bumps in this fairly conservative veil style are still small enough that I can just use my own hair pulled into two braided buns rather than building something more structural. The first veil is a small rectangular one, doubled over; wide enough to cover the top of my head and long enough to reach my shoulders. It goes across my forehead, around the bumps, in front of my ears, and the back edges are then pinned behind my neck to keep it from sliding forward. The second veil is a circle, 2 foot diameter and folded in half, and arranged as a wimple. The third veil is a large square veil, again folded in half, on top of everything. (The original is actually folded in the other direction, so it would have be a long skinny rectangle, approximately 4:1.) I pinned pretty securely into my hair, and it really didn't move all day. It also kept me fairly warm, which was a good thing.
06 November 2006
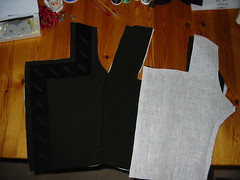
Kampfrau bodice pieced
My linen for interlining came in, so I've now got the main bodice sections sewn together. I've also gotten the cutouts done in just one of the guard pieces, shown here lying on top of its corresponding piece, but not sewn down. I did start with just slashed openings, but much like I had expected, the slashes only opened up nicely when they were free, and not secured to a solid backing fabric. So I changed over to these disc-shaped cutouts, which look just about right to me. Fortunately, the black wool won't fray at all unless picked at, so it doesn't need to be turned. I'm planning to sew down the guards, close the shoulder seam, and put off adding the lining until pretty late in the construction process.
24 October 2006
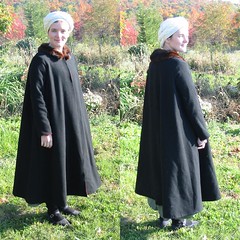
A schaube - my new replacement cloak
This wasn't one of my most heavily researched projects, but it was made from just materials on hand, and is fairly period. I mostly based it around woodcuts at Myra's schaube documentation. The Curious Frau's schaube dress diary also has good images (although the style shown is a bit later). The short length is unusual, but it's very convenient, and there is at least a little evidence for it.
It is made of a coat-weight wool, and fully lined in a bright red linen. The fur collar is a piece I inherited (it went with a matching stole) - mink, I think. You can't see it at all in the photo, but it closes at the neck with a cast pewter button (which happens to feature the device of my favorite Barony :-) ); I've got additional buttons that I plan to add eventually, but even one button does a good job of keeping the coat closed.
I definitely prefer a coat like this over a cloak; it kept me warm in chilly, windy weather this weekend, and I didn't have to take it off to shoot (a little tricky with the quiver, though). If I was going to make another one, I think the sleeves are too narrow, and I'm not totally happy with the A-line look of it. I think that's mostly a function of the stiffness of the wool, so I'm hoping it may soften up with more use.
19 October 2006
Guarded optimism
I've cut all the main pieces for the kampfrau gown. The fabric is a fairly heavy wool melton in a muted green - the same fabric that I used for the 1470s Burgundian gown. I found scraps big enough for the bodice back and cuff pieces; the bodice front and sleeves (on the bias) were cut from my remaining yardage as efficiently as I could manage, and there was just barely enough left for two skirt panels (full fabric width ~59" x waist to hem ~39"). There really aren't any pieces left that are big enough to do anything with. I don't have anything on hand that would work well for interlining, so a lot of the construction is going to have to wait until I can get some ordered. I've got lightweight linen for the lining, but I don't want to cut that until I'm almost ready to put it in.
That just leaves cutting the guards from my accent fabric (a fulled and napped medium-heavy black wool). The skirt guards are clear enough, since they're just straight strips. The guarding for the top, on the other hand, threw me for a bit of a loop. The only guidance from the pattern is straight strips 2 or 3 inches wide. One option would be to use rectangular strips and piece them around the neckline, making joins at the corners. The other option is to use a pre-shaped piece that echoes the edge of the neckline. Two considerations pushed me toward the second option. First, since my guards will be slashed, I really want as much structual integrity as possible - the bulk of seams and joins won't help in getting smooth and even slashing. Second, most of other people's reproductions that I really admire seem to use continuous, shaped pieces - or at least they look that way in photos. It's much more apparent that this is the way to go with the slightly earlier, more rounded neckline.
So I ended up doing guard pieces that are essentially cut-outs of the front and back pieces. I started 5/8" in from the neckline and center front opening (to allow room for finishing without losing guard width) and made them an even 2" wide. The plan is to attach them after doing the interlining, but before totally assembling the bodice with the lining.
My only remaining question is how exactly to do the slashes. I'm afraid that if I just cut a slit, the fabric behind won't really show through, so I might need to do a slightly wider cutout that actually removes material. I'm hoping that's not the case though, since I think I'd have trouble getting the cutouts to be even and consistent. Stitching the guards down might stretch the opening enough to make the slash noticeable, but I don't know if it'll be enough. I suppose I'll just have to experiment with some scraps.
17 October 2006
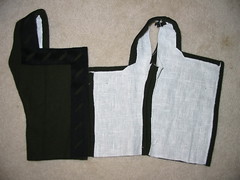
Kampfrau gown - initial mock-up
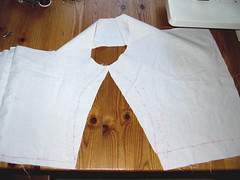
I'm starting a new project: a Kampfrau gown in green with black guards, to look very much like this one. I'll be using Reconstructing History's pattern for 1520s German Commonwoman's Gowns, which is unusual for me (I typically draft my own). I picked the colors based on what I have enough leftover yardage of, but I thnk the scheme will work. I just need to remember not to go with green next time I buy for a big project so that I don't end up too monochromatic ^_^
So far, I've made and fitted a muslin mock-up for the main bodice pieces (shown above - back on the left and front on the right). The pieces were traced directly from the pattern; the solid pink lines mark my new cutting lines. It's worth noting that the front piece is about an inch long than the back piece at the side seam - this is on purpose and the pieces should be eased to fit, but the directions don't actually mention that. I ended up losing the ease in the course of multiple pinnings and adjustments, which is why I needed to trim off much more on the front than the back. Although in the end it looks like I just worked the side seam in symmetrically, the intermediate stages looked a lot less similar to the original pieces. I've thought about trying to draft the ease back in before cutting my main fabric, but I'm not sure it would be worth it. I do wish the pattern had marked an underbust adjustment point (rather than just chest and waist at the top and bottom corners) - that would have saved me a lot of grief in drawing out the initial pattern. I should have known better, since I'm fairly familiar with the 15th c. supportive styles, but you need a snug fit in the ribcage in order to get some support from a gown, and I just wasn't going to get that from the straight-edged pieces that I started with. Fortunately, the straps and neckline seem to work for me without adjustment.
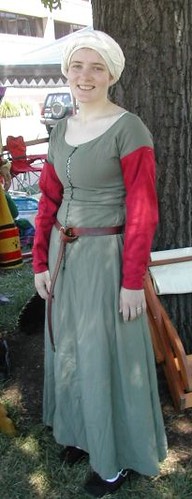
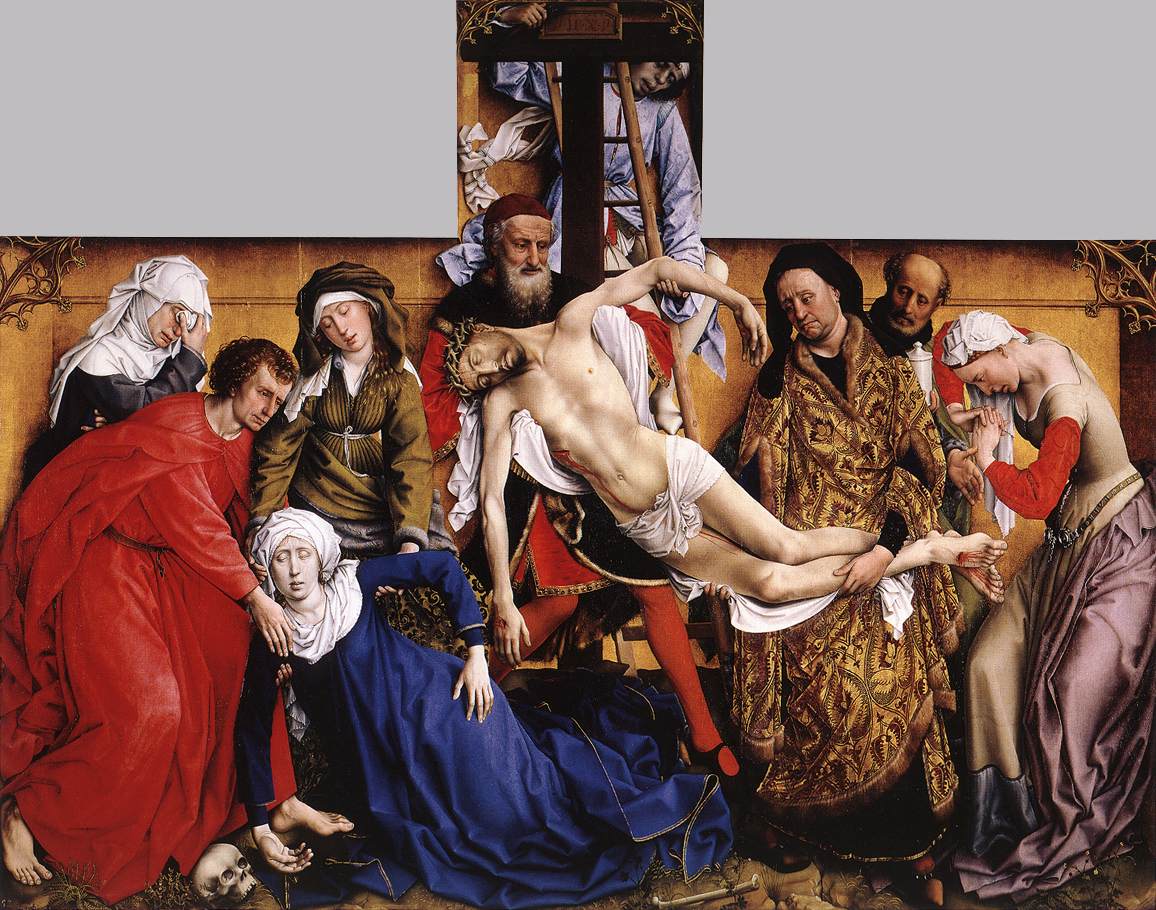
15th c. Flemish working-class a la van der Weyden's Magdalena
This is the first outfit I made specifically for the SCA and with an eye to historical accuracy. Previously, I'd done a fair bit of sewing, but directed toward the theatrical, Renfest, and cosplay end of the spectrum.
My direct inspiration for this gown was van der Weyden's 'Deposition', although I should note that this style is not restricted to depictions of Mary Magdalene. It seems to have been the basic working woman's dress of the 15th century; without oversleeves when working in the fields or the kitchen, with sleeves when in more public settings.
The gown itself is made of a lightweight worsted wool, unlined. I used a four-panel, three-gore (sides and back) construction, with raglan-cut short sleeves. I have material for a fourth gore that I have always intended to set into the front seam, but it seems increasingly unlikely that I ever will. The gown is not a self-supporting one - this is partly because it is unlined, and wool is moderately stretchy, but mostly because it was not sufficiently fitted for that. As a result, I now always wear this dress with a more tightly fitted linen underdress that provides support. Ideally, that would be the lining for the gown rather than a separate item, but it is functionally equivalent. The gown laces through 8mm sterling silver jump rings, soldered closed. They were bright and shiny when new, but quickly tarnished to a nice dark patina. This was all handsewn with silk thread.
The red pin-on sleeves are a poly-cotton damask and machine sewn. Each has two fabric-ball buttons at the wrist for a closer fit. The head wrap is a simple, very long rectangle of fine linen. The leather belt was made for me by my husband, using purchased brass reproduction hardware. I am also wearing a linen chemise (long sleeved, mid-calf length) and linen knee-high hose.
16 October 2006
Introduction and Welcome
I've decided to split off my dressmaking projects and other sewing activities from my general purpose social blog (which can be found here). I plan to have commentary and progress pictures of ongoing projects, as well as showcasing completed items, thoughts on recreation methods and theories, maybe articles on specific topics and techniques, and anything else sewing-related that strikes my fancy. Hopefully the new labels feature of Blogger Beta will allow me to keep various separate projects organized within this single space, rather than creating separate blogs for each. I'm thinking I'll start with the highlights of actually finished items in my wardrobe, so that should be up here soon.
Subscribe to:
Posts (Atom)