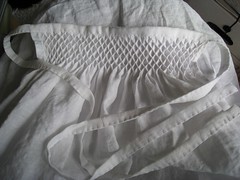
The last stage of making the apron is attaching it to a narrow waistband which extends past the edges into long ties. Between part 2 and today's entry, I hemmed the raw edges around the sides and bottom of the apron panel. Ideally, this should have been done at the very beginning of the project, before pleating, but it didn't present any problems since I purposely left a little width unpleated so that I would have room to turn a hem under.
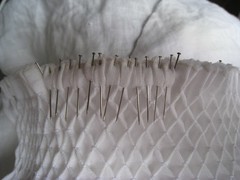
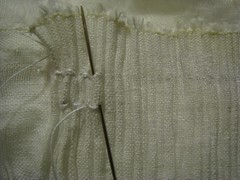
Step 8: Stretch the smocking out to the desired width, and pin to the band starting with the two ends, then the middle, and then further subdividing to get the distribution even. You generally want a gentle amount of stretching: enough to open up the pleats, but not too much, which can cause the smocking to curl up on itself. As shown in the photo, for the initial pinning you want to pin the "valleys" of the pleats to the band, not flattening down the tops of the pleats yet. The edge of the band should be on straight grain and lined up with the top of the pleats, and at this point I haven't cut it to width yet. The band should be long enough to extend past the edges of the apron, but doesn't have to be a long enough for the ties in a single piece, as it can be pieced later.
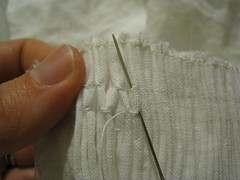
Step 9: Once the apron panel is secured, and you are happy with the width and the way it hangs, start flattening the pleats. I try to massage each standing pleat into a tiny (inverted) box pleat, so that the 'top' of the pleat is still roughly centered, rather than falling to one side.
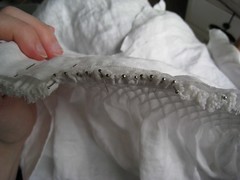
This top view of the same stage shows how much this compresses the depth of the smocking.
Step 10: At this point, there are a very large number of pins holding the apron to the band. You'll need to stitch these down, either by hand or machine. If doing machine stitching, work closer to the raw edge, so that it can be hidden once the band is folded over to the front. Once all the pins are out we can fold the band down to it's final width. The band is folded in the back (possibly farther from the edge than the stitching line), folded over the top and down to the same depth in the front, and tucked under for a finished edge. If necessary, trim the band to the appropriate width, and/or add additional pieces of the same width to lengthen the ties. Extend the folds to the end of the ties (basically, raw edges folded in, then folded in half again). At the very ends of the ties, fold the ends in first to hide those raw edges.
Step 11: Stitch the band to the apron, being sure to catch the folds in both the front and the back, and sew down the length of the ties for a finished apron.
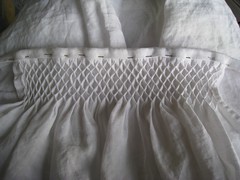
Part two for this smocked apron consists of the actual smocking stitches. Smocking has been described (accurately, I think) as embroidery on pleats, rather than a flat ground. And like the various other forms embroidery, smocking has it's own set of stitches. Fortunately, however, they tend to be simple (most are variants on backstitch) and they are generally worked in straight rows rather than figured designs. The stitch I have picked for this apron is honeycomb stitch, which opens up into a diamond lattice when finished.
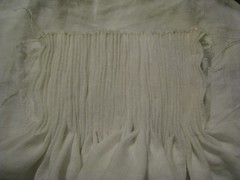
Step 5: For thread, I am using a medium weight white linen thread (35/2). Linen thread is particularly good for smocking, as it can be pulled snugly and won't slide back when not under tension, unlike silk. In the photo at right, I have just started the first row of stitches. You can see very faint pencil lines marking the row so that I stay in a straight line; these will wash out later. Also note that I've left some unworked width at the top, because we will be attaching the top edge to a band for the apron ties later.
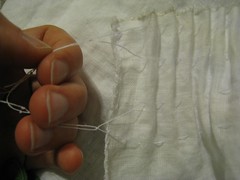
Here, I'm pulling the pleats apart a little to show the structure of the stitch, and how it creates the diamond pattern.
Step 6: Because I'm only using the one stitch, I just repeat it until I've filled the entire pleated area. The bottom row here is a bit sloppy - this is because the last gathering thread is actually between the two halves of the last row of honeycomb stitch, so those stitches were worked over loose folds rather than tightly organized pleats. Which is why you should always pleat a larger area than you think you need - it can be difficult to get the last row to line up correctly, and better to have extra room than run over the edge.
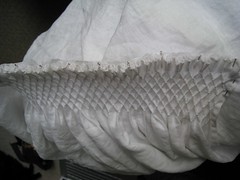
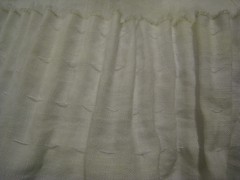
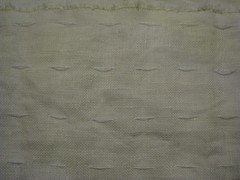
Step 7:Once the smocking stitches are complete, carefully snip the gathering threads and pull them out, letting the fabric relax to a natural width. If you look carefully, you can see the structure, with each of the original pleats zig-zagging back and forth.
An apron is one of those accessories that can really make the look of an outfit, particularly when dressing in the style of a working woman. (They don't disappear from the clothes of richer women, until you get to very formal court attire, they just get fancier and more decorative.) Aprons aren't just for women, either, some men wore them too (cooks, feast servers, butchers, etc., as well as specialized aprons for field workers and blacksmiths). Karen Larsdatter has an good collection of images of aprons.
The particular apron I am making here is a relatively fancy smocked apron, worn by women in the late 15th and early 16th centuries. I have tried to provide enough detailed photographs of the process that it could be used as a tutorial on making a similar apron, or and introduction to smocking in general. For more detailed reference, I suggest The Art of Manipulating Fabric, which has detailed instructions on several smocking techniques.
Materials: a large square of lightweight white linen, approximately 30 inches per side. It is helpful, but not necessary, to have the top edge be a selvedge. Light and medium weights of white thread.
Step 1: The first step is to run gathering threads. They will be used to pull the fabric into straight, even pleats, and it's important to spend the extra time to get them right. These threads will be removed from the final project, and it is important that they be both strong and very smooth. Because of that, I've used a smooth-finish cotton thread, even though I'm using linen thread everywhere else in the project. Polyester is fine too; just avoid colors that might bleed.
The gathering threads are stitched in a grid pattern of running stitch. The length of the stitches determines the depth of the pleats. What most important is that the threads are in straight, parallel rows, and that the stitches line up in vertical columns, going in and out in the same place. With practice and patience, this can be done by eye, matching the weave of the fabric to keep lines straight, but it's generally easier to mark out a grid with fabric chalk ahead of time. Knot the threads so they don't pull through, but don't secure them to the fabric
Step 2:As you go, you'll want to loosely gather up the fabric onto the threads, to make sure the pleats will fold up evenly.
Step 4:As you tight the pleats down onto the gathering threads, you may need to manually adjust some of the folds to lie flat, especially down at the last row of gathering. Fingerpress the correct crease into anything that's not behaving. Once the pleats are tight enough, tie off the threads at the other side. You do really want to make it as tight as you can - you don't want the pleats to be able to slide around on the foundation threads.
Additional pictures: back view
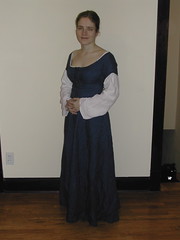
Here's one from the archives: a dress I've had for a while, but haven't written up here yet. This is a blue linen gown/kirtle that's a very basic part of my 15th century wardrobe. I have several similar ones, but this one in particular is cut with a very wide and very low neckline for wearing with my Burgundian court gown (about which I will hopefully write soon); however I also wear it with an earlier houppelande, and by itself with pin-on sleeves.
Construction Details: Unlined linen gown, handsewn with linen thread. Four-panel construction with waist seam; skirt portion has gores at front, back, and sides. Eyelets are on a separate strip to ease working with panels which are curved at the center front opening. This eyelet strip is four layers of fabric thick, to prevent buckling and gathering (2 layers of the outer fabric, and 2 layers of a more densely woven medium-weight linen). The eyelets are densely worked, approximately 5/8 inch apart on each side, approximately 3/8 inch back from the edge, and staggered between sides for spiral lacing.
Known Problems: The two main problems with this gown are both the choice of fabric. Firstly, I cannot document either colored linen, or linen used as an outer garment for this time and place. My best justification is how comfortable it is in the summer. The second problem is structural: the fabric is simply too coarsely woven to be really good for this style. I think I have had to mend this more times than anything else I own, because in seams under stress, the fabric will pull out of the stitching, one thread at a time. I think I've now fixed all the problem areas with reinforcement and multiple lines of stitching, but a tighter weave would have performed better.
I had to rip out my center insert to re-do the boning channels, because they were neither straight nor even. While I was at it, I did a lot of basted fitting to double check whether I really needed it. In the end, I trimmed the new piece down to a mere 1 inch finished width. It doesn't seem like it ought to make that much of a difference, but it really does. That one inch is the difference between va-va-voom 18th c. cleavage, and spilling over the top in an embarrassing fashion. We've all seen the woman who makes you say "That isn't supposed to be an underbust bodice..." - I don't want to be that woman.
Once the fitting was finally finished, I adjusted the seams on the lining to match, and attached it with a big whipstitch at top and bottom, and a neat hemstitch at the back opening beside the eyelets. Here's a picture of the inside. All that's left to do is bind the edges.
In retrospect, I think a lot of the trouble I had with fitting these had to do with my method for enlarging them, as it relates to my shape. I followed the pattern directions, which have you widen each of the 10 pieces equally. Generally this is sound. However, if you're adding several inches at the bust, it really does matter whether the extra size is mostly breast, or mostly ribcage. For me, my waist and (more importantly) overall ribcage would fit the pattern size - the difference is DDs. The upshot is that the back pieces probably didn't need to be enlarged - my back, from side to side, isn't any wider than the original pieces. I should have concentrated the increase at the sides and front. I the end, I made it work and I think they'll be serviceable, but if I ever get it in to my head to do another pair, I'll probably start from a different base; maybe try to find a pattern or extant example that has a larger bust to waist ratio.