After a bit of experimentation, I've found a basic chemise design that's comfortable, simple to make, and works well with the majority of my historical wardrobe (that being clothes from 15th c. northwest Europe). If I venture to other times and places, I may need a different style of underwear, but when I just need a new chemise it's usually a copy of this one.
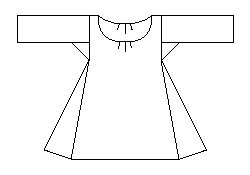
I use a simple geometric cut that's based on earlier tunic styles. While outerwear in this time uses increasingly complex tailoring, the rare depictions of chemises in art suggest that it continued to be a simple, loose garment. The main body panel is a large rectangle, folded over at the shoulder, with overall width slightly larger than half the bust measurement. Normally, this would produce a shoulder seam that falls down the arm, but pleats at center front and center back in the neckline pull the width together so that the shoulder seam falls on or near the natural shoulder. The sleeves are also rectangular, forming an untapered tube, with a square underarm gusset. Triangular gores in the side seams fill out the width of the chemise, with overall length being below knee to mid-calf. The neckline generally follows that of the gown it is to be worn under; mine typically have a low scoop neck, matching my 15th c. kirtles. I typically use 3-4 small box pleats at center front and center back in the neckline, but that is adjusted based on fit as I am finishing the garment.
For construction, nothing I have found beats lightweight linen, the lighter weight and finer weave, the better. I start assembly by sewing each sleeve to its gusset, then down the arm. Once each sleeve is assembled, I match the top of the sleeves to the shoulder point (mid-point on the length) of the body panel, and work down in both directions until the seams meet at the bottom of the gussets. Then I attach a gore to each side, front and back, and finally sew the side seams between the gores. Cutting the neckline is more an art than a science - start with the smallest hole that fits over your head and gradually trim away. The front needs to be lower (frequently a lot lower) than the back. The shape I end up with before I put in the pleats is a rectangle with rounded corners - there's a flat edge in front and back that will be taken up by the pleats, and a short straight section on the sides right where it hits the shoulder line. I finish the neckline with a single fold, and cover the raw edge on the inside with a length of 1/4 inch linen tape, sewn down with two rows of running stitch. This produces a very stable, neat neckline that won't roll or stretch out of shape.
20 November 2007
09 November 2007
18th c. strapless stays: fully boned
I've finally finished getting all the boning in and the ends trimmed to the right lengths on my strapless stays. My channels ended up being a bit narrow, so it was more work than in should have been, I think. Anyway, it's 1/4" half-round reed; two per channel with flat sides together. I do definitely like the lightness of the reed - even as a completely boned garment, it doesn't seem too heavy.
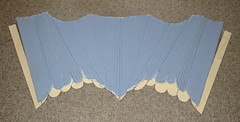
My biggest problem at this point is one of size and fit. In the photo, the stays are laying on top of the mock-up used to create the pattern pieces. And it's 2+ inches smaller horizontally (vertical is more or less unchanged). This turns a quite reasonable 2 inch gap for lacing into more like a 5 inch gap, with the dips for my arms being too far forward. I've double-checked my pattern pieces and my unassembled lining against my mock-up, and they're all the right size and include the proper seam allowances. So most or all of this difference is due the the shrinkage from inserting the boning.
So long story short, these stays are nearing completion and it doesn't look like they'll fit me. My plan at this point is to go ahead and put eyelets in and try to wear it as-is, which will hopefully stretch things out again. If not, I'll be thinking about replacing the two center front sections with much larger ones. Either that, or find a very petite lady doing 18th c. reenactment who'd be interested in buying them.
02 November 2007
Slow season
For me, fall is a bit of a slow season for sewing (as is showing in the lack of activity here). I've finished with last season's projects, and done the mending for the clothes that got worn a lot during the warmer months. But I haven't yet geared up for any big winter projects. This year, I've also been busier than usual with work, which slows things down even more. But I have gotten a few things done in the six weeks since my last post. From the pile of UFOs (UnFinished Objects), I finally put all the buttons and buttonholes on my schaube from last year. I've got reed into all the channels for my 18th c. stays, and I'm currently working on trimming them down to exactly the right size in order to bind the edges. I'm a bit worried about the fit on that project, though, as it seems to be turning out quite noticeably smaller than my mock-up. I've a also started a new project; I made a quick muslin for a new gown I'd like to get done for Twelfth Night. On the fiber arts side, I bought a ball winder and a swift, mostly for use with my spinning. I've also been working (very slowly) to clean and deal with accumulated clutter in my sewing room. This is a major quality of life issue as far as being able to work on projects, as my actual space for doing stuff was disappearing at an alarming rate. Hopefully I'll soon have more done in the way of 'visible' progress.
14 September 2007
18th c. strapless stays: instant gratification
The more I thought about this project, the more I realized that it was an 'instant gratification' project. Not that any sewing project is truly instant gratification, but in the sense that I was much more interested in finishing the object quickly rather than devoting months to the process. To that end, I've gone entirely with machine sewing, for both assembly and topstitching for the channels. (The channels are half done in the photo, I finished the rest of them this evening.) I am so much more happy with the project now, and excited about finishing it up, so I know I made the right call. I've gone with white stitching over the light blue fabric for a little contrast, and I'm hoping to get white kidskin leather for the binding to match. First, comes boning, though. I've got 1/4" half-round reed starting to uncoil, and I'll probably start on that in the next couple of days.
12 September 2007
18th c. strapless stays: (lack of) progress
I've not gotten much done on this project in the past two weeks. Basting the layers together was quick and easy, but the pieces have pretty much remained in that state ever since. I had been thinking that I would do all handsewing for this, and I started assembly with a fairly small, precise backstitch. Having done only the first seam (center front) and an inch of the second, though, the primary feeling I get when I think about picking it up again is one of dread. The thickness of the six layers combined with the strength of the seam that I think will be necessary slowed my speed to a painful crawl. So, given how I'm now feeling about this project, my inclination is to switch over to machine sewing for the main assembly. I'll probably re-visit the question of hand sewing when I get to the boning channels, since they'll be more visible (and perhaps easier, since there are fewer layers at a time).
03 September 2007
16th c. Persian ensemble, with finished hat
This is my 16th c. Persian ensemble, with the previously blogged hat. I've got a deceptive amount of clothing on here: both visible coats are fully lined, plus the chemise-type layer and pants beneath. So it's not well suited to hot weather, yet somehow I always seem to wear it in the summertime anyway. I do like this outfit a lot; it feels very comfortable and relaxed.
My pirahan (chemise) is white lightweight linen, and the salwar (pants) are a soft, drapey linen in pale yellow. (At least, it was supposed to be linen; it feels suspiciously like a blend, though.) My inner coat is white cotton lined with a purple linen/cotton blend. The outer coat is definitely the nicest piece - peach silk twill, lined with a turquoise linen/cotton blend. All of these are based on the patterns at Roxane Farabi's website. The tiara secures a small, rectangular linen veil. I frequently also drape a my largest linen veil as a chador, but the heat and wind on this particular day made it beyond impractical.
My pirahan (chemise) is white lightweight linen, and the salwar (pants) are a soft, drapey linen in pale yellow. (At least, it was supposed to be linen; it feels suspiciously like a blend, though.) My inner coat is white cotton lined with a purple linen/cotton blend. The outer coat is definitely the nicest piece - peach silk twill, lined with a turquoise linen/cotton blend. All of these are based on the patterns at Roxane Farabi's website. The tiara secures a small, rectangular linen veil. I frequently also drape a my largest linen veil as a chador, but the heat and wind on this particular day made it beyond impractical.
30 August 2007
A hat diary in one post: 16th c. Persian tiara
I've slowly been amassing enough garments to have one complete ensemble for dressing in 16th c. Persian style. One of the last pieces is appropriate headgear, specifically this hat/tiara from Duchess Roxane Farabi's site. I've largely followed the outline she gives for creating the style, with some minor changes.
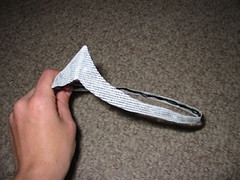 I started by twisting wire to create a frame for the overall shape of the piece, fitting it to my head as I went along. This essentially looked like a wire circlet with a single point in front. I then glued a piece of buckram around the outside to create a smoother silhouette. A picture of the back gives a better view of what the wire frame looked like.
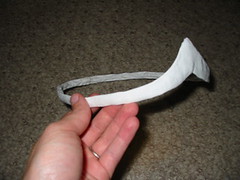 I then covered the buckram and wire frame in a double layer of lightweight white linen. It is secured by simply gluing it down on the inside of the band. Around the skinny portions of the hat, the fabric wrapped around from the front is plenty to cover the inside band; but on the point I've added an extra piece of fabric to completely cover up the wire.
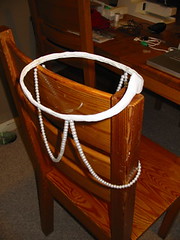 For the dangling strands, I've used glass bead faux pearls; they're strung on the fishing-line-like stuff that they came on. The front strand is a bit longer than the side ones so that it's long enough to hang below my chin. I glued the ends of the strands directly to the inside of the hat, and that's one thing I might do differently. Because the stringing material doesn't absorb glue at all, it had to be held in place carefully for quite a long time to get it to set.
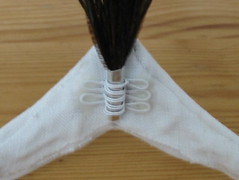 The feathers for the spray are known as peacock herl. They're sewn into strands and sold as yard goods; I bought just an inch and used less than a quarter of it. (Although specialty feather places do sell them, unless you need a large quantity, they're more easily available from places that sell supplies for making fly fishing lures.) To form the spray, I wrapped and knotted thread around the base of my feathers to form a secure bundle. I then took a small piece of sheet aluminum and used pliers to coil it around the bundle, forming a solid base. Once the base was formed, I wrapped wire around it to mold a holder of exactly the right size, with some extra loops to provide a surface to glue to the hat.
So that's pretty much it - fun with tacky glue and some random craft supplies. This picture is of the state of my Persian clothes shortly after the hat was originally finished.
28 August 2007
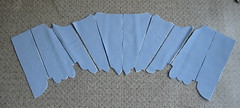
18th c. strapless stays: pieces cut
I picked up the fashion fabric for my stays this weekend, and now have all my pieces cut out. The fabric is a powder blue worsted wool twill, very smooth and lightweight. It was a remnant - 5/8 yd. and 58 inch wide for $7.50 - which is perfect for a project like this which doesn't take much yardage. In addition to the outer fabric, I've got two layers of 5 oz linen for interlining and structure, and one layer of 3.5 oz linen for lining. I'm planning to baste the outer layer and the interlining together in the seam allowances, and then start assembling it. The one thing I really need to decide soon is whether I'm going to do machine or hand sewing.
17 August 2007
18th c. strapless stays: mockup
After spending much of the past month on pre- and post-Pennsic mending, I decided to take a break and work on something thoroughly out of SCA period. J. P. Ryan's 18th c. strapless stays pattern is one that I've had in my stash for a while, and it struck my fancy. I'm not sure why - I've never done 1700s re-enactment, and I don't have any particular plans to do so either. But who knows, I may find a use for these stays while I'm living on the east coast, as I think there are plenty of colonial/revolutionary groups around.
I've done this mockup out of manila folders and packing tape, and it's a good thing I did. As you can see, I've needed to make quite a significant enlargement for the bust measurement. My bust and waist are a couple of sizes apart for standard sizes, so I frequently have to pick one or the other to buy for (particularly in a single-size pattern like this one). For most garments, I'll buy to the bigger size and just take things in as necessary in a muslin, or directly on my real fabric. But for something like a corset or pair of stays, I know I'm going to have to redraft most of it to maintain proper shapes and size ratios on the pieces, so I prefer to start small and enlarge. It may be a mental quirk, but it just seems easier to me that way.
All of which is to say, I've widened the top by close 5 inches total, and the bottom by just a small amount (maybe a half inch, if that). Note that the large gaps are *within* pattern pieces at the enlargement lines; these are not the seam lines between pieces. I haven't had to make any length adjustments, which means the pattern is drafted 1-2 inches shortwaisted relative to normal size standards. (I'd heard that this pattern was shortwaisted, and that's part of the reason I bought it in the first place - I hate making torso length adjustments on anything but the simplest of patterns.)
I've got 5 oz (and maybe 7 oz) linen for the main structural layers, and I've always got lightweight linen on hand for linings. I haven't picked an exterior fabric yet; I don't immediately see anything in the stash that seems suitable. I've ordered 1/4" reed for my boning material (the pattern suggest plastic or bamboo combined with metal at the seams, but I think reed is more appropriate, and I've been meaning to try working with it for a while).
Apron dress details: herringbone stitch
The write-up for the Hedeby find lists herringbone stitch as being used to finish the top edge, and I've done likewise, as shown here. It's a slightly unusual choice, as herringbone is more typically done as a decorative stitch or in simple embroidery. Thinking about it, though, it should be a fairly effective way of finishing a single-fold edge. Because of the stitch's zig-zag pattern, the weave is held together both along and across the grain. I'll see how effective it is in practice, although my fabric isn't likely to fray in the first place.
The write-up isn't particularly clear about whether the stitch faces in or out; I've chosen to have what is normally the face of the stitch on the inside of the garment, right on the raw edge. The backside of the stitch looks like two rows of running stitch, and is nearly invisible on the exterior of the dress (picture here).

The write-up isn't particularly clear about whether the stitch faces in or out; I've chosen to have what is normally the face of the stitch on the inside of the garment, right on the raw edge. The backside of the stitch looks like two rows of running stitch, and is nearly invisible on the exterior of the dress (picture here).
17 July 2007
Catrijn's most comfortable hose
There's something wonderful about being able to pull a pattern out of the drawer, cut without making adjustments, sew it right up, and know that it's going to fit. After several years, I've finally reached that point with my hose. Which is a very good thing, as I try to replace all of my older pairs that I've worn out. Obviously, for something as close-fitting as hose, no commercial pattern can really do this - the fit really does need to be customized. But once you've got your own personal pattern, it's a glorious thing.
I've tried at least four different styles of hose patterns (and that's just the ones I remember), with various degrees of success. If you're only interested in the one I use now, skip to number 4. Note that in all cases, the leg piece is cut on the true bias.
Attempt 1 (1 piece): The first pair of hose I ever did were in an ultra-simple one-piece pattern. The one seam is down the back of the leg, under the heel and center of the foot all the way out to the toe. I think the reason I tried this approach is that it seemed like it would make fitting simpler - there's just one piece of fabric to pin on your leg while you contort yourself to try and get it to fit. In the end, though, the shortcut didn't pay off. It looks OK when you've got your toes pointed, but try to stand and walk around normally, and you'll find that there's an enormous amount of bunching around your ankle. Plus, at least in my hands, the toe area just didn't work at all.
 Attempt 2 (2 pieces): The second style is a bit of an evolution of attempt 1. There's still one piece for the leg and the top of the foot, but instead of the fabric wrapping all the way around to a seam on the bottom, there's a separate sole piece, which is shaped like the outline of the foot. This is actually a pretty big improvement over the first attempt - the toe works, and they're substantially more comfortable. Unfortunately, there's still a lot of bunching around the ankle, and that neither looks nor feels good.
 Attempt 3 (2 pieces): The third attempt was also a 2-piece pattern, but a slightly different one. This style, in contrast to the previous two, is historically documentable. (The citation usually given is one from an older article in Costume; the construction is good, but the article's evidence/logic for it being medieval is deeply flawed. I swear I have a better source for this style, if I can just find it...) The shape of the pieces are a bit more complex: the sole piece has extensions on each side that fold up toward the ankle bones, and these fit into a slit in the top piece, essentially forming a gusset. The main piece extends slightly under the heel before meeting the sole. This pattern is pretty comfortable, although I found that getting exactly the right shape for the pieces was a little tricky. The ankle area molds to the body nicely and doesn't bunch up. The main reason I don't use this style most of the time is that I find it goes together better by hand than by machine (and I'm usually in a hurry when I need new hose). When I have made it, I find it works best with lapped seams, rather than the more typical right-sides-together seams. Doing it this way also means you can get a double layer of fabric under the heel, pushing the fabric edges to the outside rather than having a seam directly under the heel.
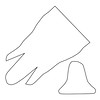
Attempt 4 (3 pieces): Although this pattern has the most pieces, it's not too much more difficult to assemble, and the fit is definitely worth it. The sole piece is like the one in attempt 2, an outline of the foot. The second piece covers the top of the foot. If you put just these two pieces together, it would look a bit like a slipper or mule. The third piece is of course the leg, and it also extends to the back of the heel. This is the pattern that I use almost exclusively now. Like type 3, it is documentable - and also highly comfortable. (See Crowfoot & Pritchard's reconstruction in Textiles and Clothing c.1150-c.1450; also this extant piece said to be from the Cluny Museum.) Assembly requires a little finagling, but isn't too bad. I like to use flat-fell seams, but a zig-zag stitch enclosing the raw edges works almost as well and is quite a bit easier. My construction order is to do the back of the leg seam first, forming a tube. Second, ease the upper into the front of the leg piece. Then finally, attach the sole. As usual, you'll want to check fit and do any seam finishing between each step. The sole seam is nearly impossible to flat-fell by machine, so I either do that by hand, or do a false French seam (turn the edges in towards each other, then do a straight stitch or overcast near their fold). Roll hem the top edge, and they're done.
What I haven't talked about so far is getting a pattern that fits. The pieces I've shown are what fit me, so you shouldn't expect to just enlarge them and get something that works. What I usually do is create a mock-up in muslin (calico for the Brits) - it can be pinned and sewn to check fit, and then unpicked to store as durable pattern pieces. Write and draw on it as necessary with tailor's chalk or just a regular pencil.
The easiest piece to start with is the sole - just an outline of your foot. It should be a fairly smooth outline, and a bit bigger than your foot all the way around. How much bigger depends on how much seam allowance you like - I use about 1 cm. Most people can use the same piece and its mirror image (i.e., upside down when you lay out the fabric) for left and right, but if your feet are substantially different, you may want separate left and right patterns - just be sure to label them well. The sole should be not be on the bias; the grain should run along with the length of the foot.
The second piece is the upper. At the toe, it should match your sole piece, but it then widens as you get further back on the foot. How much it widens will depend on the height of your instep. This piece should extend fairly far back on the foot - all the way back to were it joins the leg on top, and further back toward the heel at the sides. (The historical examples seem to have a more vertical than diagonal seam here, but I really like the fit of the diagonal.) How I work the shape out it is to start pinning a piece of fabric to the sole around my foot, working from the toe to the back. As you get to the ankle, start drawing in where you think the seam should go. Take your foot out, cut with a generous seam allowance, and try again, repeating as necessary. Like the sole, I usually cut the upper on the straight grain, although it is a little less crucial than the sole if it needs to be a little off grain to fit on your fabric.
The third piece, the leg, is the hardest to describe how to fit. It's not that hard to do, but much easier to demonstrate than to write about. First: it is absolutely critical that the leg be on the full bias (45 degrees). I like to iron a crease exactly on the bias in the center of my fabric, and while I'm working, I try to keep that crease straight up and down on the front of my shin. With the fabric draped over the front of your leg, start pinning down the back. Don't worry if it's not quite right at first; there's plenty of time to smooth things out later. If you've got a helper, this goes faster, but it's possible to do on your own too. You're aiming for a fit that is snug but not tight. It does need to be a bit looser in the ankle (so you can get your heel through) and in the knee (if you're doing men's hose up to the hip). Like you did with the upper, mark where the ankle seam is going to go, so you can trim away excess fabric. Take it off and look at where your pins fall - you should be able to see at least a vague outline of your leg. Start to pencil in a smooth curve, and re-pin along it. Now try to put it on again. If you can't get your foot through, widen the leg wherever it's too narrow. At this point it becomes a repeated process - move the pins in where it fits too loosely, move them out where it is too tight. After a few rounds, you'll probably want to switch to basting the seam rather than pinning it, to get a better feel for how it will actually fit.
Once you've got something you're happy with, assemble the rest of the mock-up and try it on. You'll probably need to do a bit of adjustment on the ankle seam to get the size of the top match the size of the bottom - this is normal, and keep in mind that it doesn't need to be exact. My top always comes out bigger than my sole, and I usually just pin them together as is, with the top just sticking out a bit further past the seam. Grab a ribbon or something to use as a garter to hold it up, and walk around. Try it on with your shoes. Kneel, dance, do whatever you'll want to be able to do. Is it binding or cutting in anywhere? Is it too baggy? Now's the time to make adjustments. Stick to a long basting stitch so that it's easy to take out a seam if necessary. If you've made just one, wear it inside-out on the other foot. Will symmetric hose work, or do you need separately fit rights and lefts? Keep fiddling with it until there's no doubt in your mind that it fits. If something's not working, and you can't figure it out, get other people to look at it. The point here is to not settle for something that's going to be uncomfortable.
So, at some point you are going to have a muslin mock-up that you like. Now what? Take it apart. As you go, permanently mark exactly where the seams are (pencil stays pretty well, as does pen or a fine-tip marker). Trim the seam allowances down to what you typically use, if necessary. This is your pattern, and it's ready to go. You might want to make just one or two pairs at first and wear them for a while, to double check that everything is good with the fit. Also, know the limits of your pattern. In my own experience, I can make hose from light or medium weight linen without additional fitting, but if I wanted a pair in wool, or a twill weave instead of tabby, I'd cut with a little extra ease all around, and spend some extra time doing fitting as I assembled them.
So go ahead and be brave, it doesn't take a ton of experience to do a custom-fit hose pattern, just a bit of patience, and trial-and-error. You'll notice that there was no math or geometry involved. And the payoff is huge.
I've tried at least four different styles of hose patterns (and that's just the ones I remember), with various degrees of success. If you're only interested in the one I use now, skip to number 4. Note that in all cases, the leg piece is cut on the true bias.
Attempt 1 (1 piece): The first pair of hose I ever did were in an ultra-simple one-piece pattern. The one seam is down the back of the leg, under the heel and center of the foot all the way out to the toe. I think the reason I tried this approach is that it seemed like it would make fitting simpler - there's just one piece of fabric to pin on your leg while you contort yourself to try and get it to fit. In the end, though, the shortcut didn't pay off. It looks OK when you've got your toes pointed, but try to stand and walk around normally, and you'll find that there's an enormous amount of bunching around your ankle. Plus, at least in my hands, the toe area just didn't work at all.
Attempt 4 (3 pieces): Although this pattern has the most pieces, it's not too much more difficult to assemble, and the fit is definitely worth it. The sole piece is like the one in attempt 2, an outline of the foot. The second piece covers the top of the foot. If you put just these two pieces together, it would look a bit like a slipper or mule. The third piece is of course the leg, and it also extends to the back of the heel. This is the pattern that I use almost exclusively now. Like type 3, it is documentable - and also highly comfortable. (See Crowfoot & Pritchard's reconstruction in Textiles and Clothing c.1150-c.1450; also this extant piece said to be from the Cluny Museum.) Assembly requires a little finagling, but isn't too bad. I like to use flat-fell seams, but a zig-zag stitch enclosing the raw edges works almost as well and is quite a bit easier. My construction order is to do the back of the leg seam first, forming a tube. Second, ease the upper into the front of the leg piece. Then finally, attach the sole. As usual, you'll want to check fit and do any seam finishing between each step. The sole seam is nearly impossible to flat-fell by machine, so I either do that by hand, or do a false French seam (turn the edges in towards each other, then do a straight stitch or overcast near their fold). Roll hem the top edge, and they're done.
What I haven't talked about so far is getting a pattern that fits. The pieces I've shown are what fit me, so you shouldn't expect to just enlarge them and get something that works. What I usually do is create a mock-up in muslin (calico for the Brits) - it can be pinned and sewn to check fit, and then unpicked to store as durable pattern pieces. Write and draw on it as necessary with tailor's chalk or just a regular pencil.
The easiest piece to start with is the sole - just an outline of your foot. It should be a fairly smooth outline, and a bit bigger than your foot all the way around. How much bigger depends on how much seam allowance you like - I use about 1 cm. Most people can use the same piece and its mirror image (i.e., upside down when you lay out the fabric) for left and right, but if your feet are substantially different, you may want separate left and right patterns - just be sure to label them well. The sole should be not be on the bias; the grain should run along with the length of the foot.
The second piece is the upper. At the toe, it should match your sole piece, but it then widens as you get further back on the foot. How much it widens will depend on the height of your instep. This piece should extend fairly far back on the foot - all the way back to were it joins the leg on top, and further back toward the heel at the sides. (The historical examples seem to have a more vertical than diagonal seam here, but I really like the fit of the diagonal.) How I work the shape out it is to start pinning a piece of fabric to the sole around my foot, working from the toe to the back. As you get to the ankle, start drawing in where you think the seam should go. Take your foot out, cut with a generous seam allowance, and try again, repeating as necessary. Like the sole, I usually cut the upper on the straight grain, although it is a little less crucial than the sole if it needs to be a little off grain to fit on your fabric.
The third piece, the leg, is the hardest to describe how to fit. It's not that hard to do, but much easier to demonstrate than to write about. First: it is absolutely critical that the leg be on the full bias (45 degrees). I like to iron a crease exactly on the bias in the center of my fabric, and while I'm working, I try to keep that crease straight up and down on the front of my shin. With the fabric draped over the front of your leg, start pinning down the back. Don't worry if it's not quite right at first; there's plenty of time to smooth things out later. If you've got a helper, this goes faster, but it's possible to do on your own too. You're aiming for a fit that is snug but not tight. It does need to be a bit looser in the ankle (so you can get your heel through) and in the knee (if you're doing men's hose up to the hip). Like you did with the upper, mark where the ankle seam is going to go, so you can trim away excess fabric. Take it off and look at where your pins fall - you should be able to see at least a vague outline of your leg. Start to pencil in a smooth curve, and re-pin along it. Now try to put it on again. If you can't get your foot through, widen the leg wherever it's too narrow. At this point it becomes a repeated process - move the pins in where it fits too loosely, move them out where it is too tight. After a few rounds, you'll probably want to switch to basting the seam rather than pinning it, to get a better feel for how it will actually fit.
Once you've got something you're happy with, assemble the rest of the mock-up and try it on. You'll probably need to do a bit of adjustment on the ankle seam to get the size of the top match the size of the bottom - this is normal, and keep in mind that it doesn't need to be exact. My top always comes out bigger than my sole, and I usually just pin them together as is, with the top just sticking out a bit further past the seam. Grab a ribbon or something to use as a garter to hold it up, and walk around. Try it on with your shoes. Kneel, dance, do whatever you'll want to be able to do. Is it binding or cutting in anywhere? Is it too baggy? Now's the time to make adjustments. Stick to a long basting stitch so that it's easy to take out a seam if necessary. If you've made just one, wear it inside-out on the other foot. Will symmetric hose work, or do you need separately fit rights and lefts? Keep fiddling with it until there's no doubt in your mind that it fits. If something's not working, and you can't figure it out, get other people to look at it. The point here is to not settle for something that's going to be uncomfortable.
So, at some point you are going to have a muslin mock-up that you like. Now what? Take it apart. As you go, permanently mark exactly where the seams are (pencil stays pretty well, as does pen or a fine-tip marker). Trim the seam allowances down to what you typically use, if necessary. This is your pattern, and it's ready to go. You might want to make just one or two pairs at first and wear them for a while, to double check that everything is good with the fit. Also, know the limits of your pattern. In my own experience, I can make hose from light or medium weight linen without additional fitting, but if I wanted a pair in wool, or a twill weave instead of tabby, I'd cut with a little extra ease all around, and spend some extra time doing fitting as I assembled them.
So go ahead and be brave, it doesn't take a ton of experience to do a custom-fit hose pattern, just a bit of patience, and trial-and-error. You'll notice that there was no math or geometry involved. And the payoff is huge.
06 May 2007
An apron dress pattern based on the Hedeby fragment
Let me preface this by saying that Viking-era Norse is totally outside the areas I normally research. As much as I am not an expert on the topics I normally write about, I am even less of an expert on this.
There's a nearly dizzying array of different apron dress styles and reconstruction theories. For this project, I knew that I specifically wanted one of the closed styles, with at least a little bit of tailoring, so that leaves out the wrapped, tubular, and open-front styles which I won't talk about at all. The primary evidence for this style of garment seems to come from a fragmentary find from Hedeby harbor (aka Haithabu). The find is dated approximately to the 10th century, in an area now in Germany near Denmark. The find was described by Inga Hågg in German; I do not have a copy of the original article. For reference I am using a translation found halfway down this pdf. [Note: This is a more direct link to the pertinent material.] I am working under the assumption that it does represent a fragment of an apron dress, and not some other unknown garment.
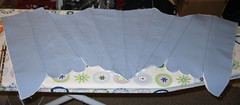
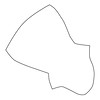
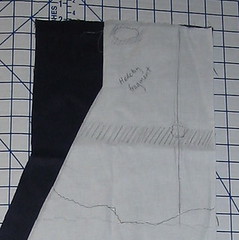
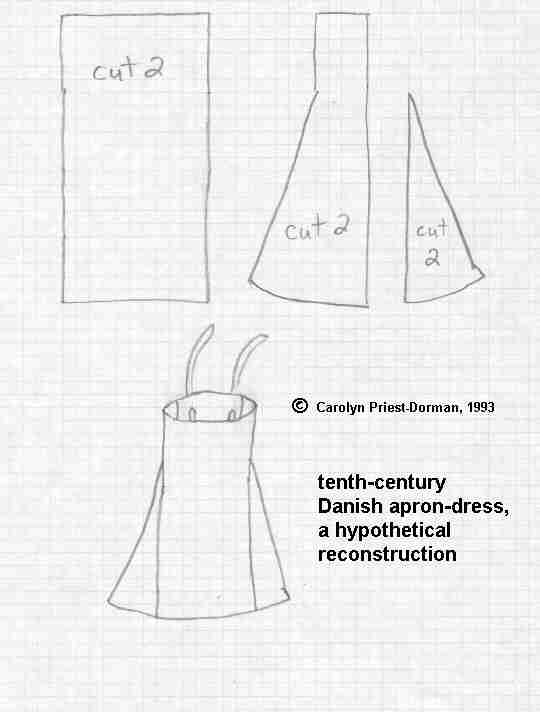
The picture for this post shows my drawing of the fragment itself (1:1 based on the measurements given in the article); it's sitting on top of the pieces I'm using for my garment, and the background is a 1 inch grid for size reference. There's a picture showing the full length here. The jagged black line represents the surviving edge of what was found; I've extended it to get a feel for the possible original shape. The main features to note are that both long edges show stitch holes along their length, and the top edge is hemmed. There's a vertical dart which was covered by a six-strand braid. Two areas of the wool are felted, apparently from wear: a band about 6 inches below the top of the piece, and the area around a hole in one corner. There's another hole where the dart meets the felted band, and the dart's widest point is here (it narrows above and below).
It's worth noting that there are a number of reconstructions based on similarly-shaped pieces (one two three four). Of these, the second and third seem to have been especially popular with re-enactors; they are essentially made from 3 Hedeby-shaped pieces cut on a fold, with or without additional gores. The first uses shaped fragments for it's side panels with rectangular front and back panels. The fourth uses 4 similarly shaped panels, but with front and back pieces significantly wider than those at the sides.
One of the biggest problems with interpreting the Hedeby fragment is its size. I don't just mean it's size as a relative to the entire garment (although it's not huge), but it's actual measurements. The top edge is only about 6 inches long. If one assumes that the garment is made of identical panels, 6 are needed to fit an approximately average-sized woman. Although I'm not at all sure, I suspect that this is the origin of the patterns that use three-fold symmetry, something that has always nagged me a bit. As far as I can tell, while two- and four-fold symmetry seem very common in early clothing construction, three-fold is extremely rare - I can't think of any other example. That's not to say it's impossible, but just that it strikes me as a weird. If, on the other hand, one assumes variable size panels and that the Hedeby fragment represents one of the smaller side panels, positioning of the hole which is thought to be a strap attachment point becomes practically under the arm.
The other point about size with regards to the fragment is its vertical measurement. As I mentioned above, the band of wear which almost certainly represents a belt is a mere six inches below the top of the piece. I am aware that very little belt hardware has been found in connection with the graves of Norse women, but a belt may have been simply tied, or fastened with hardware made of a material that wasn't preserved (perhaps bone or antler?). The widest part of the dart is also at this point, which supports my belief that this line represents the natural waist of the wearer.
Now, I don't have a particularly long torso (somewhat short, if anything), but six inches above my natural waist is still below my bust line. An apron dress made to the measurements of the fragment would have to sit below my chest, with brooches forming a metal Brunhilda-bra. Aside thinking that this would be absurd, I'll note that brooches in grave finds seem to have been positioned higher than that. Even if we propose that this represents the back, and the front piece would come higher, it is still very low cut and would require long straps. Practical considerations seem to dictate that the upper edge of the apron dress should be higher, with shorter straps, to help it stay up.
All of this is a very long way to get to the point of my new, out-on-a-limb theory: that the Hedeby fragment may represent not the dress of an adult woman, but a young girl. This would account for the apparently small size both in width and height of the piece - 4 identical panels of this size would be an appropriate size for a child, I think (note that I don't have any children to test this out on). This interpretation also allows the decorated dart seams to be in the front rather than the back. The placement of the strap does still seem to be a bit too far out to the side, but I've decided to test my theory by scaling the pieces up to my size (about 60-70% larger) and testing where straps would need to be.
So, in a nutshell, my pattern is 4 panels shaped similarly to the Hedeby fragment, but significantly larger, with straight seams at center front and center back, and shaped side seams. In my mock-up, I found that the flare at the side seam gave sufficient room at the hips and hem, and no additional gore pieces were needed. This can be cut efficiently from narrow cloth if the length of the garment is taken to be the entire width of the fabric (the top edge of the find is a selvedge, and the grain runs horizontally, rather than vertically). My dress would have required a fabric width of 34 inches for its below-knee length; I don't have any information on available fabric widths for this time - a narrow 22 inch fabric would produce a mid-thigh length garment on me, or a longer dress on a child.
There's a nearly dizzying array of different apron dress styles and reconstruction theories. For this project, I knew that I specifically wanted one of the closed styles, with at least a little bit of tailoring, so that leaves out the wrapped, tubular, and open-front styles which I won't talk about at all. The primary evidence for this style of garment seems to come from a fragmentary find from Hedeby harbor (aka Haithabu). The find is dated approximately to the 10th century, in an area now in Germany near Denmark. The find was described by Inga Hågg in German; I do not have a copy of the original article. For reference I am using a translation found halfway down this pdf. [Note: This is a more direct link to the pertinent material.] I am working under the assumption that it does represent a fragment of an apron dress, and not some other unknown garment.
The picture for this post shows my drawing of the fragment itself (1:1 based on the measurements given in the article); it's sitting on top of the pieces I'm using for my garment, and the background is a 1 inch grid for size reference. There's a picture showing the full length here. The jagged black line represents the surviving edge of what was found; I've extended it to get a feel for the possible original shape. The main features to note are that both long edges show stitch holes along their length, and the top edge is hemmed. There's a vertical dart which was covered by a six-strand braid. Two areas of the wool are felted, apparently from wear: a band about 6 inches below the top of the piece, and the area around a hole in one corner. There's another hole where the dart meets the felted band, and the dart's widest point is here (it narrows above and below).
It's worth noting that there are a number of reconstructions based on similarly-shaped pieces (one two three four). Of these, the second and third seem to have been especially popular with re-enactors; they are essentially made from 3 Hedeby-shaped pieces cut on a fold, with or without additional gores. The first uses shaped fragments for it's side panels with rectangular front and back panels. The fourth uses 4 similarly shaped panels, but with front and back pieces significantly wider than those at the sides.
One of the biggest problems with interpreting the Hedeby fragment is its size. I don't just mean it's size as a relative to the entire garment (although it's not huge), but it's actual measurements. The top edge is only about 6 inches long. If one assumes that the garment is made of identical panels, 6 are needed to fit an approximately average-sized woman. Although I'm not at all sure, I suspect that this is the origin of the patterns that use three-fold symmetry, something that has always nagged me a bit. As far as I can tell, while two- and four-fold symmetry seem very common in early clothing construction, three-fold is extremely rare - I can't think of any other example. That's not to say it's impossible, but just that it strikes me as a weird. If, on the other hand, one assumes variable size panels and that the Hedeby fragment represents one of the smaller side panels, positioning of the hole which is thought to be a strap attachment point becomes practically under the arm.
The other point about size with regards to the fragment is its vertical measurement. As I mentioned above, the band of wear which almost certainly represents a belt is a mere six inches below the top of the piece. I am aware that very little belt hardware has been found in connection with the graves of Norse women, but a belt may have been simply tied, or fastened with hardware made of a material that wasn't preserved (perhaps bone or antler?). The widest part of the dart is also at this point, which supports my belief that this line represents the natural waist of the wearer.
Now, I don't have a particularly long torso (somewhat short, if anything), but six inches above my natural waist is still below my bust line. An apron dress made to the measurements of the fragment would have to sit below my chest, with brooches forming a metal Brunhilda-bra. Aside thinking that this would be absurd, I'll note that brooches in grave finds seem to have been positioned higher than that. Even if we propose that this represents the back, and the front piece would come higher, it is still very low cut and would require long straps. Practical considerations seem to dictate that the upper edge of the apron dress should be higher, with shorter straps, to help it stay up.
All of this is a very long way to get to the point of my new, out-on-a-limb theory: that the Hedeby fragment may represent not the dress of an adult woman, but a young girl. This would account for the apparently small size both in width and height of the piece - 4 identical panels of this size would be an appropriate size for a child, I think (note that I don't have any children to test this out on). This interpretation also allows the decorated dart seams to be in the front rather than the back. The placement of the strap does still seem to be a bit too far out to the side, but I've decided to test my theory by scaling the pieces up to my size (about 60-70% larger) and testing where straps would need to be.
So, in a nutshell, my pattern is 4 panels shaped similarly to the Hedeby fragment, but significantly larger, with straight seams at center front and center back, and shaped side seams. In my mock-up, I found that the flare at the side seam gave sufficient room at the hips and hem, and no additional gore pieces were needed. This can be cut efficiently from narrow cloth if the length of the garment is taken to be the entire width of the fabric (the top edge of the find is a selvedge, and the grain runs horizontally, rather than vertically). My dress would have required a fabric width of 34 inches for its below-knee length; I don't have any information on available fabric widths for this time - a narrow 22 inch fabric would produce a mid-thigh length garment on me, or a longer dress on a child.
12 April 2007
Apron dress plans
My wonderful and generous sweetheart has saved me from the fabric disaster that I mentioned last time. We split a 10+ yard piece 50/50, and I washed only my part, so his is still smooth and not fulled-felted. Fortunately for me, he had no particular plans for his fabric yet, so he has offered to switch in exchange for me making him a cloak from the now thick, fuzzy stuff. So my apron dress plans are once again on track.
I should say that Norse is way out of my normal areas of expertise, but I'm learning a lot as I do the research for this project, so it should be fun. I'm planning to do a closed tube style dress, with some shaping like the Hedeby fragment. Actually, I think I'll separate out my commentary on that particular find out into a separate entry - I actually found it very difficult to produce a pattern that meshes with both the details of that find and other contemporary evidence and general knowledge of clothing construction. What I came up with is probably not original, I'm sure someone's done it before, but I'm happy with it and it's a bit different from what I see most commonly in recreations.
I also picked up some additional very nice fabric from the liquidation sale at one of my local Hancock Fabrics. (Many but not all locations are being closed - there's decent discounts on notions, and fabrics if you get lucky.) I got 2 yards of a lightweight wool in a cream color - I'm thinking that I might experiment a bit with wool veils, and see how they work, and also 6 yards of grey wool in the most summer of summer weights that I've ever had the pleasure to find. The color is not ideal, so I don't know what I'll do with it yet, but the weight and hand were so gorgeous that I couldn't just leave it there. Based on drape I think it would be excellent as a full-on court bliaut, but I'm having a hard time imagining doing such a high-status garment in such nondescript color. (And I'm not keen on the idea of dying it - evenness has always been a major problem for me when I attempt that.)
02 April 2007
Calm before the storm
My sewing room has been rather quiet for the last month, but I've been making plans for the new season. I've made a list of things I want to make this year, and it's a long one! Hopefully, real life won't interfere too much, although it's threatening.
Top on my list is more low-maintenance clothes for camping events this summer - simple linen tunic-dresses mostly, and a lot more stockings, as I've destroyed most of mine over the past couple years. I'd also like to do an apron-dress and pull together some Norse-appropriate accessories to dress up some of those tunic dresses a bit - probably aiming for the late end of that era.
Then I've got big plans for a new court dress - the blue dress from the April calendar page of Les Très Riches Heures du Duc de Berry. I've got a navy silk-faced satin brocade with gold fleur-de-lys, which I think should be about perfect. Unfortunately, the gold is poly, which means that the fabric is entirely and heavily backed with polyester, but I doubt I'll ever find anything better. I'm not completely sure what I'll use for the lining/contrast yet, but I do have plenty of white silk broadcloth that might work. Of course, I'll need to do a long sleeve cote first, to fit it over, which is just as well. I've been meaning to for years, but I still haven't made a long-sleeved layer to do late 14th c. stuff.
As a side project, I'd like to really finish my Persian ensemble. The coats are essentially fine (although one needs loops or buttonholes or something to go with its buttons), but I still need to make a pirahan (chemise-type layer), salwar (pants), and a hat. The pirahan will probably be white lightweight linen, which I always have on hand, but I'd need to find fabric for the salwar. The hat would be the style that Roxane Farabi calls a broom hat, which should be pretty simple once I figure out what kind of feather to use. (Incidentally, the look and color scheme of my coats is very similar to the figure in the lower left of the first picture at that link.)
If all that wasn't enough, I've also got a mid 14th c. gown with proto-tippets in the back of my head. Plus a bunch of mending and finishing on projects that should have been done by now. And I should probably make some clothes for my guy, since he's not likely to get around to doing it himself.
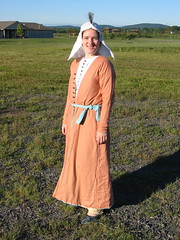
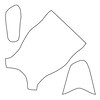
The picture above is the fabric I had intended to use for that Norse apron dress, before and after washing. (Note that the colors are mangled - it's actually purple and navy, and rather dark at that.) I hadn't expected it to react that badly to water, and sadly I threw my whole piece in (the remaining piece belongs to the guy, since we went in on the purchase). I don't know what I'll be doing with it now, since it doesn't seem at all appropriate for what I had planned. There's a lesson here about always washing a test swatch first, even if you think you know how it'll behave, and it's a lesson I really should have learned by now. Hopefully I'll remember this (rather expensive!) mistake next time : (

Top on my list is more low-maintenance clothes for camping events this summer - simple linen tunic-dresses mostly, and a lot more stockings, as I've destroyed most of mine over the past couple years. I'd also like to do an apron-dress and pull together some Norse-appropriate accessories to dress up some of those tunic dresses a bit - probably aiming for the late end of that era.
Then I've got big plans for a new court dress - the blue dress from the April calendar page of Les Très Riches Heures du Duc de Berry. I've got a navy silk-faced satin brocade with gold fleur-de-lys, which I think should be about perfect. Unfortunately, the gold is poly, which means that the fabric is entirely and heavily backed with polyester, but I doubt I'll ever find anything better. I'm not completely sure what I'll use for the lining/contrast yet, but I do have plenty of white silk broadcloth that might work. Of course, I'll need to do a long sleeve cote first, to fit it over, which is just as well. I've been meaning to for years, but I still haven't made a long-sleeved layer to do late 14th c. stuff.
As a side project, I'd like to really finish my Persian ensemble. The coats are essentially fine (although one needs loops or buttonholes or something to go with its buttons), but I still need to make a pirahan (chemise-type layer), salwar (pants), and a hat. The pirahan will probably be white lightweight linen, which I always have on hand, but I'd need to find fabric for the salwar. The hat would be the style that Roxane Farabi calls a broom hat, which should be pretty simple once I figure out what kind of feather to use. (Incidentally, the look and color scheme of my coats is very similar to the figure in the lower left of the first picture at that link.)
If all that wasn't enough, I've also got a mid 14th c. gown with proto-tippets in the back of my head. Plus a bunch of mending and finishing on projects that should have been done by now. And I should probably make some clothes for my guy, since he's not likely to get around to doing it himself.
The picture above is the fabric I had intended to use for that Norse apron dress, before and after washing. (Note that the colors are mangled - it's actually purple and navy, and rather dark at that.) I hadn't expected it to react that badly to water, and sadly I threw my whole piece in (the remaining piece belongs to the guy, since we went in on the purchase). I don't know what I'll be doing with it now, since it doesn't seem at all appropriate for what I had planned. There's a lesson here about always washing a test swatch first, even if you think you know how it'll behave, and it's a lesson I really should have learned by now. Hopefully I'll remember this (rather expensive!) mistake next time : (
05 March 2007
Finished Kampfrau gown
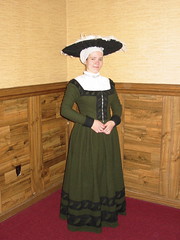
This is my finished early 16th c. German common woman's outfit. I'm very pleased with how everything turned out. Gown is heavy wool and trimmed in a lighter wool, with bodice lined and interlined in linen; sewn with silk and some linen thread and closes with hooks and eyes. Hemd (chemise) is lightweight linen, sewn with linen and smocked with black silk embroidery thread; closes with two pairs of hooks and eyes at the neck. Hat is wool bedecked in ostrich feathers, shape held by 8 gauge copper wire. The set-up under the hat is a fine example of last-minute materials-on-hand costuming - I'm using a couple of skeins of wool yarn to create the wulst bulge (fake braids would be preferable - easier to arrange and less squishy) and the veil over it is neither the right size or shape (but workable with enough pins and patience). The gown and hat used patterns from Reconstructing History; the chemise is my own design.
18 February 2007
In which Catrijn learns to smock
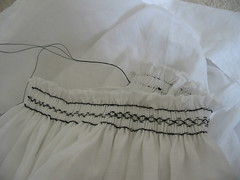
This is the hemd (chemise, shift, whatever) I'm working on to go with the green and black kampfrau gown. I've got a little under a week to get everything finished and ready to go, and it looks like I'll make it. The gown itself is finished and I've got feathers on my hat, so all that's left is this, and it mostly just needs seam finishing and hemming.
This is the first time I've done smocking, and it seems to be turning out all right. (I'm very much a learn by doing type of person.) My main reference for this was a book called The Art of Manipulating Fabric. It's a manual on a lot of very interesting techniques for shaping flat fabric into objects with volume and texture. Most of the stuff is not particularly useful for garment sewing, but some is, and it's all fun to look at. Anyway, I did three rows of gathering (dot pick-up on a 1/2 inch grid) using polyester upholstery thread (strong and slides easily). The smocking itself is done in a silk embroidery thread.
The biggest problems I had were with tension (I was nervous about pulling too tight when I started, which of course meant that things ended up much too loose) and trying to get the finished result to a particular size (in this case, to match my neck). The gathering threads are tied off at the correct length, but the smocking would relax to a longer length if they were cut out (like they would normally be) so I might need to leave them in. Either that, or go back and add additional tighter rows to stabilize it. I also need to figure out what I'm going to do for closure on it. Maybe a pair of ties at the top and bottom edge, tacked down to the first half inch or so of pleats?
08 January 2007
Modelling the in-progress Kampfrau gown
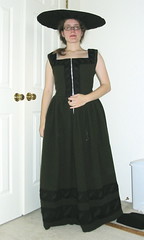
I finally got enough hooks and eyes onto the dress to model it. Actually, I ran out of hooks and eyes just above waist level, which is why I'm holding the rest of the opening closed. There's a photo of the back here. What remains to be done is attaching the skirt permanently (it is just pinned now) and sleeves, obviously. Actually I must say that I really like this as a sleeveless gown - I'm thinking that some time I might want to make one in a lighter weight wool for summer wear, like this woodcut of a seamstress. Sure, it's a very rare style, but my main pursuit in the SCA is as a seamstress, so it's not too inappropriate.
This does serve to illustrate why I don't like hooks and eyes as a closure mechanism for non-overlapping edges, but in this case I couldn't think of a better way to do it. The gapping is perfectly even, so it's not like I've set them too far apart, it's just that the edges curl out a little. I've already tacked down the ends of the hooks, or else it would be much worse, and I'm thinking I may try to tack down more of the eyes as well. If that doesn't fix it, I may resign myself to basting the opening closed when I wear it.
As you can see, I also started the hat. It's made of basically the same wool fabric as the guards, but with the non-napped side out instead. If you're working from Reconstructing History pattern 505 (German accessories) be careful when you cut the underside piece - it needs to be 70-75 inches long to go all the way around (same measurement as you need of wire) - on my copy of the pattern, at least, the printed piece is only half that long (18x7.5 inches, cut on fold for total length of 36 inches). As for wire, I used 8 gauge solid copper wire from Home Depot (it's in electrical on the cut to order spools; you'll need to get an employee to measure it off for you, just like at the fabric store). It's very sturdy (possibly overkill, but I'm okay with that). Now I just need to obtain feathers. Sure, you see some hats that are just plain, but I really enjoy going all out : )
Subscribe to:
Posts (Atom)