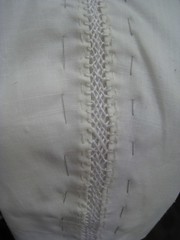
The first of the looped interlacing threads actually went pretty smoothly. Once I got the right pattern of over-under memorized, it worked up well and looked fairly good.
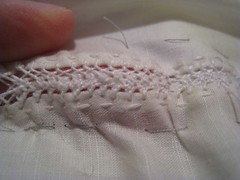
The second of the looped interlacing threads is another story entirely. The photo doesn't quite capture it (I'd need a dedicated macro lens set up), but the truth is that my eyes can't quite capture it - even my incredibly-nearsighted-when-uncorrected eyes have trouble seeing the details for this. It's incredibly hard to work, and the results... well I don't think they look as good as what I started with.
A lot of the problem is scale. The gap between the fabric edges where I'm working is down to barely 5mm - and the original was twice that! (8-12mm). I started with a > 10 mm gap between the two sides, but every set of stitches seems to pull it closer, whether I mean to or not. It might still be workable with a finer thread, but there's just not enough room for the one that I'm using (although I think it is a very appropriate weight for this type of work). There are smaller problems - waxing the thread to prevent it fuzzing out as I rework the same areas might have been helpful.
At this point I'm not sure what I'm going to do with this. I figured out how to manage well enough that I could probably keep going and finish it. I'm also tempted to cut the whole thing out and start over from scratch. The two seem about equally appealing (which is to say: Not At All).
I'm always looking for low-maintenance ways to keep my hair covered at out of the way at events, plus I like funky hats in general. So I've had a reproduction of the St. Birgitta cap in the back of my mind for a while now. Since I was looking for a small, portable project, it seemed like the thing to do.
References: the article in Medieval Clothing and Textiles 4 is really good - recommended reading even with all the information that's available online. Karen Larsdatter has a collection of links for period illustrations and recreations.
First up: I have a big head, apparently. My pattern piece is substantially larger than the original, at 13 x 10.5 inches on the straight sides. But based on my mock-up, I don't think I'd want it any smaller.
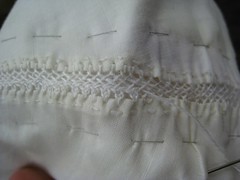
I pulled out a little bit of really nice finely-woven linen I'd been saving, and started by hemming the two curved edges. Then I basted those edges down in parallel lines to a very stiff piece of cotton canvas in order to keep my spacing even. The interlacing herringbone worked up pretty quickly and easily. I ended up with five threads instead of the original six, because I got one of the cross directions wrong on the first thread I laid down, which meant the interlacing only worked right for an odd number. The only point of note was that I tended to pull the later threads tighter, so the opening is pulled smaller than I intended, and the first thread looks a bit loose and wobbly.
I needed a really long thread in order to work from end to end... to long for convenience, really, and some of them weren't actually long enough - the joins look kind of bad, too. If I was doing it again I might try working out in both directions from the middle, so I only had to deal with half the length at one time. Other than that, I really like how it looks at this stage. I was debating leaving it like this, and in retrospect I kind of wish that I had. But more on that next time...
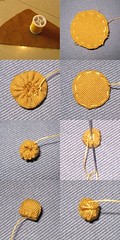
I always intended that my version of the Moy gown would have buttons on the sleeves, but when I first made it, I ran out of time. I've now gone back and made 50 fabric ball buttons.
There's good reference material for these in the Museum of London Textiles and Clothing book, but also a good tutorial on the web by Jennifer Carlson, and the photo collage at right shows what my buttons looked like at each of the main stages.