After a bit of experimentation, I've found a basic chemise design that's comfortable, simple to make, and works well with the majority of my historical wardrobe (that being clothes from 15th c. northwest Europe). If I venture to other times and places, I may need a different style of underwear, but when I just need a new chemise it's usually a copy of this one.
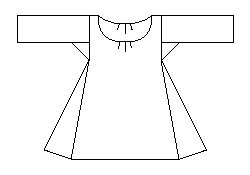
I use a simple geometric cut that's based on earlier tunic styles. While outerwear in this time uses increasingly complex tailoring, the rare depictions of chemises in art suggest that it continued to be a simple, loose garment. The main body panel is a large rectangle, folded over at the shoulder, with overall width slightly larger than half the bust measurement. Normally, this would produce a shoulder seam that falls down the arm, but pleats at center front and center back in the neckline pull the width together so that the shoulder seam falls on or near the natural shoulder. The sleeves are also rectangular, forming an untapered tube, with a square underarm gusset. Triangular gores in the side seams fill out the width of the chemise, with overall length being below knee to mid-calf. The neckline generally follows that of the gown it is to be worn under; mine typically have a low scoop neck, matching my 15th c. kirtles. I typically use 3-4 small box pleats at center front and center back in the neckline, but that is adjusted based on fit as I am finishing the garment.
For construction, nothing I have found beats lightweight linen, the lighter weight and finer weave, the better. I start assembly by sewing each sleeve to its gusset, then down the arm. Once each sleeve is assembled, I match the top of the sleeves to the shoulder point (mid-point on the length) of the body panel, and work down in both directions until the seams meet at the bottom of the gussets. Then I attach a gore to each side, front and back, and finally sew the side seams between the gores. Cutting the neckline is more an art than a science - start with the smallest hole that fits over your head and gradually trim away. The front needs to be lower (frequently a lot lower) than the back. The shape I end up with before I put in the pleats is a rectangle with rounded corners - there's a flat edge in front and back that will be taken up by the pleats, and a short straight section on the sides right where it hits the shoulder line. I finish the neckline with a single fold, and cover the raw edge on the inside with a length of 1/4 inch linen tape, sewn down with two rows of running stitch. This produces a very stable, neat neckline that won't roll or stretch out of shape.
Subscribe to:
Post Comments (Atom)
No comments:
Post a Comment