Smocked Apron, part 2
Part two for this smocked apron consists of the actual smocking stitches. Smocking has been described (accurately, I think) as embroidery on pleats, rather than a flat ground. And like the various other forms embroidery, smocking has it's own set of stitches. Fortunately, however, they tend to be simple (most are variants on backstitch) and they are generally worked in straight rows rather than figured designs. The stitch I have picked for this apron is honeycomb stitch, which opens up into a diamond lattice when finished.
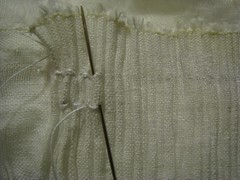
Step 5: For thread, I am using a medium weight white linen thread (35/2). Linen thread is particularly good for smocking, as it can be pulled snugly and won't slide back when not under tension, unlike silk. In the photo at right, I have just started the first row of stitches. You can see very faint pencil lines marking the row so that I stay in a straight line; these will wash out later. Also note that I've left some unworked width at the top, because we will be attaching the top edge to a band for the apron ties later.
Here, I'm pulling the pleats apart a little to show the structure of the stitch, and how it creates the diamond pattern.
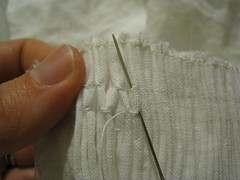
Step 6: Because I'm only using the one stitch, I just repeat it until I've filled the entire pleated area. The bottom row here is a bit sloppy - this is because the last gathering thread is actually between the two halves of the last row of honeycomb stitch, so those stitches were worked over loose folds rather than tightly organized pleats. Which is why you should always pleat a larger area than you think you need - it can be difficult to get the last row to line up correctly, and better to have extra room than run over the edge.
Step 7:Once the smocking stitches are complete, carefully snip the gathering threads and pull them out, letting the fabric relax to a natural width. If you look carefully, you can see the structure, with each of the original pleats zig-zagging back and forth.


4 comments:
Hello and good afternoon!
My name is Tammy Milner (Eleanor Spencer in the SCA) and I am from Chattanooga, TN (Meridies in the SCA). I am teaching a class on honeycomb-smocked aprons and their construction at the upcoming event, Castle Wars on November 19, 2017. I'm writing to see if it would be possible to use some of your photos in the tutorial to show technique. This would be in the form of a take-home handout. I would be sure to give you credit for all your wonderful work and would also be happy to send you a copy of the document so you can ensure that you are credited to your satisfaction. If this is a possibility, please let me know. Thank you so very much for your time and help! Your work is beautiful!
Regards,
Tammy Milner
tammyrmilner@gmail.com
Yes, you may use my photos in this way. Photos should indicate "Copyright Catrijn vanden Westhende, 2009 CC BY-NC-ND 2.0" The text there indicates the license that I publish my photos under - Creative Commons. BY means attribution is required. NC means non-commercial use only. ND means no derivatives - the photos should not be changed from how I published them. I would also appreciate it if you provide a link back to the tutorial article. Thanks!
Hi, regarding thread. Could cotton embroidery be used?
Cotton threads are fine substitution. If using DMC or similar, you'd need to divide to perhaps 2 strands. White is most common, but colors sometimes seen would generally be black, red, and blue (rarest).
Post a Comment