Smocked Apron, part 3
The last stage of making the apron is attaching it to a narrow waistband which extends past the edges into long ties. Between part 2 and today's entry, I hemmed the raw edges around the sides and bottom of the apron panel. Ideally, this should have been done at the very beginning of the project, before pleating, but it didn't present any problems since I purposely left a little width unpleated so that I would have room to turn a hem under.
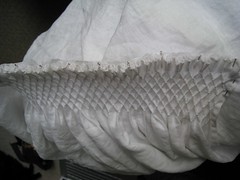
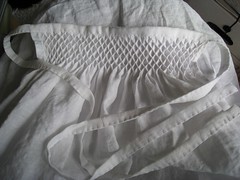
Step 8: Stretch the smocking out to the desired width, and pin to the band starting with the two ends, then the middle, and then further subdividing to get the distribution even. You generally want a gentle amount of stretching: enough to open up the pleats, but not too much, which can cause the smocking to curl up on itself. As shown in the photo, for the initial pinning you want to pin the "valleys" of the pleats to the band, not flattening down the tops of the pleats yet. The edge of the band should be on straight grain and lined up with the top of the pleats, and at this point I haven't cut it to width yet. The band should be long enough to extend past the edges of the apron, but doesn't have to be a long enough for the ties in a single piece, as it can be pieced later.
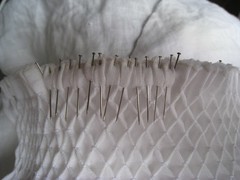
Step 9: Once the apron panel is secured, and you are happy with the width and the way it hangs, start flattening the pleats. I try to massage each standing pleat into a tiny (inverted) box pleat, so that the 'top' of the pleat is still roughly centered, rather than falling to one side.
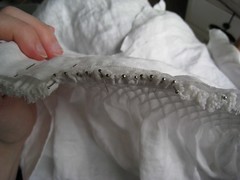
This top view of the same stage shows how much this compresses the depth of the smocking.
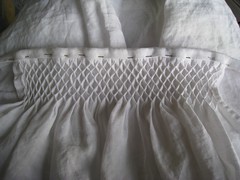
Step 10: At this point, there are a very large number of pins holding the apron to the band. You'll need to stitch these down, either by hand or machine. If doing machine stitching, work closer to the raw edge, so that it can be hidden once the band is folded over to the front. Once all the pins are out we can fold the band down to it's final width. The band is folded in the back (possibly farther from the edge than the stitching line), folded over the top and down to the same depth in the front, and tucked under for a finished edge. If necessary, trim the band to the appropriate width, and/or add additional pieces of the same width to lengthen the ties. Extend the folds to the end of the ties (basically, raw edges folded in, then folded in half again). At the very ends of the ties, fold the ends in first to hide those raw edges.
Step 11: Stitch the band to the apron, being sure to catch the folds in both the front and the back, and sew down the length of the ties for a finished apron.
5 comments:
Thank you very much for posting this. I've read through this information quite a few times.
When you were setting up the grid, how far apart did you make the stitches?
Thanks
Sylvie
My stitch length for the grid was about 1.5 cm or 5/8 in. (That's the total stitch length - needle up at 0, down at .75cm, and back up at 1.5cm.) Glad it was helpful!
Is there any chance of seeing the apron being worn? I'd love to see how and on what level it sits on the waist.
You can see it on my purple German dress. Usually I have it at my low waist, about the same level as a belt, but that's really just a function of how tightly the strings are tied.
Would you consider making an old english surplice with this honey comb smocking at the top instead of the single row gathering?
Post a Comment