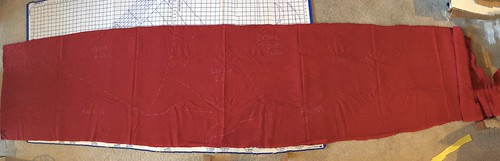
I've been meaning to blog this forever: how I cut my Burgundian gowns. And since I was cutting a new one, I finally have a picture of my layout. Obviously, there's some distortion from creating the panoramic, but you can get the idea. My back panels are cut like a 4-panel supportive kirtle, with flared skirt. Laying them on the selvage leaves a large wedge between them that becomes the center back gore. The front panels are cut differently, with the selvage going all the way up the neckline to the shoulder. Like the back, the skirt is flared as much as fabric width allows. The leftover bit between the fronts is enough for sleeves, cuffs, and collar. How this works in practice, and why there's only one gore is this: the angling of the front pulls the fullness forward, draping in folds at center front with the side seams pulled forward from the normal vertical line. The big gore in the back then replaces all the fullness that the front is stealing, making it even. I think it works really well, and it's a fairly efficient layout.
I have several other projects I'm working on, including some exciting things, but they are !sssh~secret!, with a few months to go before unveiling.
Subscribe to:
Post Comments (Atom)
2 comments:
Thanks for your picture! I found your post just at the right time, before I started patterning my first burgundian gown, and this lay-out worked a charm. I've got the write-up on my dress here, I included a link to your post! https://ateliernostalgia.wordpress.com/2017/08/11/late-15th-century-burgundian-gown/
Nice work - that is fantastic use of beautiful fabric! I always love hearing that something I've posted is helpful :)
Post a Comment