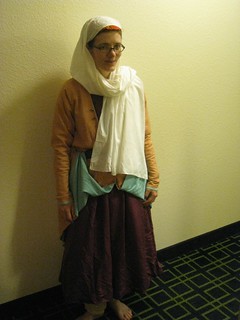
One of my long-term projects has been to slowly rehab and improve my Persian clothes. I made my first set many years ago, essentially on a whim, and entirely from fabric out of the stash. It's a lot of fun to wear something completely different than I normally do (and to hang out with my awesome Persian-persona friends), but it really wasn't up to my normal standards. So one of my goals has been to fix, replace, and add pieces for gradual improvement.
Here, I've swapped out my first coat layer for the new silk one I made this winter, although much of the interesting detail is hidden. (Please forgive the low-light hotel room photo) You can also glimpse just the tiniest bit of my braid case peeking out under the veil - a teaser for another post hopefully appearing soon. Next up? I need more bling! I definitely need to add jewelry, and I think my next coat should be a brocade.
04 April 2014


06 March 2014
See you at Gulf Wars!
I've got a few fun new projects to show, and I'd really hoped to get some photos taken and posted this week. But I've run out of time, and the things have been packed into tubs instead, and there's really still far too much to get done before I hit the road.
21 February 2014
Button loops and bead buttons for the Persian coat
Last weekend, I finally got through the last bit of finishing for my new coat, which was the closures for the front opening. I used small round glass beads for buttons, building a short thread shank right on the front edge. Then I made a finger-loop braid using silk sewing thread and the first braid described on Phiala's string page.
I attached the braid to the opposite edge using a whip stitch that alternately pierced the braid and the fabric. At each point where I needed a loop, I took a few extra stitches to secure the braid, made a loop and took two stitches in place going around the braid rather than piercing it. This left the loop temporarily adjustable and allowed me to tighten to just the right size for the buttons. Once the size was set, I took several stitches in place, piercing both layers of braid at the crossover, before moving down the edge toward the next one.
The end result is a very delicate, fine finish, and it works really well.
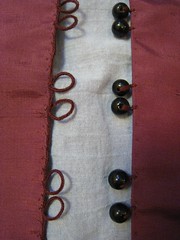
I attached the braid to the opposite edge using a whip stitch that alternately pierced the braid and the fabric. At each point where I needed a loop, I took a few extra stitches to secure the braid, made a loop and took two stitches in place going around the braid rather than piercing it. This left the loop temporarily adjustable and allowed me to tighten to just the right size for the buttons. Once the size was set, I took several stitches in place, piercing both layers of braid at the crossover, before moving down the edge toward the next one.
The end result is a very delicate, fine finish, and it works really well.
27 January 2014
Fuzzy fezzy felted hat
Combine friends, projects, and learning new things, and you might end up with an awesome weekend plus a cool new hat.
A friend of mine has recently been felting a lot of hats, and after watching her work on a few that were in different stages of finishing, I wanted to do one but couldn't figure out what style to go with. Once we realized we had a block that would work for the little pillbox/very short hennin type that would go with my transitional gown project, though, that had to happen.
We started with unspun roving piled in layers around a waterproof pattern that provided a resist. After a lot of soapy water, agitation, reheating, and rolling, it shrank down to this impressively thick hat blank.
After letting it dry overnight, I ironed it to get a nice smooth surface on the felt, and then we steamed it and aggressively stretched it to get it over the hat block in the picture. (The block is the middle and lower portions of one designed for a fez). It's not completely done - the bottom edge needs to be trimmed to the correct length, and it will probably also need some stiffening (wire and/or thinned glue, maybe?).
I can hardly wait to get this finished; it's going to be fabulous!
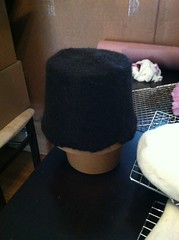
A friend of mine has recently been felting a lot of hats, and after watching her work on a few that were in different stages of finishing, I wanted to do one but couldn't figure out what style to go with. Once we realized we had a block that would work for the little pillbox/very short hennin type that would go with my transitional gown project, though, that had to happen.
We started with unspun roving piled in layers around a waterproof pattern that provided a resist. After a lot of soapy water, agitation, reheating, and rolling, it shrank down to this impressively thick hat blank.
After letting it dry overnight, I ironed it to get a nice smooth surface on the felt, and then we steamed it and aggressively stretched it to get it over the hat block in the picture. (The block is the middle and lower portions of one designed for a fez). It's not completely done - the bottom edge needs to be trimmed to the correct length, and it will probably also need some stiffening (wire and/or thinned glue, maybe?).
I can hardly wait to get this finished; it's going to be fabulous!
16 January 2014
Second finished thing of 2014: man's tunic
There's a lot going on in this photograph, which includes several of my nearest and dearest.
But the reason it's on the blog here is the green tunic on the man second from the right. It's a simple tunic in a suit-weight wool. I'm still debating adding contrast bands via appliqué to the neckline and wrists, but it's finished as is and might stay that way. I think it fits him pretty well, at any rate.

But the reason it's on the blog here is the green tunic on the man second from the right. It's a simple tunic in a suit-weight wool. I'm still debating adding contrast bands via appliqué to the neckline and wrists, but it's finished as is and might stay that way. I think it fits him pretty well, at any rate.
07 January 2014
The very pet-able hennin
The last project started in 2013 is the first one finished in 2014.
My first hennin was of buckram and wire construction. I've been pretty happy with it, and I've used it at least occasionally for years, but it was starting to get a bit beat up. So I decided to make a new one, and try a different construction method.
The structure of this one is made of two layers of heavy (but unstiffened) linen, with channels filled with reed. It collapses flat when not being worn, so it's pretty resistant to being crushed. The outer fabric is a rather luscious velvet (hence the pet-able hennin). I'd hoped to have enough of the velvet to do at least a band of drape for the front, but sadly there wasn't an appropriately shaped piece.
I also made a round bonnet to go with it, working from the pattern in The Queen's Servants, which worked really well.
The hat worked pretty well in practice, but I need to work in securing my understructure to keep everything steady. My black band under the hood kept slipping back, which threw everything off, and I think I need to pin the hat down to the hood, since the base of it isn't quite big enough to really grip my head. Overall, though, I'd rate it a success.
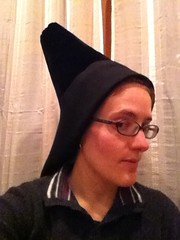
My first hennin was of buckram and wire construction. I've been pretty happy with it, and I've used it at least occasionally for years, but it was starting to get a bit beat up. So I decided to make a new one, and try a different construction method.
The structure of this one is made of two layers of heavy (but unstiffened) linen, with channels filled with reed. It collapses flat when not being worn, so it's pretty resistant to being crushed. The outer fabric is a rather luscious velvet (hence the pet-able hennin). I'd hoped to have enough of the velvet to do at least a band of drape for the front, but sadly there wasn't an appropriately shaped piece.
I also made a round bonnet to go with it, working from the pattern in The Queen's Servants, which worked really well.
The hat worked pretty well in practice, but I need to work in securing my understructure to keep everything steady. My black band under the hood kept slipping back, which threw everything off, and I think I need to pin the hat down to the hood, since the base of it isn't quite big enough to really grip my head. Overall, though, I'd rate it a success.
Subscribe to:
Posts (Atom)