The continental 1490's project has been languishing while I searched high and low for a lining fabric. I wanted something white or off-white, heavy enough to not be sheer, in natural fibers, preferably wool, priced such that I could afford to do a full lining. This was not to be. Plan B is to embrace the medieval mindset and work with what I have. I'm going to interline with white linen, and then fake a richer lining of wool flannel at all the edges.
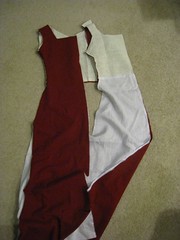
That decision gave me enough information to move forward. My primary fabric is a luscious red wool twill, in 2 remnants of 2 yards each. To maximize that limited resource, I cut pieces as I knew what shapes I needed, trying to leave the most usable yardage as I went. The bodice is cut from my kirtle pattern, with a bit of ease added but without the extra for folding into a strong lacing opening. This layer shouldn't be under stress, so that reinforcement isn't needed. In the back, I stopped it at the waist, just like the kirtle, but in the front I extended it all the way to the hem to remove the front waist seam. That seam still exists in the interlining, though, since I wanted to transition from heavier linen in the bodice to lightweight linen in the skirt. The photo shows this rather unusual construction order - I plan to draft the sleeves next, leaving the skirt back for absolute last, since that will be a simple rectangle, as big as I can make it at that point.
02 January 2015


19 November 2014
Mending season
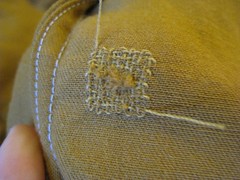
Although the early fall is my busiest time for travel and events, by late October or November, I'm well into the slow part of the year. That means it's time to look carefully at my most used clothing, checking for anything in need of repair. Simple mending, such as repairing a seam where the thread has snapped, I do without even questioning it. Holes or tears affecting the structure of the fabric are a bigger question mark, and varies a bit depending on how much time and money went in to the piece initially. I really do try to get long life out of the garments I make, though, perhaps more than is usual? I'm still wearing things I've had a decade or more, and they've all been mended and in some cases altered more than once. Pictured here is the result of darning a small tear near the hem of my Moy gown. Brick stitch embroidery also continues - I think I'm about halfway done - but that's not exactly a great spectator sport.
08 June 2014
A simple late 15th c. cap
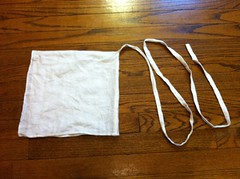
Late 15th c. cap
Originally uploaded by Catrijn.

Wearing late 15th c. cap
Originally uploaded by Catrijn.
- Take a rectangle of fine linen, 22 by 12 inches. (These measurements fit my head - small adjustments may be necessary.)
- Hem all four sides.
- Fold in half, sewing the edge together to form the center-back seam.
- Attach a long tie to the point at the top of the head.
- There is no step 5!
14 May 2014
Mostly quiet on the sewing front
I've been on a bit of a hiatus from my big sewing projects, so I haven't had a lot of new material to post here. I did remake the sleeves on the black kirtle (much better!), and I just need to add a lining and a new lacing cord to consider that finished. The next step is the outer gown, and although I know I want to fully line it, I'm not sure with what. Until I figure that out, that project's on hold.
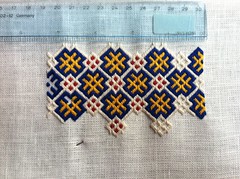
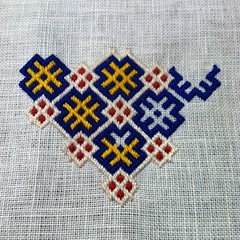
I've been working on the embroidered pouch in little bits here and there. Right now, I need to decide on my finished dimensions before I go much farther. The current width is about the minimum for me to get my hand into comfortably; I'm strongly leaning towards adding another half-repeat which would put it at about 5 inches, for more room and better symmetry. The finished pouch should be approximately square, so I'll need to embroider something twice as tall as it is wide.
I've been working on the embroidered pouch in little bits here and there. Right now, I need to decide on my finished dimensions before I go much farther. The current width is about the minimum for me to get my hand into comfortably; I'm strongly leaning towards adding another half-repeat which would put it at about 5 inches, for more room and better symmetry. The finished pouch should be approximately square, so I'll need to embroider something twice as tall as it is wide.
29 April 2014
New project: embroidered pouch
I have long admired (and coveted) the brick stitch pouches that a few of my friends have. So there was only one solution... make my own! Richard Wymarc's article on brick stitch embroidery is fantastically helpful, and I've adapted the pattern from one of the extant pieces to use the colors I wanted. I'm working with commercial silk embroidery floss on a 32ct linen ground. The embroidery itself is fairly simple, and now that I've got the pattern well established, it's easier to work without looking at my diagram too often. Still, no completely filled design is exactly fast to work...
11 April 2014
The previously-promised Persian braid case
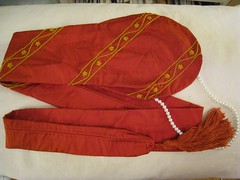
Here are some pictures of the (mostly) finished braidcase. This was almost entirely a stash project. The main fabric is a red silk - it is medium weight with a strong hand, somewhat similar to a dupioni but with very few slubs. The tassel is also silk, and although not an exact color match it is close. The yarn was the loom waste from a weaving project, and I've been saving the short thrums for a long time but they were perfect for this! The (fake, plastic) pearls are recycled from my old persian hat, which I'd like to redo anyway. The only thing new was the silk embroidery thread. I picked a simple, repetitive band pattern done in outline stitch and lazy daisies. It is probably not terribly authentic, but I think it has approximately the right aesthetic. I ran out of time before I wanted to wear it, so only the first three bands at the top are done, but eventually I want to extend the design along the entire length. (The finishing of the tube part was done in a way to make it easy to un-do later.)

Subscribe to:
Posts (Atom)