12 January 2009
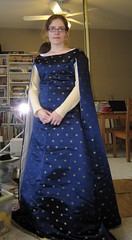
Finished 'fleur-de-lys' gown with hat
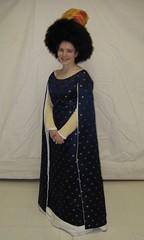
I really had a great time at 12th Night in this outfit; the hat especially is just so much fun (and other people seemed to think so too, which always makes my day).
Final wrap-up on the project:
The dress I am mostly happy with, although it's been a long road with some serious doubts along the way. It doesn't look quite as nice as I originally imagined in my head, but it does still look good. The fabric, a rare find I just couldn't pass up, has a bit too much body to it to drape quite right. Coupled with my decision to go with a pullover style and skip a long opening, and you can't get the body-skimming fit and soft folds that the inspiration has. If I was doing this dress again, I'd either pick a fabric with a softer hand (let me know if you find any wool brocade, mmmkay?), or I'd put an invisible zipper in one of the side seams under the arm. Plausibly, the original might have been laced (front, back, or side, there's no way to know), but I just couldn't picture it, and the thought of putting stress-bearing eyelets into satin makes me want to run screaming.
The hat I'm more positive on; essentially my only reservation is that it's a little larger than I intended. I failed to account for the extra volume taken up by the covering of feathers, which was just a silly oversight. So it's even more over-the-top, and I can hardly be sad about that. My technique at sewing feathers has improved quite a bit too - it's harder to do on a solid base like this than a flat hat like the Tellebarrett where you can work from both the top and the bottom.


07 January 2009
Feathered hat progress
There's nothing like a deadline to get you moving on a project. I really want this hat finished for 12th Night, which is this weekend, as it will really make or break the outfit. It's looking good from the top, but the side shows the truth. And yes, it will be completely covered in feathers, aside from the inside band. Actually, I'm a bit further along, since I took these pictures before working on it last night. The bottom edge is now covered in as well, and I'm just starting to work on filling in the middle, overlapping feathers so the change in direction isn't so obvious. (For comfort, I've kept the stiff root end of the quills always away from the head opening, which means that the top and the bottom have feathers going in different directions.)
The large string of beads from the original inspiration will probably be a miss for this weekend because of time constraints, although I would still like to make it. I do, however, have a new pair of appropriate shoes that I got for Christmas, which makes me very happy.
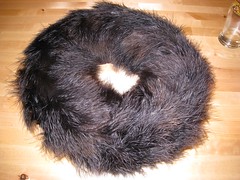
The large string of beads from the original inspiration will probably be a miss for this weekend because of time constraints, although I would still like to make it. I do, however, have a new pair of appropriate shoes that I got for Christmas, which makes me very happy.
02 December 2008
Hats of Unusual Size
Very few historical outfits are complete without the appropriate headgear. Even when hats or veils aren't particularly called for, the right hairstyle can really put the finishing touch on an ensemble. And since I'm primarily working in the 15th century, I have a delightful variety of outlandish hats to choose from.
The hat I am working on at the moment will accompany the fleur-de-lys gown in the style from the Très Riches Heures. At its core, its really just a padded roll, albeit a very large one and extensively decorated. Because of this, it doesn't call for the wires or stiffening usually associated with hatmaking - just fabric, stuffing, and ordinary sewing tools.
Very narrow padded rolls can be made with just a straight tube of fabric, particularly if it is cut on the bias. As it is bent around the head, the inner portion of the ring automatically forms small folds. However, as they become larger, it becomes necessary to shape the fabric for the roll, as the folding and bunching would become excessive. In making my roll, I still started with a straight rectangle of fabric. I decided that the lengthwise seam would go along the outer edge, and then I put tucks in at even intervals such that the center line of the piece (which becomes the head opening, the smallest point) was much shorter than the two edges. If you're having trouble picturing that, here's how it works in practice: fold the fabric cross-wise at the point you want to put in the tuck. Stitch from edge to edge in a sideways V shape: very close to the fold at each end, and farther away at the center line. Carefully stitch the long edge, leaving an opening so that you don't form a donut which can't be turned rightside out. Stuff, pin or baste the opening closed, and try on. It may require several tests to get it right - expect the tucks to become more severe to shrink the head opening. It's also easy to add additional pieces to the end if the overall size is not big enough; just shape the seam like the other tucks. Starting with a long arc (2, really, for top and bottom) rather than a straight piece would probably reduce the need for tucks, but would also require being close to the correct size and shape from the first cut, as it would be more difficult to adjust.
I like a soft wool for the outer material; it has some give and provides a smooth silhouette. Many people go for cotton, but it can produce sharp creases and puckers which I think detract from the overall look. As for stuffing, while unspun wool seems the most likely candidate for an authentic material, polyester fiberfill is cheap, light, and readily available if you're working on a deadline. It is worth spending a little bit more to get the extra soft stuff, though. Keep in mind that it does have a tendency to poke through most materials if they are not very tightly woven - your particular design will dictate whether this will be a problem or not. Mine will be entirely hidden under the embellishment, so I'm not worried.
The hat I am working on at the moment will accompany the fleur-de-lys gown in the style from the Très Riches Heures. At its core, its really just a padded roll, albeit a very large one and extensively decorated. Because of this, it doesn't call for the wires or stiffening usually associated with hatmaking - just fabric, stuffing, and ordinary sewing tools.
Very narrow padded rolls can be made with just a straight tube of fabric, particularly if it is cut on the bias. As it is bent around the head, the inner portion of the ring automatically forms small folds. However, as they become larger, it becomes necessary to shape the fabric for the roll, as the folding and bunching would become excessive. In making my roll, I still started with a straight rectangle of fabric. I decided that the lengthwise seam would go along the outer edge, and then I put tucks in at even intervals such that the center line of the piece (which becomes the head opening, the smallest point) was much shorter than the two edges. If you're having trouble picturing that, here's how it works in practice: fold the fabric cross-wise at the point you want to put in the tuck. Stitch from edge to edge in a sideways V shape: very close to the fold at each end, and farther away at the center line. Carefully stitch the long edge, leaving an opening so that you don't form a donut which can't be turned rightside out. Stuff, pin or baste the opening closed, and try on. It may require several tests to get it right - expect the tucks to become more severe to shrink the head opening. It's also easy to add additional pieces to the end if the overall size is not big enough; just shape the seam like the other tucks. Starting with a long arc (2, really, for top and bottom) rather than a straight piece would probably reduce the need for tucks, but would also require being close to the correct size and shape from the first cut, as it would be more difficult to adjust.
I like a soft wool for the outer material; it has some give and provides a smooth silhouette. Many people go for cotton, but it can produce sharp creases and puckers which I think detract from the overall look. As for stuffing, while unspun wool seems the most likely candidate for an authentic material, polyester fiberfill is cheap, light, and readily available if you're working on a deadline. It is worth spending a little bit more to get the extra soft stuff, though. Keep in mind that it does have a tendency to poke through most materials if they are not very tightly woven - your particular design will dictate whether this will be a problem or not. Mine will be entirely hidden under the embellishment, so I'm not worried.
16 November 2008
The finish line
Over the past week or so, I've slowly finished the hemming on this gown - both for the contrast band and the inner lining - and secured the lining to the main fabric around the bottom edge. Which means that it is finally, completely finished! I'm planning to wear this to 12th Night, so I probably won't get any 'all dressed up' pictures until then. Accessories have yet to be finished, although I've started on the hat. I do already have a middle layer gown to wear with this, although in the long term I'm planning to replace it with a nicer one, for which I already have the fabric. It's doubtful that I'll get that done soon, though.
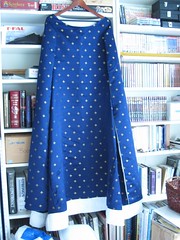
26 October 2008
A tale of two hems
Sometimes you've just got to put your butt in the chair and work on things, even if you're not inspired.
I realized I had a whole day for projects, with nothing planned, and I figured I'd just start working on this dress again so that I can get it off my 'in-progress' list. I still hadn't decided on a floor-skimming vs. a puddling-on-the-floor length, but after trimming the main fabric so it was even, it became obvious that I didn't have enough length to puddle convincingly anyway. So I trimmed off another 4 cm or so, and zig-zagged a 1 cm hem to keep the fabric in check while I worked on the rest.
The turned-up contrast of the lining fabric I've decided to do as an applied band rather than actually turning up the lining (which you can see hanging down in the center of the photo). There are four thicknesses total - 2 lengths of fabric, folded over and pressed at the top of the band. The bottom two layers are sewn to the very edge of the dress to secure them, and the upper layers have extra length which will be folded under and tacked on the inside.
Of course, since the band is straight and the skirt is flared, it is inevitably a bit too wide at the top. My current debate is whether to ease the extra through the entire width (on the right on the photo), or to keep it as smooth as possible and take a few darts in the section over the gores as necessary (on the left). I'm strongly leaning toward the latter, but I'm going to stare at it for a day or two before I commit to one or the other.
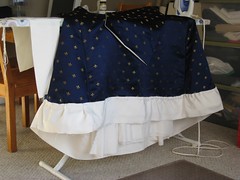
I realized I had a whole day for projects, with nothing planned, and I figured I'd just start working on this dress again so that I can get it off my 'in-progress' list. I still hadn't decided on a floor-skimming vs. a puddling-on-the-floor length, but after trimming the main fabric so it was even, it became obvious that I didn't have enough length to puddle convincingly anyway. So I trimmed off another 4 cm or so, and zig-zagged a 1 cm hem to keep the fabric in check while I worked on the rest.
The turned-up contrast of the lining fabric I've decided to do as an applied band rather than actually turning up the lining (which you can see hanging down in the center of the photo). There are four thicknesses total - 2 lengths of fabric, folded over and pressed at the top of the band. The bottom two layers are sewn to the very edge of the dress to secure them, and the upper layers have extra length which will be folded under and tacked on the inside.
Of course, since the band is straight and the skirt is flared, it is inevitably a bit too wide at the top. My current debate is whether to ease the extra through the entire width (on the right on the photo), or to keep it as smooth as possible and take a few darts in the section over the gores as necessary (on the left). I'm strongly leaning toward the latter, but I'm going to stare at it for a day or two before I commit to one or the other.
24 August 2008
Continuing progress on Très Riches Heures gown
Neither I nor this dress are dead yet. I've just set in the sleeves and started attaching the lining.
Subscribe to:
Posts (Atom)