What with my new copy of Fashion in Detail, working on the strapless stays, and a trip to the Fort Frederick Market Fair this weekend, I seem to have the 18th century on the brain. The dress that has really caught my fancy is this one in the V&A's collection. It is English, estimated at mid 1770s, in a pumpkin color that I'd probably look awful in. If you don't have the book for reference, the front is flat with a round neck and open skirts. What I really like about is the way it is at once both quite plain and finely detailed. I also love the back pleats that run continuously down from the top of the bodice (where they are stitched down) all the way down through the skirts without any sign of piecing or a waist seam.
I'm not sure that I want to start this gown, but I'm starting to plan out how I would approach it if I decide to. I need to look through Bradfield's Costume in Detail, as there are likely a few similar gowns in there, and it's as good an excuse as any to pick up the relevant volume of Arnold's Patterns of Fashion. Kass from Reconstructing History has a photo diary of making a closed gown with similar details, and of course there's also her pattern for an open robe anglais. J. P. Ryan also has a Robe a l'Anglaise pattern, which based solely on the line drawings on the covers might be closer to the style I'm looking for. On the down side, though, her patterns are single-size-per-envelope, which would mean a significant amount of redrafting. If anyone happens to know of other resources which document this particular gown more completely (it's certainly in good enough shape to be patterned from), I'd be more than happy to hear about it.
As for the progress on the strapless stays, they perplex me at every turn. My center front insert is trimmed down to 2 1/8", and boned with more reed, and I'm really quite happy with the fit. But if I lace to comfortably snug, the back edges touch, suggesting that maybe I didn't need to enlarge them after all? And yet I can assure you they were really too tight before. In theory, they're now ready for lining and binding, but I may rip out and re-sew the new section one more time, because the seamlines aren't as straight as I'd like.
28 April 2009
17 April 2009
Facing the music
So, after months and months of a mixture of avoidance and denial, the truth is obvious: the strapless stays are not likely to stretch out to my size, and neither will I shrink to theirs. Rather than abandoning them, I'm still going to try to make them work. So tonight, I pulled the reed out of a few channels on either side of the center front, and picked open that seam. I managed to find all the materials that I had started with, and I drafted out an additional piece to insert. I cut it about 6 inches wide, plus seam allowances, although I think I'll only need 4 inches or less of extra room. I've left the rest of the boning in, so I should be able to get a good idea of the final fit. Except for the fact that I'm out of white thread (?!), which means that this is on hold again at least until I can get to the store.
Adding a large adjustment like this in just one spot, rather than distributing it throughout all the pieces, will change the shape of the stays a bit, although hopefully not too much. The dips for the arms will move around towards the back, and although they were too far forward in the current incarnation, I might need to trim down the side front points for comfort. The center front point will also be notably longer if I keep the current slope of the edge, although, again, I can trim it down as needed.
Adding a large adjustment like this in just one spot, rather than distributing it throughout all the pieces, will change the shape of the stays a bit, although hopefully not too much. The dips for the arms will move around towards the back, and although they were too far forward in the current incarnation, I might need to trim down the side front points for comfort. The center front point will also be notably longer if I keep the current slope of the edge, although, again, I can trim it down as needed.
16 April 2009
Books: Fashion in Detail
Oh, my poor neglected blog. Today's (brief) note is about availability of some very nice books. New high-quality softcover editions of the V&A's Seventeenth and Eighteenth-Century Fashion in Detail, and Nineteenth-Century Fashion in Detail have been released this spring (earlier editions were becoming hard to find). Both are full of close-up, full-color photographs of extant garments, with brief descriptions and line drawings of the complete items. They are absolutely beautiful, very affordable, and highly recommended if they correspond to your periods of interest. They're particularly useful for finishing and embellishment ideas; slightly less useful for complete garment reconstruction, since there aren't full-length photos.
12 January 2009
Finished 'fleur-de-lys' gown with hat
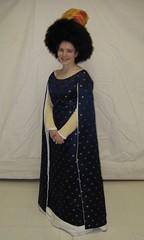
I really had a great time at 12th Night in this outfit; the hat especially is just so much fun (and other people seemed to think so too, which always makes my day).
Final wrap-up on the project:
The dress I am mostly happy with, although it's been a long road with some serious doubts along the way. It doesn't look quite as nice as I originally imagined in my head, but it does still look good. The fabric, a rare find I just couldn't pass up, has a bit too much body to it to drape quite right. Coupled with my decision to go with a pullover style and skip a long opening, and you can't get the body-skimming fit and soft folds that the inspiration has. If I was doing this dress again, I'd either pick a fabric with a softer hand (let me know if you find any wool brocade, mmmkay?), or I'd put an invisible zipper in one of the side seams under the arm. Plausibly, the original might have been laced (front, back, or side, there's no way to know), but I just couldn't picture it, and the thought of putting stress-bearing eyelets into satin makes me want to run screaming.
The hat I'm more positive on; essentially my only reservation is that it's a little larger than I intended. I failed to account for the extra volume taken up by the covering of feathers, which was just a silly oversight. So it's even more over-the-top, and I can hardly be sad about that. My technique at sewing feathers has improved quite a bit too - it's harder to do on a solid base like this than a flat hat like the Tellebarrett where you can work from both the top and the bottom.
07 January 2009
Feathered hat progress
There's nothing like a deadline to get you moving on a project. I really want this hat finished for 12th Night, which is this weekend, as it will really make or break the outfit. It's looking good from the top, but the side shows the truth. And yes, it will be completely covered in feathers, aside from the inside band. Actually, I'm a bit further along, since I took these pictures before working on it last night. The bottom edge is now covered in as well, and I'm just starting to work on filling in the middle, overlapping feathers so the change in direction isn't so obvious. (For comfort, I've kept the stiff root end of the quills always away from the head opening, which means that the top and the bottom have feathers going in different directions.)
The large string of beads from the original inspiration will probably be a miss for this weekend because of time constraints, although I would still like to make it. I do, however, have a new pair of appropriate shoes that I got for Christmas, which makes me very happy.
The large string of beads from the original inspiration will probably be a miss for this weekend because of time constraints, although I would still like to make it. I do, however, have a new pair of appropriate shoes that I got for Christmas, which makes me very happy.
02 December 2008
Hats of Unusual Size
Very few historical outfits are complete without the appropriate headgear. Even when hats or veils aren't particularly called for, the right hairstyle can really put the finishing touch on an ensemble. And since I'm primarily working in the 15th century, I have a delightful variety of outlandish hats to choose from.
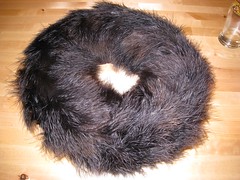
The hat I am working on at the moment will accompany the fleur-de-lys gown in the style from the Très Riches Heures. At its core, its really just a padded roll, albeit a very large one and extensively decorated. Because of this, it doesn't call for the wires or stiffening usually associated with hatmaking - just fabric, stuffing, and ordinary sewing tools.
Very narrow padded rolls can be made with just a straight tube of fabric, particularly if it is cut on the bias. As it is bent around the head, the inner portion of the ring automatically forms small folds. However, as they become larger, it becomes necessary to shape the fabric for the roll, as the folding and bunching would become excessive. In making my roll, I still started with a straight rectangle of fabric. I decided that the lengthwise seam would go along the outer edge, and then I put tucks in at even intervals such that the center line of the piece (which becomes the head opening, the smallest point) was much shorter than the two edges. If you're having trouble picturing that, here's how it works in practice: fold the fabric cross-wise at the point you want to put in the tuck. Stitch from edge to edge in a sideways V shape: very close to the fold at each end, and farther away at the center line. Carefully stitch the long edge, leaving an opening so that you don't form a donut which can't be turned rightside out. Stuff, pin or baste the opening closed, and try on. It may require several tests to get it right - expect the tucks to become more severe to shrink the head opening. It's also easy to add additional pieces to the end if the overall size is not big enough; just shape the seam like the other tucks. Starting with a long arc (2, really, for top and bottom) rather than a straight piece would probably reduce the need for tucks, but would also require being close to the correct size and shape from the first cut, as it would be more difficult to adjust.
I like a soft wool for the outer material; it has some give and provides a smooth silhouette. Many people go for cotton, but it can produce sharp creases and puckers which I think detract from the overall look. As for stuffing, while unspun wool seems the most likely candidate for an authentic material, polyester fiberfill is cheap, light, and readily available if you're working on a deadline. It is worth spending a little bit more to get the extra soft stuff, though. Keep in mind that it does have a tendency to poke through most materials if they are not very tightly woven - your particular design will dictate whether this will be a problem or not. Mine will be entirely hidden under the embellishment, so I'm not worried.
Subscribe to:
Comments (Atom)