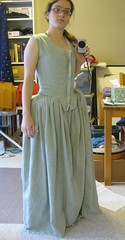
So, after the let-down caused by actually following the pattern directions, I'm going to consider them more like 'suggestions', starting with re-drafting the top of the skirt portion. Here's a picture of the new piece, laid out flat. And, as you can see with the pleats set in, the top of the skirts reach the waist without pulling the hemline up. So, at right, is the current stage of fitting (see also: back).
I'm pretty happy with this stage of fitting, although I'm still working out a few wrinkles in the outer fabric. I'm going to cut the neckline wider, and possibly a bit lower, and neither the skirts or the petticoat have been hemmed to length yet (they'll be closer to ankle length). I am second-guessing the shape of the bum roll a little, it seems too abrupt and angular to me.
14 November 2009
26 October 2009
Does this make my butt look big?
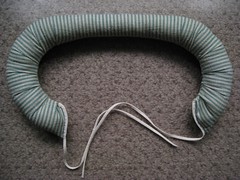
So, there's good news and bad news on the 18th c. English dress. First, I found a scrap big enough to make a bumroll, shown at right. I would have liked a little bit more length so that I could taper the ends in and not have the ties coming out at such an odd angle. It fits well, though, and puts a fair bit of emphasis on my already not-that-small hips, as it should.
The bad is the dress itself. Right after cutting the back and skirts, I looked at the pieces and had a sinking feeling. Here's a picture of the problem. It's not the uneven skirt widths; I had only attached one side so far, and that was cut extra wide so that I could either do double-depth pleats, or trim it down as necessary. No, it's how the top edge of the skirts goes straight across, several inches below the waistline of the bodice that it needs to join to. A quick glance at Arnold confirmed my suspicion, that the panels need to be sloped upward toward the waist. Here's another picture, showing what this does to the hemline. That's without the hip roll, which would only make it worse. It could be salvaged, although to make the hem even, I'd have to cut it much shorter than I want to.
Fortunately, I have tons of extra material, so I'll cut completely new dress pieces that are shaped correctly. The panels I already have I'll change to a petticoat to wear with the dress; I'll need to piece them to get decent length, and I can hide the seam under a band of self trimming, or something like that. It's incredibly frustrating, though. If I didn't have so much material, a drafting error like this could have completely ruined the project. It's enough to make me think I should always just work from scratch instead of relying on other people or companies.
23 October 2009
Just one wafer-thin mint...
It might be time to admit that I have a problem. Once I have all the materials on hand to start a project, it gradually but inexorably becomes irresistible. So although my plate is already full with everything else I'm working on, I just couldn't not start the 18th c. open robe anglais I've been thinking of.
Actually, I was really itching to cut into the the main fabric (a linen-cotton blend with narrow printed stripes - inexpensive for a trial run of the design). But reading through the instructions, it became sadly clear that I couldn't start there. So instead, I cut the bodice lining and started the fitting on that instead. Now, this is really a draped gown - you can't work straight from a flat pattern and expect it to work. But I don't have a dressmaking form, or even a fitting helper - so I'm trying to drape a bodice on myself while wearing stays, and that's a contortionist act if ever there was one. I started by basting the fronts together, then putting pins at the corners of the side-back seams while wrapping it around me, at which point it was held together enough to not fall off, and I could set the shoulder straps. Maybe I just got lucky, but the straps really fell right into place the first time. At that point, I pinched close to an inch out of the side seams and re-set those corner pins, then ripped out the front basting to take it off again. While I had it off, I switch the side seams to overlapped rather than right sides together, and re-pinned a tentative seam line. Then it's an iterative process: put on, carefully pin front seam where the basting had been, pull on seams to see how much room is left (and make a mental note), unpin fronts, take off, adjust seams (measuring to keep the two sides even), repeat. It was easiest for me to work down from the top - getting the underarm just right before worrying too much about the waist. I think it took about 2 hours to get the fitting done. Really, an assistant or a dress dummy would have made this a lot easier. There are some fitting photos here when I was almost finished - I did one more round of adjustments afterward.
Actually, I was really itching to cut into the the main fabric (a linen-cotton blend with narrow printed stripes - inexpensive for a trial run of the design). But reading through the instructions, it became sadly clear that I couldn't start there. So instead, I cut the bodice lining and started the fitting on that instead. Now, this is really a draped gown - you can't work straight from a flat pattern and expect it to work. But I don't have a dressmaking form, or even a fitting helper - so I'm trying to drape a bodice on myself while wearing stays, and that's a contortionist act if ever there was one. I started by basting the fronts together, then putting pins at the corners of the side-back seams while wrapping it around me, at which point it was held together enough to not fall off, and I could set the shoulder straps. Maybe I just got lucky, but the straps really fell right into place the first time. At that point, I pinched close to an inch out of the side seams and re-set those corner pins, then ripped out the front basting to take it off again. While I had it off, I switch the side seams to overlapped rather than right sides together, and re-pinned a tentative seam line. Then it's an iterative process: put on, carefully pin front seam where the basting had been, pull on seams to see how much room is left (and make a mental note), unpin fronts, take off, adjust seams (measuring to keep the two sides even), repeat. It was easiest for me to work down from the top - getting the underarm just right before worrying too much about the waist. I think it took about 2 hours to get the fitting done. Really, an assistant or a dress dummy would have made this a lot easier. There are some fitting photos here when I was almost finished - I did one more round of adjustments afterward.
05 October 2009
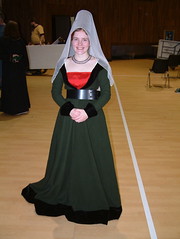
1470s Burgundian gown
From the archives: the green Burgundian V-neck gown that I made in 2005-2006.
Few dresses are as iconic of medieval fashion as the V-neck gown that was popular in the court of the Dukes of Burgundy around 1475, thus called by reenactors the Burgundian gown. The fashion extended to nearby regions as well, of course, particularly the Low Countries which were held by Burgundy at that time, and similar styles were seen in France and England. This style of gown is an overgown, being worn over a chemise and a foundation gown; artwork of the period seems to indicate it was made of fairly thick material and fully lined, often with fur. As such, this is a very warm dress, and would replace a cloak or coat. There are some illustrations and paintings that seem to indicate velvet was also a possible lining option, based on color and painted texture, and I have at least one unusual example that shows a blue and gold brocade instead.
Construction details: Unlined gown of heavy-weight 100% wool melton, with silk velvet trim; hand-sewn with silk thread. The body construction uses four main panels, with selvage edges at front and back center seams. The V neckline is opened by pulling the selvage edge out to the side, not by cutting away material. In the back, the opening is filled in by a triangular piece. The side seams were shaped by draping to the body, and then gradually widen into the A-line skirt. The front opening extends slightly lower than the bottom of the belt; there are a few lacing rings on the inside edge to hold it closed. The sleeves are bias-cut to allow a closer fit, although they are slightly too long for me. I have chosen to only place the trim material at collar, cuff, and hem, where it shows, rather than fully lining the gown, due to the very limited quantities of silk velvet that I had. (It was taken from a vintage dress which had already been ruined by someone else's attempts at alterations.) The inset panel is a rectangle of red silk, pinned to the undergown layer. The gown neckline, as it has a tendency to pull out wider than I like, is also pinned down under the collar, to hold it in place.
Other details: I'm also wearing a beaded necklace, and a silk gauze veil over a truncated hennin, about which I might blog later. I will note that the veil is catching the flash in this photo, and is much more sheer under normal lighting conditions.
19 September 2009
Two left sleeves
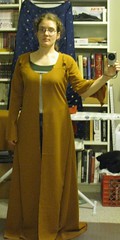
Well, it doesn't look too impressive at this stage, but my Moy gown is now cut and (mostly) basted into shape. There's a lot left unfinished - I haven't slipped the front sleeve gores in, or the front or back skirt gores, and the seams are either temporary or only pinned so far.
Some of the apparent fitting problems here are artifacts; most of the pulling at the bust goes away with the appropriate (lack of) undergarments. That and I need to start the gores about an inch or two higher. The one thing that I will need to correct shows in the back - those pulls across the shoulder piece. The y-shaped shoulder piece is currently eased into the gusset in that section - I need to see whether the problem is just the pins, in which case it would lay flat once it's sewn and distributed more evenly. Otherwise I'll trim the piece down and eliminate the ease; the fabric has enough give that it doesn't seem to need it anyway.
As for the post title, I forgot to check whether my sleeves were right sides together before I cut the slit for the front gore, the one part of the piece that's asymmetrical. And of course, they were both facing up and I ended up with two identical left sleeves. I had plenty of extra fabric to cut another sleeve, but it's just a silly waste that could have been easily avoided.
14 September 2009
Small victories
The muslin for the Moy gown has been beaten into submission, more or less. After following the pattern instructions initially, to understand the spatial relationships of the pieces, it was easiest to make adjustments by ignoring them completely. I'll have to do most of the work again, since I wouldn't expect the wool twill I'm using for the real thing to behave the same way as cotton muslin, but I have a lot better idea of what needs to happen. The yoke/shoulder strap piece is one that I'll actually cut differently, as the initial one was much too long for me, but the others can mostly be massaged into place and trimmed down as needed.
Subscribe to:
Posts (Atom)