This dress has been done for months, but I hadn't gotten any pictures of it until now. Like I outlined in my post on creating the pattern, it's a very simple cut with 4 identical panels, and each panel has a vertical dart for tailoring. The darts in the back are much shallower than the ones in the front, and might be skipped entirely for some women. The straps are long loops made from 1 inch strips of the same fabric as the dress, folded in itself twice.
I'm happy with the overall fit and look of the dress, but not entirely satisfied with it as a recreation based on the Hedeby fragment. While I was able to incorporate most of the features of the piece, the location of the hole near the upper edge of the piece didn't match up with anywhere I could plausibly position a strap, either on the front or the back.
03 March 2008

30 January 2008
Talking the talk, and cutting the fabric
Way back in April of last year, I mentioned plans for a court gown based on one in Très Riches Heures. Nine months later, I have finally convinced myself to cut into the very expensive fabric I'm using for the project. I'm using a very simple cut for the gown, to make best use of my limited yardage (6 yards, but only 30 inches wide, with a directional pattern to boot). The front and back are each cut in a single piece, the full width of the fabric - no center front or center back seams. All the shaping will be in the side seams. Triangular gores for the side seams finish out the width of the skirt. I've got enough room to adjust still that I could add center front and back seams, if I find that I need shaping there, but my muslin seemed okay without them and I'm hoping to avoid that if possible. The gown will be a pull-over-the-head style, more body-skimming than tight. Working with heavy satin is hard enough without having to mess with eyelets or buttons or even zippers. The 'sleeves' are completely open, just draped from the armscye. At the top, I've got essentially half of the typical sleevehead shape, just a simple arc, and they gradually widen out to 15 inches by about halfway down, and are straight from there to the bottom. I've decided on a white silk broadcloth for the lining, which will be cut the same way except longer in the body, so I can turn it up on the outside for the contrast hem. The illumination seems to show a patterned edge to the hemline; I'm still thinking about whether to attempt that or to go for a much simpler straight edge.
15 January 2008
18th c. strapless stays: nearly finished
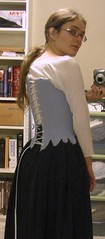
With all the eyelets now done, I can finally actually try these stays on. The fit isn't nearly as bad as I had feared (going to show that holding something up and trying to pull the edges together with your hands isn't a good approximation of lacing it up properly). Still, there's no denying that they are a noticeably small overall. In the front, my chest is pushing out over the top just a bit, which really isn't the look I'd be going for. Some of that is weight gain since I started the project, which will hopefully be fixed with exercise, and some of that is that the finished stays are legitimately smaller than my mock-up, which can hopefully be fixed as they stretch out a bit with wearing.
So this project is going to be on hold for some time, while I see if the stays stretch out enough, or if I need to make major adjustments to improve the fit (like replacing a couple of the sections with new, larger ones). All that really needs to be done to finish them is to put in the lining and bind the top and bottom edges. In the mean time, I've got plenty of other sewing to do.
So this project is going to be on hold for some time, while I see if the stays stretch out enough, or if I need to make major adjustments to improve the fit (like replacing a couple of the sections with new, larger ones). All that really needs to be done to finish them is to put in the lining and bind the top and bottom edges. In the mean time, I've got plenty of other sewing to do.
10 January 2008
New beginnings... slowly
It's been remarkably quiet here, and there's exactly one reason for that: my sewing projects haven't been getting much love lately. There have been plenty of distractions, and winter weather doesn't help (my crafts and projects room is far and away the coldest area of our home in the winter), and the result is that things just haven't gotten done. I've got that spark back in my eye, though, so things may change. One big improvement is that I'm about 2/3 done with a big clean-up of the room - I can see the floor again! Over the next month or so, I'll still be busy trying to push some work-related stuff out the door, but hopefully I'll be able to carve out some time for all the sewing I've got planned. I have finally gotten all the eyelets into the 18th c. stays, meaning I could actually try them on, and the result is neither as good as I had hoped nor as bad as I had feared. I should have a more specific post with pictures up in the next week.
20 November 2007
Catrijn's most comfortable chemise
After a bit of experimentation, I've found a basic chemise design that's comfortable, simple to make, and works well with the majority of my historical wardrobe (that being clothes from 15th c. northwest Europe). If I venture to other times and places, I may need a different style of underwear, but when I just need a new chemise it's usually a copy of this one.
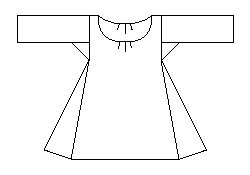
I use a simple geometric cut that's based on earlier tunic styles. While outerwear in this time uses increasingly complex tailoring, the rare depictions of chemises in art suggest that it continued to be a simple, loose garment. The main body panel is a large rectangle, folded over at the shoulder, with overall width slightly larger than half the bust measurement. Normally, this would produce a shoulder seam that falls down the arm, but pleats at center front and center back in the neckline pull the width together so that the shoulder seam falls on or near the natural shoulder. The sleeves are also rectangular, forming an untapered tube, with a square underarm gusset. Triangular gores in the side seams fill out the width of the chemise, with overall length being below knee to mid-calf. The neckline generally follows that of the gown it is to be worn under; mine typically have a low scoop neck, matching my 15th c. kirtles. I typically use 3-4 small box pleats at center front and center back in the neckline, but that is adjusted based on fit as I am finishing the garment.
For construction, nothing I have found beats lightweight linen, the lighter weight and finer weave, the better. I start assembly by sewing each sleeve to its gusset, then down the arm. Once each sleeve is assembled, I match the top of the sleeves to the shoulder point (mid-point on the length) of the body panel, and work down in both directions until the seams meet at the bottom of the gussets. Then I attach a gore to each side, front and back, and finally sew the side seams between the gores. Cutting the neckline is more an art than a science - start with the smallest hole that fits over your head and gradually trim away. The front needs to be lower (frequently a lot lower) than the back. The shape I end up with before I put in the pleats is a rectangle with rounded corners - there's a flat edge in front and back that will be taken up by the pleats, and a short straight section on the sides right where it hits the shoulder line. I finish the neckline with a single fold, and cover the raw edge on the inside with a length of 1/4 inch linen tape, sewn down with two rows of running stitch. This produces a very stable, neat neckline that won't roll or stretch out of shape.
09 November 2007
18th c. strapless stays: fully boned
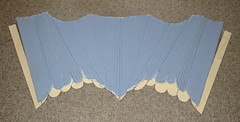
I've finally finished getting all the boning in and the ends trimmed to the right lengths on my strapless stays. My channels ended up being a bit narrow, so it was more work than in should have been, I think. Anyway, it's 1/4" half-round reed; two per channel with flat sides together. I do definitely like the lightness of the reed - even as a completely boned garment, it doesn't seem too heavy.
My biggest problem at this point is one of size and fit. In the photo, the stays are laying on top of the mock-up used to create the pattern pieces. And it's 2+ inches smaller horizontally (vertical is more or less unchanged). This turns a quite reasonable 2 inch gap for lacing into more like a 5 inch gap, with the dips for my arms being too far forward. I've double-checked my pattern pieces and my unassembled lining against my mock-up, and they're all the right size and include the proper seam allowances. So most or all of this difference is due the the shrinkage from inserting the boning.
So long story short, these stays are nearing completion and it doesn't look like they'll fit me. My plan at this point is to go ahead and put eyelets in and try to wear it as-is, which will hopefully stretch things out again. If not, I'll be thinking about replacing the two center front sections with much larger ones. Either that, or find a very petite lady doing 18th c. reenactment who'd be interested in buying them.
Subscribe to:
Posts (Atom)